Swift 中 Protocol 和 泛型
前言
一般在 Swift 中使用 泛型 的时候我们会这么写:
/// 类
class AClass<T> {}

/// 结构体
struct ASctuct<T> {}

/// 枚举
enum AEnum<T> {}
但是如果想在 协议 中使用泛型的时候这么写就会报错:
protocol AProtocol<T> {}
报错信息:
Protocols do not allow generic parameters; use associated types instead
虽然 泛型 可以在 类, 结构体, 枚举 中使用, 但是某些使用场景中, 如果在 协议 中加入 泛型 的话, 会使我们的代码更加灵活.
尽管 协议 中不支持 泛型, 但是却有个 associatedtype, 各种文章和书籍中都把它翻译为 关联类型. 我们可以使用 associatedtype 来达成 泛型 的目的.
正文
假设现在有如下 2 个接口:

/// 请求老师数据列表
/// - page:  分页页码
/// - limit: 分页页面容量
/// - return: 老师列表数据
[POST] https://example.com/teachlist

/// 请求老师所教授的科目
/// - id:     老师 id
/// - page:   分页页码
/// - limit:  分页页面容量
/// - return: 老师教授的科目数据列表
[POST] https://example.com/subjectlist
PListable 协议
此处定义协议 PListable.
Parameters 为网络请求的参数类型, 由于其需要使用 JSONEncoder 对其进行编码, 因此需要实现 Encodable 协议.
Result 作为请求方法的返回类型, 由于需要使用 JSONDecoder 对请求到的 Data 进行解码, 因此需要实现 Decodable 协议.
requestURL 返回结果为网络请求的 URL 地址.
protocol PListable {

    /// 参数类型
    associatedtype Parameters: Encodable

    /// 请求结果类型
    associatedtype Result: Decodable

    /// 请求地址
    static var requestURL: URL? { get }
}
在协议的 extension 中实现了 static func plist(parameters: Parameters) -> Result? , 该方法为实现该协议的类型提供网络请求的功能实现.
extension PListable {

    /// 分页的方式请求数据列表
    /// - Parameter parameters: 参数对象
    /// - Returns: 请求结果
    static func plist(parameters: Parameters) -> Result? {
        /*
         网络请求代码
         ...
         */
        /// 网络请求取到的数据
        let data: Data = ...
        /// 解析数据
        return try? JSONDecoder().decode(Result.self, from: data)
    }
}
此方法为了更加清晰的表达意图, 未使用 异步, 而是使用了 同步 的直接返回请求结果的写法.
如果了解 协程 的话, 应该就很容易理解这种写法了.
参数类型数据结构
PLimit 结构为需要 page 和 limit 参数类型的接口提供参数. 依据 PListable 协议中 Parameters 的约束要求实现了 Encodable 协议.
struct PLimit: Encodable {

    /// 分页页码
    let page: Int

    /// 分页数据容量
    let limit: Int
}
PLimitWithId 结构对应的为需要 id, page, limit 参数类型的接口提供参数, 同样的实现了 Encodable 协议.
struct PLimitWithId: Encodable {

    /// 数据查询依赖的 id
    let id: Int

    /// 分页页码
    let page: Int

    /// 分页数据容量
    let limit: Int
}
Teacher 为接口 https://example.com/teachlist 返回的数据体部分的数据结构. 根据 PListable 协议中 Result 类型约束的要求实现了 Decodable 协议.
数据体数据结构
/// 老师对象
struct Teacher: Decodable {

    /// 姓名
    var name: String?

    /// 教学科目列表
    var subject: [Subject]?
}
Teacher 实现 PListable 协议, 并在 extension 中给 Parameters 类型关联为 PLimit, Result 类型关联为 [Teacher] 类型.
extension Teacher: PListable {

    typealias Parameters = PLimit
    typealias Result = [Teacher]

    static var requestURL: URL? { URL(string: "http://example.com/teachlist") }
}
这样 Teacher 就可以调用 static func plist(parameters: Parameters) -> Result? 方法了, 并且其参数类型为 PLimit, 返回类型为 [Teacher] 返回一组 Teacher 类型的数据.
对应的, Subject 也与 Teacher 做相同的操作.
/// 科目对象
struct Subject: Decodable {

    /// 科目名称
    var name: String?
}
不同的是 Subject 中 Parameters 绑定为 PLimitWithId 类型, Result 绑定为 [Subject] 类型.
extension Subject: PListable {

    typealias Parameters = PLimitWithId
    typealias Result = [Subject]

    static var requestURL: URL? { URL(string: "http://example.com/subjectlist") }
}
这样 Subject 就同样可以调用 static func plist(parameters: Parameters) -> Result? 方法了, 并且其参数类型为 PLimitWithId, 返回类型为 [Subject] 返回一组 Subject 类型的数据.
调用的代码如下:
Teacher.plist(parameters: PLimit(page: 0, limit: 20))
Subject.plist(parameters: PLimitWithId(id: 101, page: 0, limit: 20))
扩展
同时 protocol + associatedtype 还可以与 泛型 组合使用:
如果我们有如下 Animal 协议 和 结构体 Cat:
protocol Animal {

    associatedtype `Type`
}

struct Cat<T> {}

extension Cat: Animal {

    typealias `Type` = T
}
Cat 类型接收一个 T 类型的泛型, Cat 在实现 Animal 协议后, 可以把 T 设置为 Type 的关联类型.
结语
虽然使用 class 的 继承 也能达到类似的效果, 但是 struct 和 enum 却不支持 继承.
通过 协议 任何实现 PListable 的类型都拥有了 分页获取数据 的能力.
在项目开发中我们往往可能还要有 Deleteable, Updateable … 等等诸多类型的接口, 如果我们都通过 protocol + associatedtype 的方式来为对应类型进行扩展, 不仅能够提升开发效率, 还能降低维护成本.

Combine之实战(应用)
没有写过完整SwiftUI项目的同学,应该没怎么使用过Combine,可以这么说,**Combine就是专门用于处理数据的利器,**如果你学会了这些知识,那么你写SwiftUI程序的效率绝对会成倍的增加。
前边已经写了很多篇文章详细介绍了Combine中的Publisher,Operator,Subscriber,相信大家已经对Combine有了一个基本的了解,今天就带领大家一起研究一下Combine的实际应用。
大家可以在这里找到SwiiftUI和Combine的合集:FuckingSwiftUI
本文演示demo下载地址:CombineDemoTest
模拟网络搜索

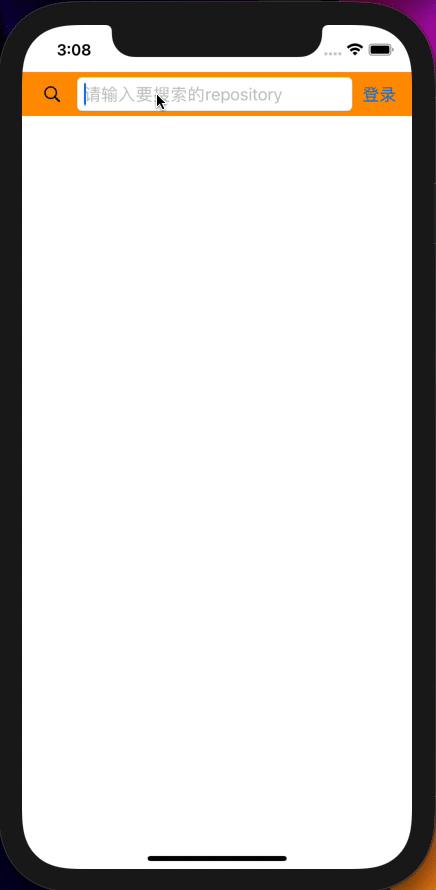
上图演示了一个开发中最常见的场景,实时地根据用户的输入进行搜索,这样一个功能表面上看起来非常简单,其实内部逻辑细节很多:
- 需要为用户输入设置一个网络请求的间隔时间,比如当用户停止输入0.5秒后才发送请求,避免浪费不必要的网络资源
- 去重
- 显示loading状态
先看一下首页的代码:
struct ContentView: View {
    @StateObject private var dataModel = MyViewModel()
    @State private var showLogin = false;

    var body: some View {
        GeometryReader { geometry in
            VStack(alignment: .leading, spacing: 0) {
                ZStack {
                    HStack(spacing: 10) {
                        Group {
                            if dataModel.loading {
                                ActivityIndicator()
                            } else {
                                Image(systemName: "magnifyingglass")
                            }
                        }
                        .frame(width: 30, height: 30)

                        TextField("请输入要搜索的repository", text: $dataModel.inputText)
                            .textFieldStyle(RoundedBorderTextFieldStyle())

                        Button("登录") {
                            self.showLogin.toggle()
                        }
                    }
                    .padding(.vertical, 10)
                    .padding(.horizontal, 15)

                }
                .frame(width: geometry.size.width, height: 44)
                .background(Color.orange)

                List(dataModel.repositories) { res in
                    GithubListCell(repository: res)
                }
            }
        }
        .sheet(isPresented: $showLogin) {
            LoginView()
        }
    }
}
上边代码非常简单,没有任何数据相关的处理逻辑,这些处理数据的逻辑全都在MyViewModel中进行,妙的地方在于,如果View中依赖了MyViewModel后,那么当MyViewModel数据改编后,View自动刷新。
- 我们使用
@StateObject初始化dataModel,让View管理其生命周期 - 使用
GeometryReader可以获取到父View的frame GithubListCell是每个仓库cell的封装,代码就不贴上来了,可以下载代码查看
重点来了,我们看看MyViewModel中的内容:
final class MyViewModel: ObservableObject {
    @Published var inputText: String = ""
    @Published var repositories = [GithubRepository]()
    @Published var loading = false

    var cancellable: AnyCancellable?
    var cancellable1: AnyCancellable?

    let myBackgroundQueue = DispatchQueue(label: "myBackgroundQueue")

    init() {
        cancellable = $inputText
//            .debounce(for: 1.0, scheduler: myBackgroundQueue)
            .throttle(for: 1.0, scheduler: myBackgroundQueue, latest: true)
            .removeDuplicates()
            .print("Github input")
            .map { input -> AnyPublisher<[GithubRepository], Never> in
                let originalString = "https://api.github.com/search/repositories?q=\(input)"
                let escapedString = originalString.addingPercentEncoding(withAllowedCharacters: .urlQueryAllowed)!
                let url = URL(string: escapedString)!
                return GithubAPI.fetch(url: url)
                    .decode(type: GithubRepositoryResponse.self, decoder: JSONDecoder())
                    .map {
                        $0.items
                    }
                    .replaceError(with: [])
                    .eraseToAnyPublisher()
            }
            .switchToLatest()
            .receive(on: RunLoop.main)
            .assign(to: \.repositories, on: self)

        cancellable1 = GithubAPI.networkActivityPublisher
            .receive(on: RunLoop.main)
            .assign(to: \.loading, on: self)
    }
}
在这里,我会大概讲解主要代码的用途,不会太过详细,因为这些内容在之前的文章中已经详细讲过了。
$inputText:当我们在用@Published装饰过的属性前边加一个$符号后,就能获取一个Publisher.debounce(for: 1.0, scheduler: myBackgroundQueue): 当有输入时,debounce就会开启一个1秒的时间窗口,如果在1秒内收到了新的数据,则再开启一个新的1秒的时间窗口,之前的窗口作废,直到1秒内没有新的数据,然后发送最后收到的数据,它的核心思想是可以控制频繁的数据发送问题.throttle(for: 1.0, scheduler: myBackgroundQueue, latest: true): throttle会开启一系列连续的1秒的时间窗口,每次达到1秒的临界点就发送最近的一个数据,注意,当收到第一个数据时,会立刻发送。.removeDuplicates()可以去重,比如,当最近收到的两个数据都是swift时,第二个就会被忽略.print("Github input")可以打印pipline的过程,可以给输出信息加上前缀.map: 上边map的逻辑是把输入的字符串映射成一个新的Publisher,这个新的Publisher会请求网络,最终输出我们封装好的数据模型GithubRepositoryResponse.self.decode用于解析数据.replaceError(with: [])用于替换错误,如果网络请求出错,则发送一个空的数组.switchToLatest()用于输出Publisher的数据,如果map返回的是Publisher,就要使用switchToLatest切换输出.receive(on: RunLoop.main)用于切换线程.assign(to: \.repositories, on: self): assign可以直接使用KeyPath的形式为属性复制,它是一个Subscriber
大家看到了吗? 在一个完整的处理过程中,用到了很多Operators,通过组合使用这些Operator,几乎能实现任何需求。
我们再看看 GithubAPI的封装:
enum GithubAPIError: Error, LocalizedError {
    case unknown
    case apiError(reason: String)
    case networkError(from: URLError)

    var errorDescription: String? {
        switch self {
        case .unknown:
            return "Unknown error"
        case .apiError(let reason):
            return reason
        case .networkError(let from):
            return from.localizedDescription
        }
    }
}

struct GithubAPI {
    /// 加载
    static let networkActivityPublisher = PassthroughSubject<Bool, Never>()

    /// 请求数据
    static func fetch(url: URL) -> AnyPublisher<Data, GithubAPIError> {
        return URLSession.shared.dataTaskPublisher(for: url)
            .handleEvents(receiveCompletion: { _ in
                networkActivityPublisher.send(false)
            }, receiveCancel: {
                networkActivityPublisher.send(false)
            }, receiveRequest: { _ in
                networkActivityPublisher.send(true)
            })
            .tryMap { data, response in
                guard let httpResponse = response as? HTTPURLResponse else {
                    throw GithubAPIError.unknown
                }
                switch httpResponse.statusCode {
                case 401:
                    throw GithubAPIError.apiError(reason: "Unauthorized")
                case 403:
                    throw GithubAPIError.apiError(reason: "Resource forbidden")
                case 404:
                    throw GithubAPIError.apiError(reason: "Resource not found")
                case 405..<500:
                    throw GithubAPIError.apiError(reason: "client error")
                case 500..<600:
                    throw GithubAPIError.apiError(reason: "server error")
                default: break
                }

                return data
            }
            .mapError { error in
                if let err = error as? GithubAPIError {
                    return err
                }
                if let err = error as? URLError {
                    return GithubAPIError.networkError(from: err)
                }
                return GithubAPIError.unknown
            }
            .eraseToAnyPublisher()
    }
}
GithubAPIError是对各种Error的一个封装,有兴趣可以看看Alamofirez中的AFErrornetworkActivityPublisher是一个Subject,本质上也是一个Publisher,用于发送网络加载的通知事件,大家可以看上边视频左上角的loading,就是用networkActivityPublisher实现的URLSession.shared.dataTaskPublisher(for: url)是最常见的网络请求Publisher.handleEvents可以监听pipline中的事件.tryMap是一种特殊的Operator,它主要用于数据映射,但允许throw异常.mapError用于处理错误信息,,在上边的代码中,我们做了错误映射的逻辑,错误映射的核心思想是把各种各样的错误映射成自定义的错误类型.eraseToAnyPublisher()用于磨平Publisher的类型,这个就不多做介绍了
总结一下,很多同学可能无法立刻体会到上边代码的精妙之处,响应式编程的妙处就在于我们提前铺设好数据管道,数据就会自动在管道中流动,实在是秒啊。
模拟登录

如果说网络请求是对异步数据的处理,那么模拟登录就是对多个数据流的处理,让我们先简单看一下UI代码:
struct LoginView: View {
    @StateObject private var dataModel = LoginDataModel()
    @State private var showAlert = false

    var body: some View {
        VStack {
            TextField("请输入用户名", text: $dataModel.userName)
                .textFieldStyle(RoundedBorderTextFieldStyle())

            if dataModel.showUserNameError {
                Text("用户名不能少于3位!!!")
                    .foregroundColor(Color.red)
            }

            SecureField("请输入密码", text: $dataModel.password)
                .textFieldStyle(RoundedBorderTextFieldStyle())

            if dataModel.showPasswordError {
                Text("密码不能少于6位!!!")
                    .foregroundColor(Color.red)
            }

            GeometryReader { geometry in
                Button(action: {
                    self.showAlert.toggle()
                }) {
                    Text("登录")
                        .foregroundColor(dataModel.buttonEnable ? Color.white : Color.white.opacity(0.3))
                        .frame(width: geometry.size.width, height: 35)
                        .background(dataModel.buttonEnable ? Color.blue : Color.gray)
                        .clipShape(Capsule())
                }
                .disabled(!dataModel.buttonEnable)

            }
            .frame(height: 35)
        }
        .padding()
        .border(Color.green)
        .padding()
        .animation(.easeInOut)
        .alert(isPresented: $showAlert) {
            Alert(title: Text("登录成功"),
                  message: Text("\(dataModel.userName) \n \(dataModel.password)"),
                  dismissButton: nil)
        }
        .onDisappear {
            dataModel.clear()
        }
    }
}
具体涉及到SwiftUI的知识就不再复述了,套路都是相同的,在上边的UI代码中,我们直接拿LoginDataModel来使用,所有的业务逻辑都封装在LoginDataModel之中。
class LoginDataModel: ObservableObject {
    @Published var userName: String = ""
    @Published var password: String = ""
    @Published var buttonEnable = false

    @Published var showUserNameError = false
    @Published var showPasswordError = false

    var cancellables = Set<AnyCancellable>()

    var userNamePublisher: AnyPublisher<String, Never> {
        return $userName
            .receive(on: RunLoop.main)
            .map { value in
                guard value.count > 2 else {
                    self.showUserNameError = value.count > 0
                    return ""
                }
                self.showUserNameError = false
                return value
            }
            .eraseToAnyPublisher()
    }

    var passwordPublisher: AnyPublisher<String, Never> {
        return $password
            .receive(on: RunLoop.main)
            .map { value in
                guard value.count > 5 else {
                    self.showPasswordError = value.count > 0
                    return ""
                }
                self.showPasswordError = false
                return value
            }
            .eraseToAnyPublisher()
    }

    init() {
        Publishers
            .CombineLatest(userNamePublisher, passwordPublisher)
            .map { v1, v2 in
                !v1.isEmpty && !v2.isEmpty
            }
            .receive(on: RunLoop.main)
            .assign(to: \.buttonEnable, on: self)
            .store(in: &cancellables)
    }

    func clear() {
        cancellables.removeAll()
    }

    deinit {

    }
}
仔细观察上边的代码,它是声明式的,对各个数据的处理是如此的清晰:
- 我们使用
userNamePublisher来处理用户名的逻辑 - 我们使用
passwordPublisher来处理密码的逻辑 - 我们使用
CombineLatest来合并用户名和密码的数据,用于控制登录按钮的状态
它确实是声明式的,如果从上往下看,它很像一份说明书,而不是一堆变量的计算。
在此,我也懒得写非Combine的对照代码了,大家可以仔细理解代码,细细品味其中韵味。
总结
本文写的不算复杂,也不算全面,并非一个完整的实战内容,只是让大家看一下Combine在真实开发场景的例子。本教程后续还有3篇文章,分别讲解如何自定义Publisher,Operator和Subscriber,算是进阶内容,大家拭目以待吧。
Combine之自定义Operator

自定义Operator是整个Combine教程中难度最高的内容,因为它连接了Publisher和Subscriber,起到了一个中间桥梁的作用。
那么难点在哪里呢?我希望读者朋友能够带着下边3个问题来仔细读这篇文章:
- 如何接收上游Publisher的数据?
- 下游可能是Operator,也可能是Subscriber,如何处理这种情况?
- 当下游是Subscriber时,如何接收其请求,并传播给上游?
上边3个问题就是本文的核心,下边的讲解的代码来自CombineExt
查看全部Combine教程,请访问:FuckingSwiftUI
最简单的自定义Operator
所谓的组合就是指使用已有的Publisher和Operator组合成具有新功能的Operator,举个例子:
public extension Publisher where Output: Collection {

    func mapMany<Result>(_ transform: @escaping (Output.Element) -> Result) -> Publishers.Map<Self, [Result]> {
        map { $0.map(transform) }
    }
}
上边代码中的.mapMany()就是通过组合生成的一个新的Operator,它的用法如下:
let intArrayPublisher = PassthroughSubject<[Int], Never>()

intArrayPublisher
   .mapMany(String.init)
  .sink(receiveValue: { print($0) })

intArrayPublisher.send([10, 2, 2, 4, 3, 8])

// Output: ["10", "2", "2", "4", "3", "8"]
可以看出,.mapMany()的功能就是按照给出的规则映射Collection中的所有元素,上边的代码是非常简单的,我们可以模仿这种模式来组合生成任何其他的Operator。
有意思的一点是,.mapMany()输出类型通过代码public extension Publisher where Output: Collection约束成了Collection。也就是说该Operator的输入数据必须是Collection。
当然,大多数情况下没必要像上边这样写代码,这个看个人的喜好,上边的代码与下边的代码等价:
let intArrayPublisher = PassthroughSubject<[Int], Never>()

cancellable = intArrayPublisher
    .map {
        $0.map { String($0) }
    }
  .sink(receiveValue: { print($0) })

intArrayPublisher.send([10, 2, 2, 4, 3, 8])
完全自定义Operator
我们将会使用CombineExt中的amb来演示如何自定义Operator,要想弄明白本文的内容,前提条件是对Combine有一定的了解,对CombineExt有一定的研究,迫切想知道如何自定义Operator。再回到amb,它是一个非常有意思的Operator,我们先看看它的用法:
let subject1 = PassthroughSubject<Int, Never>()
let subject2 = PassthroughSubject<Int, Never>()

subject1
  .amb(subject2)
  .sink(receiveCompletion: { print("amb: completed with \($0)") },
        receiveValue: { print("amb: \($0)") })

subject2.send(3) // Since this subject emit first, it becomes the active publisher
subject1.send(1)
subject2.send(6)
subject1.send(8)
subject1.send(7)

subject1.send(completion: .finished)
// Only when subject2 finishes, amb itself finishes as well, since it's the active publisher
subject2.send(completion: .finished)
打印结果:
amb: 3
amb: 6
amb: completed with .finished
从上边的代码可以看出,subject1和subject2谁先发送数据谁就会被激活,另一个则被忽略,这种行为很像是淘汰赛,只有第一名才会被保留。
这个Operator特别适合讲解如何自定义Operator,因为它的用法不算复杂,接下来我们就进入正题。
要想讲述清楚amb的创作过程,我们需要反向推演,我们先看看当我们调用了下边代码后,是怎样的一个过程:
subject1
  .amb(subject2)
public extension Publisher {
    func amb<Other: Publisher>(_ other: Other)
        -> Publishers.Amb<Self, Other> where Other.Output == Output, Other.Failure == Failure {
        Publishers.Amb(first: self, second: other)
    }
}
从上边的代码中,我们可以分析出以下几点信息:
amb()函数的入参必须是一个Publisher,这算是一个约束条件amb()函数的返回值是Publishers.Amb,同样也是一个Publisher,后边给出的约束条件约束了这两个Publisher的输入和输出类型必须相同
从上边的代码可以看出,所谓的Operator就是Publisher协议的一个extension,因此我们能够获取到当前的Publisher,然后这个函数中需要返回一个Publisher,这样就实现了链式调用。
因此,现在的问题指向了Publishers.Amb,我们需要解决的问题是:如何处理上边提到的淘汰逻辑?如何响应Subscriber的订阅和请求?
我们看看Publishers.Amb的代码:
public extension Publishers {
    struct Amb<First: Publisher, Second: Publisher>: Publisher where First.Output == Second.Output, First.Failure == Second.Failure {
        public func receive<S: Subscriber>(subscriber: S) where Failure == S.Failure, Output == S.Input {
            subscriber.receive(subscription: Subscription(first: first,
                                                          second: second,
                                                          downstream: subscriber))
        }

        public typealias Output = First.Output
        public typealias Failure = First.Failure

        private let first: First
        private let second: Second

        public init(first: First,
                    second: Second) {
            self.first = first
            self.second = second
        }
    }
}
代码看起来非常简单,只是持有了这2个Publisher,由于Amb实现了Publisher协议,那么重点就在于如何处理订阅的逻辑了:
Subscription(first: first,
            second: second,
            downstream: subscriber)
在以前的文章中,我们提到过,Subscription是沟通Publisher和Subscriber的一座桥梁,因此,这个Subscription里边的逻辑就显得非常重要。
我们看看它的代码:
private extension Publishers.Amb {
    class Subscription<Downstream: Subscriber>: Combine.Subscription where Output == Downstream.Input, Failure == Downstream.Failure {
        private var firstSink: Sink<First, Downstream>?
        private var secondSink: Sink<Second, Downstream>?
        private var preDecisionDemand = Subscribers.Demand.none
        private var decision: Decision? {
            didSet {
                guard let decision = decision else { return }
                switch decision {
                case .first:
                    secondSink = nil
                case .second:
                    firstSink = nil
                }

                request(preDecisionDemand)
                preDecisionDemand = .none
            }
        }

        init(first: First,
             second: Second,
             downstream: Downstream) {
            self.firstSink = Sink(upstream: first,
                                  downstream: downstream) { [weak self] in
                                guard let self = self,
                                      self.decision == nil else { return }

                                self.decision = .first
                             }

            self.secondSink = Sink(upstream: second,
                                   downstream: downstream) { [weak self] in
                                guard let self = self,
                                      self.decision == nil else { return }

                                self.decision = .second
                              }
        }

        func request(_ demand: Subscribers.Demand) {
            guard decision != nil else {
                preDecisionDemand += demand
                return
            }

            firstSink?.demand(demand)
            secondSink?.demand(demand)
        }

        func cancel() {
            firstSink = nil
            secondSink = nil
        }
    }
}
上边的代码比较长,我们拆分一下,我们先看初始化方法:
init(first: First,
     second: Second,
     downstream: Downstream) {
    self.firstSink = Sink(upstream: first,
                          downstream: downstream) { [weak self] in
                        guard let self = self,
                              self.decision == nil else { return }

                        self.decision = .first
                     }

    self.secondSink = Sink(upstream: second,
                           downstream: downstream) { [weak self] in
                        guard let self = self,
                              self.decision == nil else { return }

                        self.decision = .second
                      }
}
downstream在这里就是Subscriber,Sink我们先别管,下边会解释,现在只需要把它当作一个新的桥梁,它能够连接Publisher和Subscriber。
上边firstSink的Sink初始化函数中的闭包的调用时机是: 当第一次收到first这个Publisher的事件时调用,不管是收到数据还是收到完成事件,这个我们在后续讲解Sink的时候会讲解。
同理,secondSink跟firstSink差不多,在上边的初始化函数中,我们就找到了上边第一个问题的答案,当第一次收到first或second的事件后,就为decision赋值了,decision是一个enum,因此他是可以区分是first还是second。
private enum Decision {
    case first
    case second
}
到目前为止,大家应该仍然是糊涂的,因为大家对Sink还不是很了解, 我们必须先把这个Sink讲解了才能继续下去:
class Sink<Upstream: Publisher, Downstream: Subscriber>: Subscriber {
    typealias TransformFailure = (Upstream.Failure) -> Downstream.Failure?
    typealias TransformOutput = (Upstream.Output) -> Downstream.Input?

    private(set) var buffer: DemandBuffer<Downstream>
    private var upstreamSubscription: Subscription?
    private let transformOutput: TransformOutput?
    private let transformFailure: TransformFailure?

    init(upstream: Upstream,
         downstream: Downstream,
         transformOutput: TransformOutput? = nil,
         transformFailure: TransformFailure? = nil) {
        self.buffer = DemandBuffer(subscriber: downstream)
        self.transformOutput = transformOutput
        self.transformFailure = transformFailure
        upstream.subscribe(self)
    }

    func demand(_ demand: Subscribers.Demand) {
        let newDemand = buffer.demand(demand)
        upstreamSubscription?.requestIfNeeded(newDemand)
    }

    func receive(subscription: Subscription) {
        upstreamSubscription = subscription
    }

    func receive(_ input: Upstream.Output) -> Subscribers.Demand {
        ...
    }

    func receive(completion: Subscribers.Completion<Upstream.Failure>) {
        ...
    }

    func cancelUpstream() {
        upstreamSubscription.kill()
    }

    deinit { cancelUpstream() }
}
我省略了一些不重要的代码,我们仔细分析下上边的代码:
Sink实现了Subscriber协议,这说明了它本身就是一个订阅者,通常我们用它订阅upstream,这么做的目的是方便操作upstream输出的数据和request。DemandBuffer我们之前的文章已经讲过了,它做数据管理,只复杂把数据发送给downstreamtransformOutput和transformFailure数据转换函数,我们这里不讲了
Sink的核心思想就是通过亲自订阅上游的Publisher来接收数据和事件,通过DemandBuffer来管理这些数据和事件,当需要时,发送给下游的订阅者。
上边Sink的设计很重要,它是一个中间过程,本质上是因为它本身就是一个Subscriber订阅者,因此不仅能够获取到上游的数据,还剩自己控制发送rquest。
过程讲解
我们再重复一遍这个过程,先看下图:
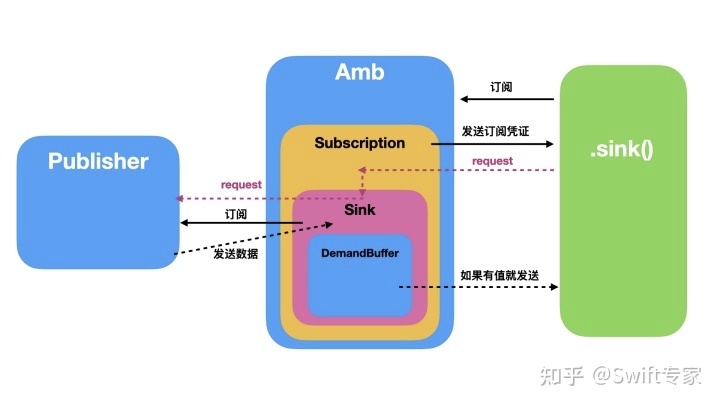
当执行下边代码时,究竟发生了什么?
subject1
  .amb(subject2)
  .sink(receiveCompletion: { print("amb: completed with \($0)") },
        receiveValue: { print("amb: \($0)") })
subject1就是上图中的Publisher,.amb()返回了上图中的Amb, 当上边代码中调用了.sink()后,Amb就收到了订阅,会调用下边的代码:
public extension Publishers {
    struct Amb<First: Publisher, Second: Publisher>: Publisher where First.Output == Second.Output, First.Failure == Second.Failure {
        public func receive<S: Subscriber>(subscriber: S) where Failure == S.Failure, Output == S.Input {
            subscriber.receive(subscription: Subscription(first: first,
                                                          second: second,
                                                          downstream: subscriber))
        }
    }
}
当收到订阅后,需要返回一个subscription,也就是订阅凭证,因为后边的Subscriber需要使用这个凭证来发送请求或者取消pipline。
由于上图中绿色的.sink()是系统方法,我们无法看到实现,但是,我们知道,当.sink()收到订阅凭证后就会发送request,也就是上图中的紫色虚线。
请注意,Amb里边的内容完全是我们自定义的,所以我们能够完全控制,当收到.sink()的request后,会调用Subscription下边的函数:
private extension Publishers.Amb {
    class Subscription<Downstream: Subscriber>: Combine.Subscription where Output == Downstream.Input, Failure == Downstream.Failure {
        ...

        func request(_ demand: Subscribers.Demand) {
            guard decision != nil else {
                preDecisionDemand += demand
                return
            }

            firstSink?.demand(demand)
            secondSink?.demand(demand)
        }
                ...
    }
}
.sink()传过来的demand的值是.unlimited,表示不限制数据的接收个数,观察上边的代码,decision表示当前使用的Publisher是哪个,subject1或者subject2谁第一个发送数据,decision就指向谁。
由于这个request是收到订阅凭证后立刻发出的,这时候subject1和subject2都没有发送数据,因此decision为nil,上边的代码就把.sink()传过来的demand保存在preDecisionDemand属性中了,后边会把这个demand透传给胜出的Publisher(subject1或subject2)。
那么重点来了,subject1,subject2竞争的代码在什么地方呢?答案是放在了上边Subscription初始化方法中了:
private extension Publishers.Amb {
    class Subscription<Downstream: Subscriber>: Combine.Subscription where Output == Downstream.Input, Failure == Downstream.Failure {
        private var firstSink: Sink<First, Downstream>?
        private var secondSink: Sink<Second, Downstream>?
        private var preDecisionDemand = Subscribers.Demand.none
        private var decision: Decision? {
            didSet {
                guard let decision = decision else { return }
                switch decision {
                case .first:
                    secondSink = nil
                case .second:
                    firstSink = nil
                }

                request(preDecisionDemand)
                preDecisionDemand = .none
            }
        }

        init(first: First,
             second: Second,
             downstream: Downstream) {
            self.firstSink = Sink(upstream: first,
                                  downstream: downstream) { [weak self] in
                                guard let self = self,
                                      self.decision == nil else { return }

                                self.decision = .first
                             }

            self.secondSink = Sink(upstream: second,
                                   downstream: downstream) { [weak self] in
                                guard let self = self,
                                      self.decision == nil else { return }

                                self.decision = .second
                              }
        }

        ...
    }
}
还记得Subscription什么时候初始化吗?就是当收到.sink()的订阅后创建的。上边的init()很简单,分别创建了两个Sink,firstSink代表subject1,secondSink代表subject2。
在上边的小节中,我们已经知道,Sink的闭包参数的调用时机是当收到第一个参数时调用,再结合上边的代码,我们就可以看出,当firstSink或者secondSink其中一个第一次收到数据后,就决定了decision的值,并且在decision的didSet中,这时候就选中了哪个Publisher作为发送数据的Publisher,另一个则赋值为nil,之后我们重新调用了request(preDecisionDemand),把之前保存的demand透传给胜出的Publisher。
此时此刻,我们的头脑中应该有两个疑问:
- 假设firstSink胜出了,那么调用
firstSink?.demand(demand)是如何实现把demand透传subject1的? - Sink是如何接收subject1或者subject2的数据的?
这两个问题的核心都指向了Sink,注意,这个Sink很有意思,本文的最上边也讲到了,它实现了Subscriber协议,这一点很重要,我们看看它的初始化方法中干了啥?
init(upstream: Upstream,
     downstream: Downstream,
     transformOutput: TransformOutput? = nil,
     transformFailure: TransformFailure? = nil) {
    self.buffer = DemandBuffer(subscriber: downstream)
    self.transformOutput = transformOutput
    self.transformFailure = transformFailure
    upstream.subscribe(self)
}
看明白了吗?由于Sink本身就是一个Subscriber,因此,它订阅了传进来的上游Publisher。
func receive(subscription: Subscription) {
    upstreamSubscription = subscription
}
并且能够拿到上游Publisher传过来的subscription,因此可以使用这个subscription发送request。
到此为止,上边的两个问题的答案已经呼之欲出了。
总结一下,Amb中自定义的Subscription作为沟通下游.sink()的桥梁接收request,Subscription中持有的Sink订阅了上游的Publisher,它作为Publisher和.sink()的中间桥梁,透传demand和数据。
那么回到开头的3个问题,你有答案了吗?
- 如何接收上游PubLisher的数据?
- 下游可能是Publisher或者其他Operator,也可能是Subscriber,如何处理这种情况?
- 当下游是Subscriber时,如何接收其请求,并传播给上游?
总结
当初特别好奇,Combine中的Operator是如何实现的?因为它确实比较特殊,它的上游是Publisher或者Operator,下游是Operator或Subscriber。本文讲解的内容可以作为一个套路来学习,如果需要自定义Operator,可以参考这篇文章。
Combine之自定义Publisher
在真实的开发中,我们几乎不会去自定义Publisher,但学习本文的知识还是很有必要的,接下来的3篇文章,我会讲解如何自定义Publisher,Operator和Subscriber,我尽量把这些内容讲清楚,通过这3篇文章的学习,能够让大家对Combine的实现原理有一个清晰的认识。

这篇文章的主要代码来源于CombineExt
组合
/// 请求数据
static func fetch(url: URL) -> AnyPublisher<Data, GithubAPIError> {
    return URLSession.shared.dataTaskPublisher(for: url)
        .handleEvents(receiveCompletion: { _ in
            networkActivityPublisher.send(false)
        }, receiveCancel: {
            networkActivityPublisher.send(false)
        }, receiveRequest: { _ in
            networkActivityPublisher.send(true)
        })
        .tryMap { data, response in
            guard let httpResponse = response as? HTTPURLResponse else {
                throw GithubAPIError.unknown
            }
            switch httpResponse.statusCode {
            case 401:
                throw GithubAPIError.apiError(reason: "Unauthorized")
            case 403:
                throw GithubAPIError.apiError(reason: "Resource forbidden")
            case 404:
                throw GithubAPIError.apiError(reason: "Resource not found")
            case 405..<500:
                throw GithubAPIError.apiError(reason: "client error")
            case 500..<600:
                throw GithubAPIError.apiError(reason: "server error")
            default: break
            }

            return data
        }
        .mapError { error in
            if let err = error as? GithubAPIError {
                return err
            }
            if let err = error as? URLError {
                return GithubAPIError.networkError(from: err)
            }
            return GithubAPIError.unknown
        }
        .eraseToAnyPublisher()
}
上边的代码就是一个使用Operator组合的例子,我们并没有自定义任何Publisher,但最后我们生成了一个AnyPublisher<Data, GithubAPIError>类型的Publisher。
大家仔细想想,这种通过组合来实现某种功能的方式和自定义Publisher是不是没啥区别?也就是说,在开发中,尽可能的使用这种组合的方式解决问题。
自定义Create(一个新的Publisher)
我们这一小节将会演示一个完整的自定义Publisher的例子,Create这个Publisher的使用方法跟Combine中的Record很像,这是一个非常完美的示例,功能相同确能看到实现代码。Record的用法如下:
let recordPublisher = Record<String, MyCustomError> { recording in
    recording.receive("你")
    recording.receive("好")
    recording.receive("吗")
    recording.receive(completion: Subscribers.Completion.finished)
}
而Create的用法如下:
AnyPublisher<String, MyError>.create { subscriber in
  // Values
  subscriber.send("Hello")
  subscriber.send("World!")

  // Complete with error
  subscriber.send(completion: .failure(MyError.someError))

  // Or, complete successfully
  subscriber.send(completion: .finished)

  return AnyCancellable {
    // Perform cleanup
  }
}
在学习新技术的时候,我们要慢慢学会通过观察代码的使用方法,来尝试推断代码的设计思想。 我们尝试分析一下上边代码的思想:
AnyPublisher<String, MyError>.create表明create是AnyPublisher的一个静态函数,该函数接收一个闭包作为参数- 闭包的参数
subscriber至少有两个方法:send()和send(completion:),一个用于发送数据。一个用于发送完成事件 - 闭包返回
AnyCancellable - 重要的设计思想:使用闭包把数据的发送过程封装起来,当接收到订阅后,调用闭包,触发该过程
接下来,我们从代码层次来进一步分析上边代码的具体实现过程。
// MARK: - Publisher
@available(OSX 10.15, iOS 13.0, tvOS 13.0, watchOS 6.0, *)
public extension Publishers {
    /// A publisher which accepts a closure with a subscriber argument,
    /// to which you can dynamically send value or completion events.
    ///
    /// You should return a `Cancelable`-conforming object from the closure in
    /// which you can define any cleanup actions to execute when the pubilsher
    /// completes or the subscription to the publisher is canceled.
    struct Create<Output, Failure: Swift.Error>: Publisher {
        public typealias SubscriberHandler = (Subscriber) -> Cancellable
        private let factory: SubscriberHandler

        /// Initialize the publisher with a provided factory
        ///
        /// - parameter factory: A factory with a closure to which you can
        ///                      dynamically push value or completion events
        public init(factory: @escaping SubscriberHandler) {
            self.factory = factory
        }

        public func receive<S: Combine.Subscriber>(subscriber: S) where Failure == S.Failure, Output == S.Input {
            subscriber.receive(subscription: Subscription(factory: factory, downstream: subscriber))
        }
    }
}
当我们要自定义Publisher时,从宏观应该考虑以下2点:
- 写一个
Publishers的extension,方便导出类型,比如上边代码中,导出的类型就是Publishers.Create - 实现
Publisher协议,其中最核心的是要给subscriber发送一个Subscription,这个Subscription是最核心的内容,我们下边详细讲解
在上边的代码中,Create通过一个闭包(SubscriberHandler = (Subscriber) -> Cancellable)来进行初始化,我们先研究一下这个闭包,不难看出,闭包的参数是个Subscriber类型,我们看看它的代码:
public extension Publishers.Create {
    struct Subscriber {
        private let onValue: (Output) -> Void
        private let onCompletion: (Subscribers.Completion<Failure>) -> Void

        fileprivate init(onValue: @escaping (Output) -> Void,
                         onCompletion: @escaping (Subscribers.Completion<Failure>) -> Void) {
            self.onValue = onValue
            self.onCompletion = onCompletion
        }

        /// Sends a value to the subscriber.
        ///
        /// - Parameter value: The value to send.
        public func send(_ input: Output) {
            onValue(input)
        }

        /// Sends a completion event to the subscriber.
        ///
        /// - Parameter completion: A `Completion` instance which indicates whether publishing has finished normally or failed with an error.
        public func send(completion: Subscribers.Completion<Failure>) {
            onCompletion(completion)
        }
    }
}
上边的代码,包含了以下几条信息:
- Subscriber本身是一个struct
- 初始化方法需要传入两个private闭包:
onValue和onCompletion,不能在外部调用 - 当调用
subscriber.send("Hello")时,本质上是调用了onValue - 当调用
subscriber.send(completion: .finished)时,本质上是调用了onCompletion
总结一下:Subscriber对外暴露了两个函数接口,调用后,会触发闭包,至于闭包中的操作,我们在下文中会讲到。
接来下就是重点了,我们需要自定义Subscription,数据的处理逻辑都在它里边,它起到了一个承上启下的核心功能。
private extension Publishers.Create {
    class Subscription<Downstream: Combine.Subscriber>: Combine.Subscription where Output == Downstream.Input, Failure == Downstream.Failure {
        private let buffer: DemandBuffer<Downstream>
        private var cancelable: Cancellable?

        init(factory: @escaping SubscriberHandler,
             downstream: Downstream) {
            self.buffer = DemandBuffer(subscriber: downstream)

            let subscriber = Subscriber(onValue: { [weak self] in _ = self?.buffer.buffer(value: $0) },
                                        onCompletion: { [weak self] in self?.buffer.complete(completion: $0) })

            self.cancelable = factory(subscriber)
        }

        func request(_ demand: Subscribers.Demand) {
            _ = self.buffer.demand(demand)
        }

        func cancel() {
            self.cancelable?.cancel()
        }
    }
}
所谓的自定义Subscription,就是实现Combine.Subscription协议,它有2个目的:
- 通过
func request(_ demand: Subscribers.Demand)接收订阅者的数据请求 - 通过
func cancel()接收订阅者的取消请求
仔细观察上边的代码就能够发现,Subscription的Output和Failure类型必须和下游的订阅者匹配上才行,并且引入了一个private let buffer: DemandBuffer<Downstream>属性作为数据的缓存单元。
self.buffer = DemandBuffer(subscriber: downstream)
上边这行代码显示,DemandBuffer使用downstream进行初始化,别忘了downstream是一个订阅者,也就是subscriber,在这里,大家只需要理解,DemandBuffer持有了subscriber就可以了。
let subscriber = Subscriber(onValue: { [weak self] in _ = self?.buffer.buffer(value: $0) },
                                        onCompletion: { [weak self] in self?.buffer.complete(completion: $0) })
这行代码就和前边讲过的Subscriber联系上了,它的onValue闭包绑定了self?.buffer.buffer(value: $0),也就是当调用subscriber.send("Hello")后,实际上的操作是self?.buffer.buffer(value: "Hello"),同样的道理,它的onCompletion闭包绑定了self?.buffer.complete(completion: $0),也就是当调用subscriber.send(completion: .finished)后,实际上的操作是self?.buffer.complete(completion: .finished)。
self.cancelable = factory(subscriber)
这行代码才是Create初始化参数闭包的真正调用的地方。
大家应该已经发现了吧?自定义Subscription的核心在于如何做好数据管理,我们还需要搞明白DemandBuffer这个东西的实现原理,它在后边两篇文章中,也起到了核心作用。
最后,我们分析一波DemandBuffer的源码:
class DemandBuffer<S: Subscriber> {
private let lock = NSRecursiveLock()
private var buffer = [S.Input]()
private let subscriber: S
private var completion: Subscribers.Completion<S.Failure>?
private var demandState = Demand()


init(subscriber: S) {
    self.subscriber = subscriber
}
func buffer(value: S.Input) -> Subscribers.Demand {
precondition(self.completion == nil,
"How could a completed publisher sent values?! Beats me ♂️")
switch demandState.requested {
case .unlimited:
return subscriber.receive(value)
default:
buffer.append(value)
return flush()
}
}
func complete(completion: Subscribers.Completion<S.Failure>) {
precondition(self.completion == nil,
"Completion have already occured, which is quite awkward ")
self.completion = completion
_ = flush()
}
func demand(_ demand: Subscribers.Demand) -> Subscribers.Demand {
flush(adding: demand)
}
private func flush(adding newDemand: Subscribers.Demand? = nil) -> Subscribers.Demand {
lock.lock()
defer { lock.unlock() }
if let newDemand = newDemand {
demandState.requested += newDemand
}
// If buffer isn't ready for flushing, return immediately
guard demandState.requested > 0 || newDemand == Subscribers.Demand.none else { return .none }
while !buffer.isEmpty && demandState.processed < demandState.requested {
demandState.requested += subscriber.receive(buffer.remove(at: 0))
demandState.processed += 1
}
if let completion = completion {
// Completion event was already sent
buffer = []
demandState = .init()
self.completion = nil
subscriber.receive(completion: completion)
return .none
}
let sentDemand = demandState.requested - demandState.sent
demandState.sent += sentDemand
return sentDemand
}
}
上边的代码虽然看上去很长,但内容并不多,我们可以把它分为3个部分:
- 初始化
- 对外接口
- 内部核心逻辑
我们先看看初始化的代码:
private let lock = NSRecursiveLock()
private var buffer = [S.Input]()
private let subscriber: S
private var completion: Subscribers.Completion<S.Failure>?
private var demandState = Demand()
init(subscriber: S) {
self.subscriber = subscriber
}
从属性let lock = NSRecursiveLock()不难看出,它为数据的操作增加了安全性,这是非常有必要的,因为pipline专门处理异步数据流。在平时的开发中,我们也可以使用这个锁来保证安全地操作数据,用法如下:
lock.lock()
defer { lock.unlock() }
从属性var buffer = [S.Input]()可以看出,它内部把数据保存在一个数据之中,数据的类型是Subscriber的输入类型。
从属性let subscriber: S可以看出,它持有了Subscriber,这个在后边的代码中会用到。
之所以把var completion: Subscribers.Completion<S.Failure>?这个属性保存起来,主要目的是数组buffer中不能存放该类型的数据,因此需要额外保存。
var demandState = Demand()表示当前的请求状态,它是一个独立的struct,源码如下:
private extension DemandBuffer {
    /// A model that tracks the downstream's
    /// accumulated demand state
    struct Demand {
        var processed: Subscribers.Demand = .none
        var requested: Subscribers.Demand = .none
        var sent: Subscribers.Demand = .none
    }
}
这里的代码可能会让人疑惑,看一下Subscribers.Demand的定义:
/// A requested number of items, sent to a publisher from a subscriber through the subscription.
@frozen public struct Demand : Equatable, Comparable, Hashable, Codable, CustomStringConvertible {

    /// A request for as many values as the publisher can produce.
    public static let unlimited: Subscribers.Demand

    /// A request for no elements from the publisher.
    ///
    /// This is equivalent to `Demand.max(0)`.
    public static let none: Subscribers.Demand

    /// Creates a demand for the given maximum number of elements.
    ///
    /// The publisher is free to send fewer than the requested maximum number of elements.
    ///
    /// - Parameter value: The maximum number of elements. Providing a negative value for this parameter results in a fatal error.
    @inlinable public static func max(_ value: Int) -> Subscribers.Demand
}
由于它实现了Equatable,Comparable和Hashable这3个协议,所有完全可以把它看作是一个数字,可以进行运算,也可以进行比较,.none可以看成0,.unlimited可以看成最大值,也可以用.max指定一个值。
那么这个值的作用是什么呢?很简单,它表示Subscriber(订阅者)能接受数据的最大个数。 我们看到下边这样的打印结果:
receive subscription: (PassthroughSubject)
request unlimited
就说明Subscriber(订阅者)可以接收任何数量的数据,没有限制。我们再回到前边的代码,var demandState = Demand()的初始状态都是.none。
接下来,我们看看第2部分的代码,主要是暴露出的接口,用于给外部调用:
func buffer(value: S.Input) -> Subscribers.Demand {
precondition(self.completion == nil,
"How could a completed publisher sent values?! Beats me ♂️")
switch demandState.requested {
case .unlimited:
return subscriber.receive(value)
default:
buffer.append(value)
return flush()
}
}
func complete(completion: Subscribers.Completion<S.Failure>) {
precondition(self.completion == nil,
"Completion have already occured, which is quite awkward ")
self.completion = completion
_ = flush()
}
func demand(_ demand: Subscribers.Demand) -> Subscribers.Demand {
flush(adding: demand)
}
buffer()用于处理缓存数据的部分逻辑,当收到外部的调用后,如果请求是不受限的,就直接发送数据给Subscriber,否则,把数据拼接到数组中,然后调用flush()complete()用于接收外部的完成事件,保存后调用flush()demand()是一个非常奇妙且重要的方法,它的目的是响应一个Demand请求,然后调用flush()处理这个响应,本质上这个函数中的参数的Demand请求就是Subscriber(订阅者)的请求。
我发现用文字讲知识确实比较费劲,没有视频好,大家再看看上边的自定义Subscription的代码:
func request(_ demand: Subscribers.Demand) {
    _ = self.buffer.demand(demand)
}
Subscription实现了Combine.Subscription协议,func request(_ demand: Subscribers.Demand)正是协议中的方法,该方法会被Subscriber(订阅者)调用。
大家如果有任何疑问,可以留言。我们再看看第3部分的内容:
private func flush(adding newDemand: Subscribers.Demand? = nil) -> Subscribers.Demand {
    lock.lock()
    defer { lock.unlock() }

    if let newDemand = newDemand {
        demandState.requested += newDemand
    }

    // If buffer isn't ready for flushing, return immediately
    guard demandState.requested > 0 || newDemand == Subscribers.Demand.none else { return .none }

    while !buffer.isEmpty && demandState.processed < demandState.requested {
        demandState.requested += subscriber.receive(buffer.remove(at: 0))
        demandState.processed += 1
    }

    if let completion = completion {
        // Completion event was already sent
        buffer = []
        demandState = .init()
        self.completion = nil
        subscriber.receive(completion: completion)
        return .none
    }

    let sentDemand = demandState.requested - demandState.sent
    demandState.sent += sentDemand
    return sentDemand
}
上边代码很简单,就是当requested > 0的时候,把数据发送给Subscriber,DemandBuffer持有Subscriber的目的就是为了后边调用subscriber.receive(buffer.remove(at: 0))。我们再重新分析一下Subscription的过程:
首先,我们初始化:
init(factory: @escaping SubscriberHandler,
     downstream: Downstream) {
    self.buffer = DemandBuffer(subscriber: downstream)

    let subscriber = Subscriber(onValue: { [weak self] in _ = self?.buffer.buffer(value: $0) },
                                onCompletion: { [weak self] in self?.buffer.complete(completion: $0) })

    self.cancelable = factory(subscriber)
}
初始化成功后,buffer中的.flush()函数并不会把数据透传给Subscriber,当收到订阅接收到订阅者的request后调用下边的代码:
func request(_ demand: Subscribers.Demand) {
    _ = self.buffer.demand(demand)
}
然后调用buffer中的.demand()函数,.demand()函数又调用.flush(),最终遍历数组,把数据全部透传给Subscriber。
如果大家有点蒙,只能多看代码和上边的解释,再细细品一下。
最后,我们回到起始的地方,再回过头来看下边的代码:
public extension AnyPublisher {

    init(_ factory: @escaping Publishers.Create<Output, Failure>.SubscriberHandler) {
        self = Publishers.Create(factory: factory).eraseToAnyPublisher()
    }

    static func create(_ factory: @escaping Publishers.Create<Output, Failure>.SubscriberHandler)
        -> AnyPublisher<Output, Failure> {
        AnyPublisher(factory)
    }
}
总结
自定义Publisher的关键是自定义Subscription,Subscription又通过DemandBuffer管理数据,DemandBuffer的核心思想是把数据放入到数组中,然后通过func demand(_ demand: Subscribers.Demand) -> Subscribers.Demand释放数据。
Apple 官方异步编程框架:Swift Combine 简介
WWDC19 Session 722 - Introducing Combine
引言
在现代 GUI 编程中,开发者会处理大量事件(包括网络,屏幕输入,系统通知等),根据事件去让界面变化。而对异步事件的处理,会让代码和状态变得复杂。而现有的 Cocoa 框架中,异步编程的接口主要有以下这几种:
- Target/Action
- NotificationCenter
- KVO
- Callbacks
而在实际情况中,由于不同的第三方库,系统框架,业务代码可能采用不一样的方式处理异步事件,会导致对事件的处理分散且存在差异。苹果为了帮助开发者简化异步编程,发布了 Swift 的异步编程框架 - Combine。
What is Combine
“A unified, declarative API for processing values over time”
统一、声明式、为处理变化的值而生的 API。
Combine 作用是将异步事件通过组合事件处理操作符进行自定义处理。
关注如何处理变化的值,正是响应式编程所考虑的。也可以说,Combine 是一个苹果官方的 Swift 响应式框架。
响应式编程(Reactive Programming):面向异步数据流的编程思想。业界比较知名的响应式框架是 ReactiveX 系列。Rx 也有 Swift 版本的 RxSwift。
Combine 特性
由于 Combine 是一个 Swift 编写的框架,所以 Combine 可以受益于 Swift 的一些语言特性。
泛型支持
Combine 享受 Swift 泛型带来的便利性。泛型可以帮助开发者提取更多模板代码,这也意味着我们可以让异步操作的代码支持泛型,然后适配到各个种类的异步操作中。
类型安全
同样受惠于 Swift,可以让编译器和 Runtime 帮助我们检查类型安全问题。
组合优先
Combine 的主要设计理念,使用组合。组合的优点是可以将核心设计得简单又便于理解,但当放在一起使用时,能产生 1 + 1 > 2 的效果。
请求驱动
请求驱动(Request Driven):基于请求和响应的设计思想,消费者向生产者请求某个事务的变化,当变化时生产者给消费者对应的响应。
事件驱动(Event Driven):基于事件通知的设计思想。在事务发生变化时,生产者将通知提交给事件管道进行分发,而不关心谁去消费事件。消费者需要到事件管道中订阅关心的通知。
Combine 是基于请求和响应的设计思想的,这允许你更精准的控制 App 的内存使用和性能。(这一块苹果没有详细解释)
Combine 核心
Combine 框架有三个核心概念
- 发布者(Publisher)
- 订阅者(Subscriber)
- 操作符(Operator)
发布者(Publisher)
发布者在 Combine 框架中是一个协议:
public protocol Publisher {

    /// 产生的值的类型
    associatedtype Output

    /// 失败的错误类型
    associatedtype Failure : Error

    /// 实现这个方法,将调用 `subscribe(_:)` 订阅的订阅者附加到发布者上
    func receive<S>(subscriber: S) where S : Subscriber, Self.Failure == S.Failure, Self.Output == S.Input
}

extension Publisher {
    /// 将订阅者附加到发布者上,供外部调用,不直接使用 `receive(_:)` 方法
    public func subscribe<S>(_ subscriber: S) where S : Subscriber, Self.Failure == S.Failure, Self.Output == S.Input
}
发布者定义了如何描述产生的值和错误,通过定义关联类型 Output 和 Failure 的实际类型(当发布者不产生错误时,可以使用 Never)。由于发布者不需要实际产生值和错误,所以我们可以用值类型来定义它,也就是 Swift 里的结构体。发布者提供让订阅者注册的能力,通过实现 receive 方法。
发布者可以适配到现有的很多异步操作接口中。
官方 Cocoa 框架中 NotificationCenter 接口适配发布者的例子( 截止至 beta1 版本的 Xcode, 此 API 尚未开放 beta2 版本已支持):
extension NotificationCenter {
        struct Publisher: Combine.Publisher {
                typealias Output = Notification
                typealias Failure = Never
                init(center: NotificationCenter, name: Notification.Name, object: Any? = nil)
        }
}
订阅者(Subscriber)
和发布者配对的,就是订阅者。同样的,在 Combine 框架中是一个协议:
public protocol Subscriber : CustomCombineIdentifierConvertible {

    /// 接受到的值的类型
    associatedtype Input

    /// 可能接受到的错误的类型
    associatedtype Failure : Error

    /// 告诉订阅者,它在发布者上被成功订阅,可以请求值了
    func receive(subscription: Subscription)

    /// 告诉订阅者,发布者产生值了
    func receive(_ input: Self.Input) -> Subscribers.Demand

    /// 告诉订阅者,发布者已经终止产生值了,不管是正常情况还是由于错误情况
    func receive(completion: Subscribers.Completion<Self.Failure>)
}
订阅者定义了如何描述接受的值和错误,类似的,通过定义关联类型 Input 和 Failure。由于订阅者在接受到值之后,经常会影响和修改某些状态,所以我们使用引用类型来定义它,也就是 Swift 里的类类型。
订阅者有三个核心方法:
- 接收到订阅的消息
- 接收到产生的值的消息
- 接收到产生已经终止的消息
订阅消息(Subsciption):描述如何控制发布者到订阅者的数据流动,用于表达发布者和订阅者之间的连接。
官方的提供 Assign 的订阅者例子(可以在文档中找到更详细的定义):
extension Subscribers {

    final public class Assign<Root, Input> : Subscriber, Cancellable {

        public typealias Failure = Never
        public init(object: Root, keyPath: ReferenceWritableKeyPath<Root, Input>)
			//...
    }
}
运算符(Operator)
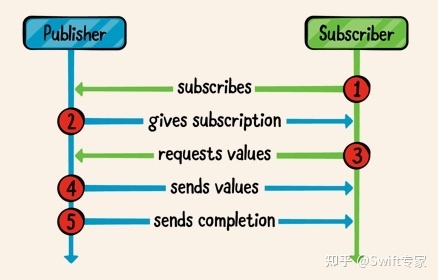
当有了发布者和订阅者后,它们之间是怎么配合起来运作的呢,如下图所示:
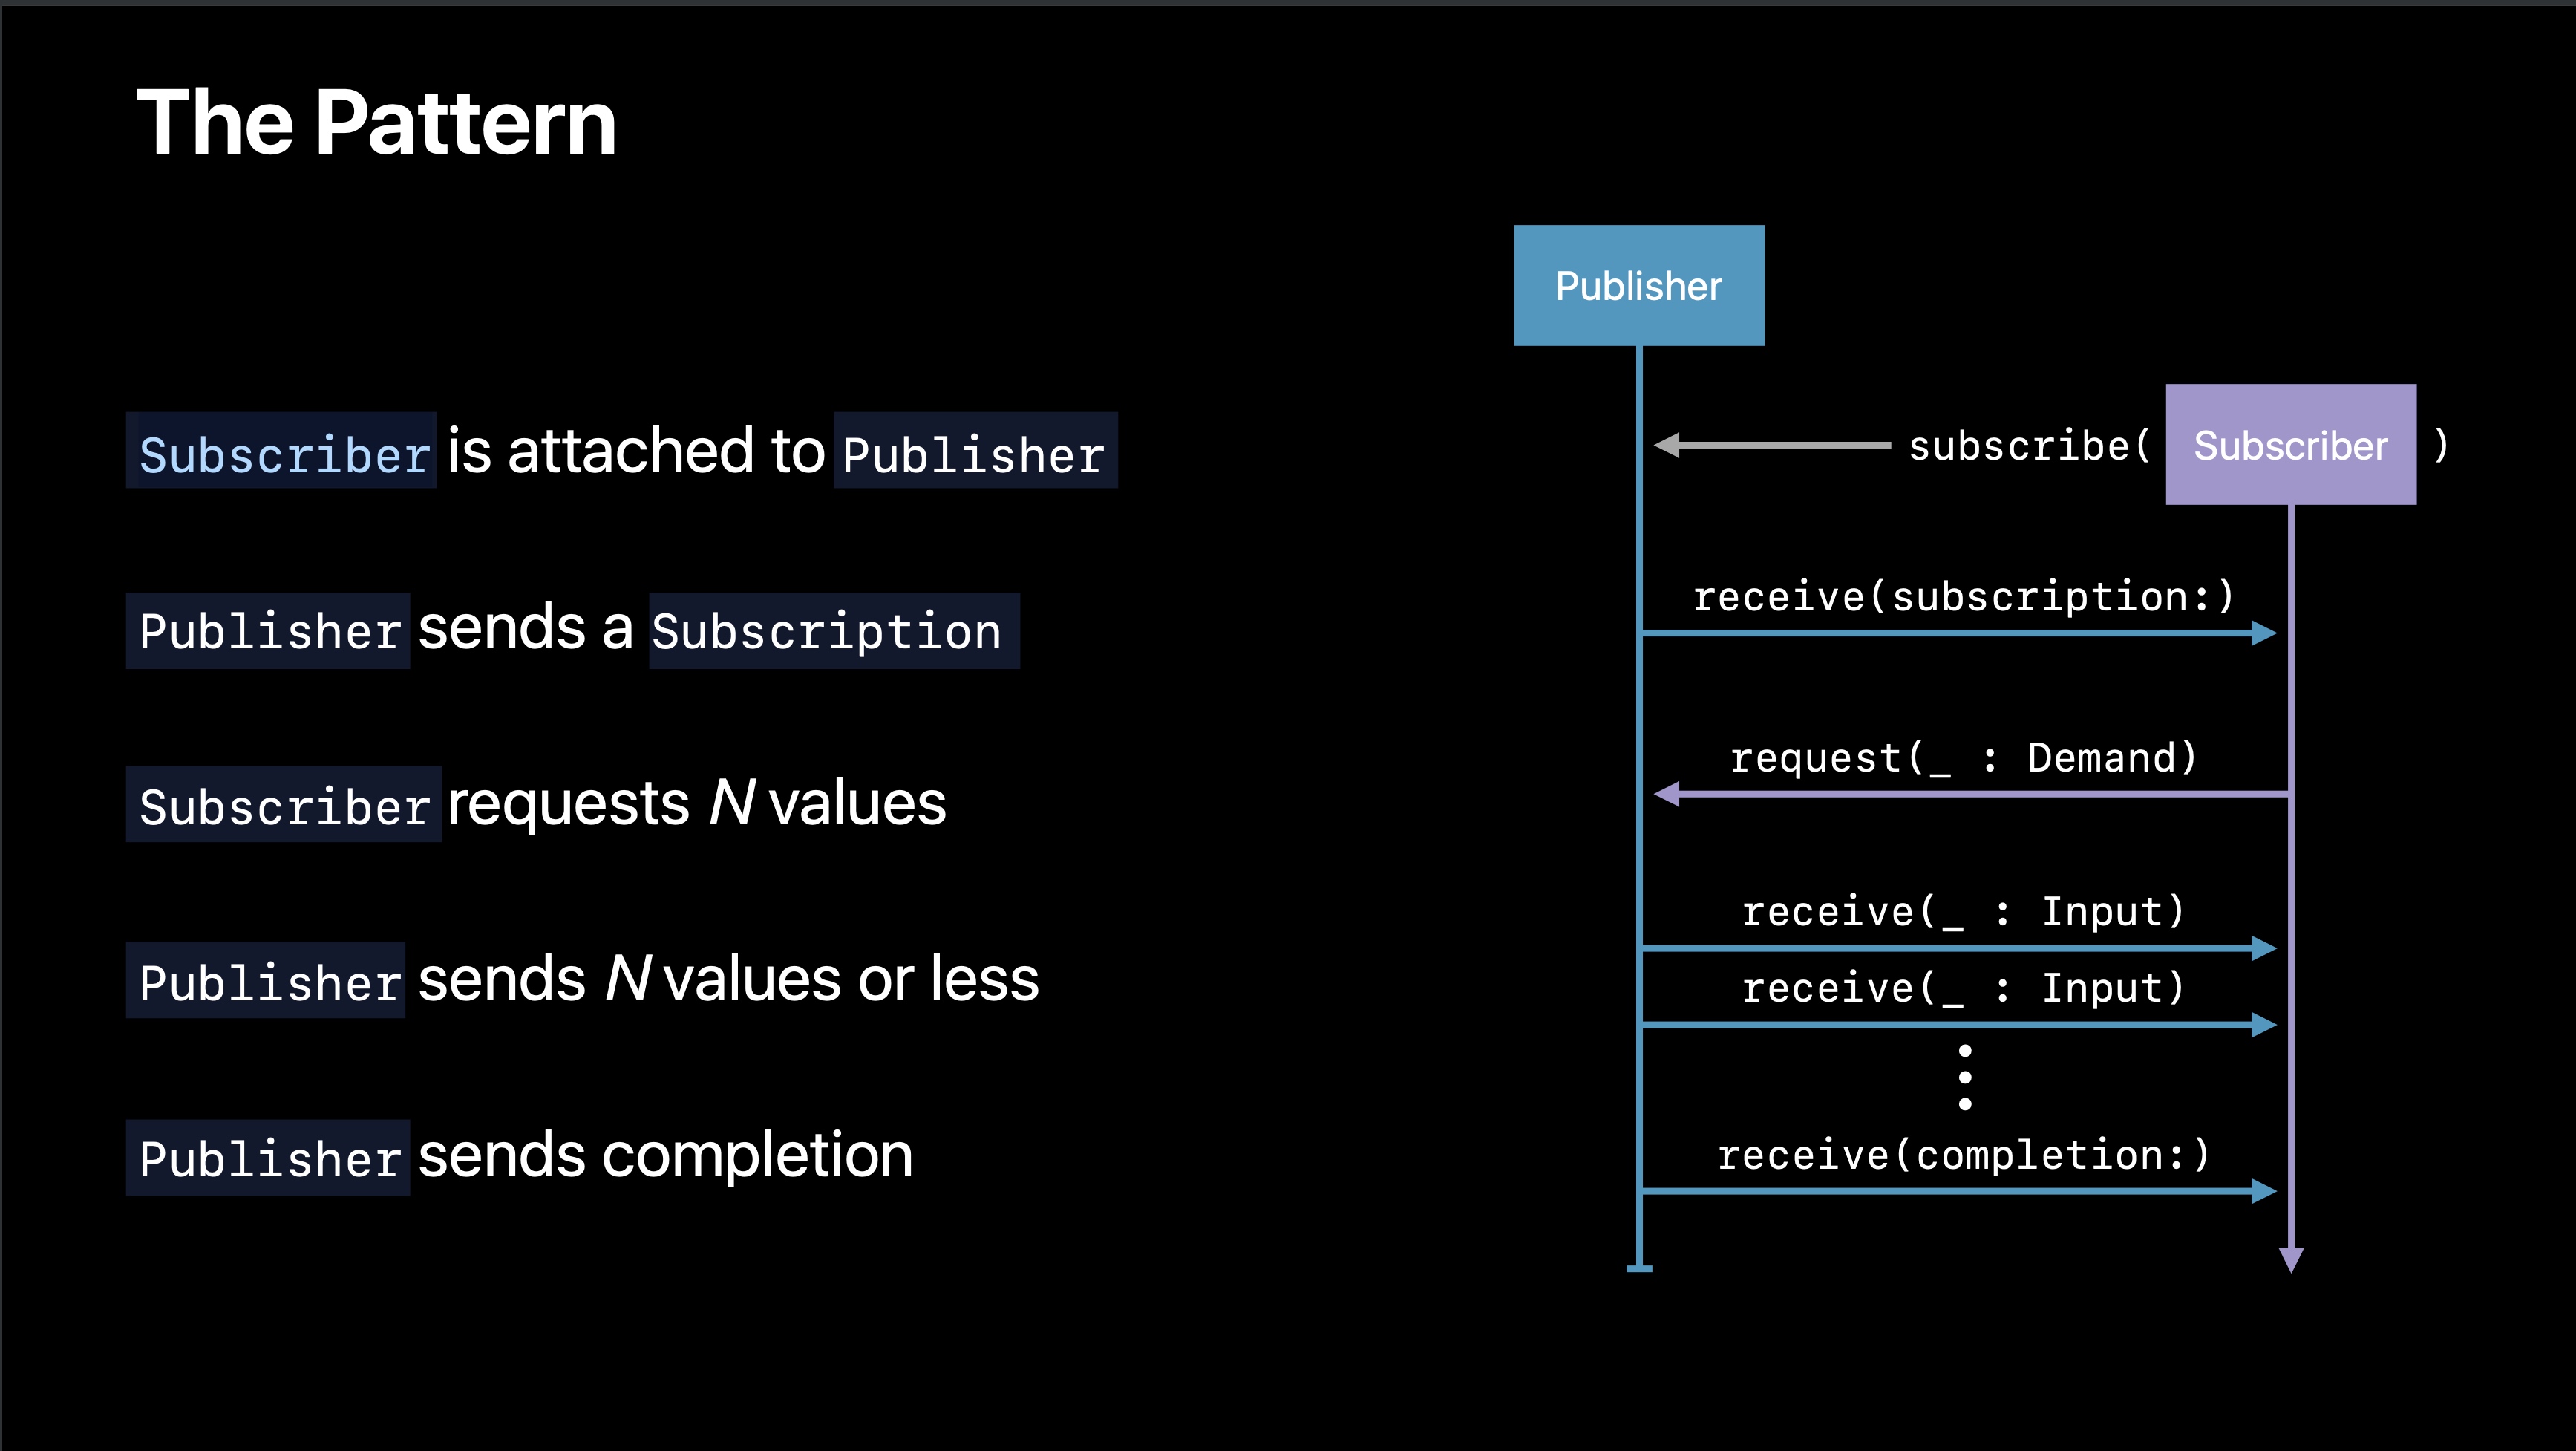
- 首先订阅者通过 subsribe 方法附加到发布者上
- 发布者发送一个订阅消息给订阅者,订阅者通过 receive 方法响应
- 发布者通过定义在订阅消息中的 request 方法发送请求需要的值
- 当请求的值产生时,发布者将值发送给订阅者,订阅者通过 receive 方法收到响应
- 最后当发布者终止产生值时,发送完成消息给订阅者,订阅者通过 receive 方法收到响应
看起来一切都配合的很美好,好像这两个概念已经可以实现我们的功能了。当你开开心心敲下这个例子的时候:
class Foo {
    var name:String
    init(name:String) {
        self.name = name
    }
}

let object = Foo(name:"Test")
let publisher = NotificationCenter.Publisher(center: .default, name: "Send", object: object)
let subsciber = Subscribers.Assign(object: object, keyPath: \.name)

publisher.subscribe(subsciber)
你会发现编译不过,因为 NotificationCenter 发布者产生的值类型是 Notification,而订阅者需要接受 name 的 String 类型。这时候,操作符就应运而生了。
操作符是一个桥梁,定义一些便捷的操作,让发布者和订阅者能搭配使用,而这样就可以让发布者和订阅者的耦合程度降低,通用程度变高。而复用的发布者和订阅者可以通过一到多个操作符进行适配。
操作符定义如何进行值的转换。操作符是遵循 Publisher 协议的,从上游的发布者订阅值,生成新的发布者,处理后并发送给下游的订阅者。
官方提供的 Map 操作符的例子:
extension Publishers {
    public struct Map<Upstream, Output> : Publisher where Upstream : Publisher {
        public typealias Failure = Upstream.Failure
        public let upstream: Upstream
        public let transform: (Upstream.Output) -> Output
        public func receive<S>(subscriber: S) where Output == S.Input, S : Subscriber, Upstream.Failure == S.Failure
    }
}
但在一般使用时,我们不直接生成操作符发布者,而是使用官方提供的声明式操作符 API。
比如 Map 操作符的方法如下:
extension Publishers.Map {
    public func map<T>(_ transform: @escaping (Output) -> T) -> Publishers.Map<Upstream, T>
}
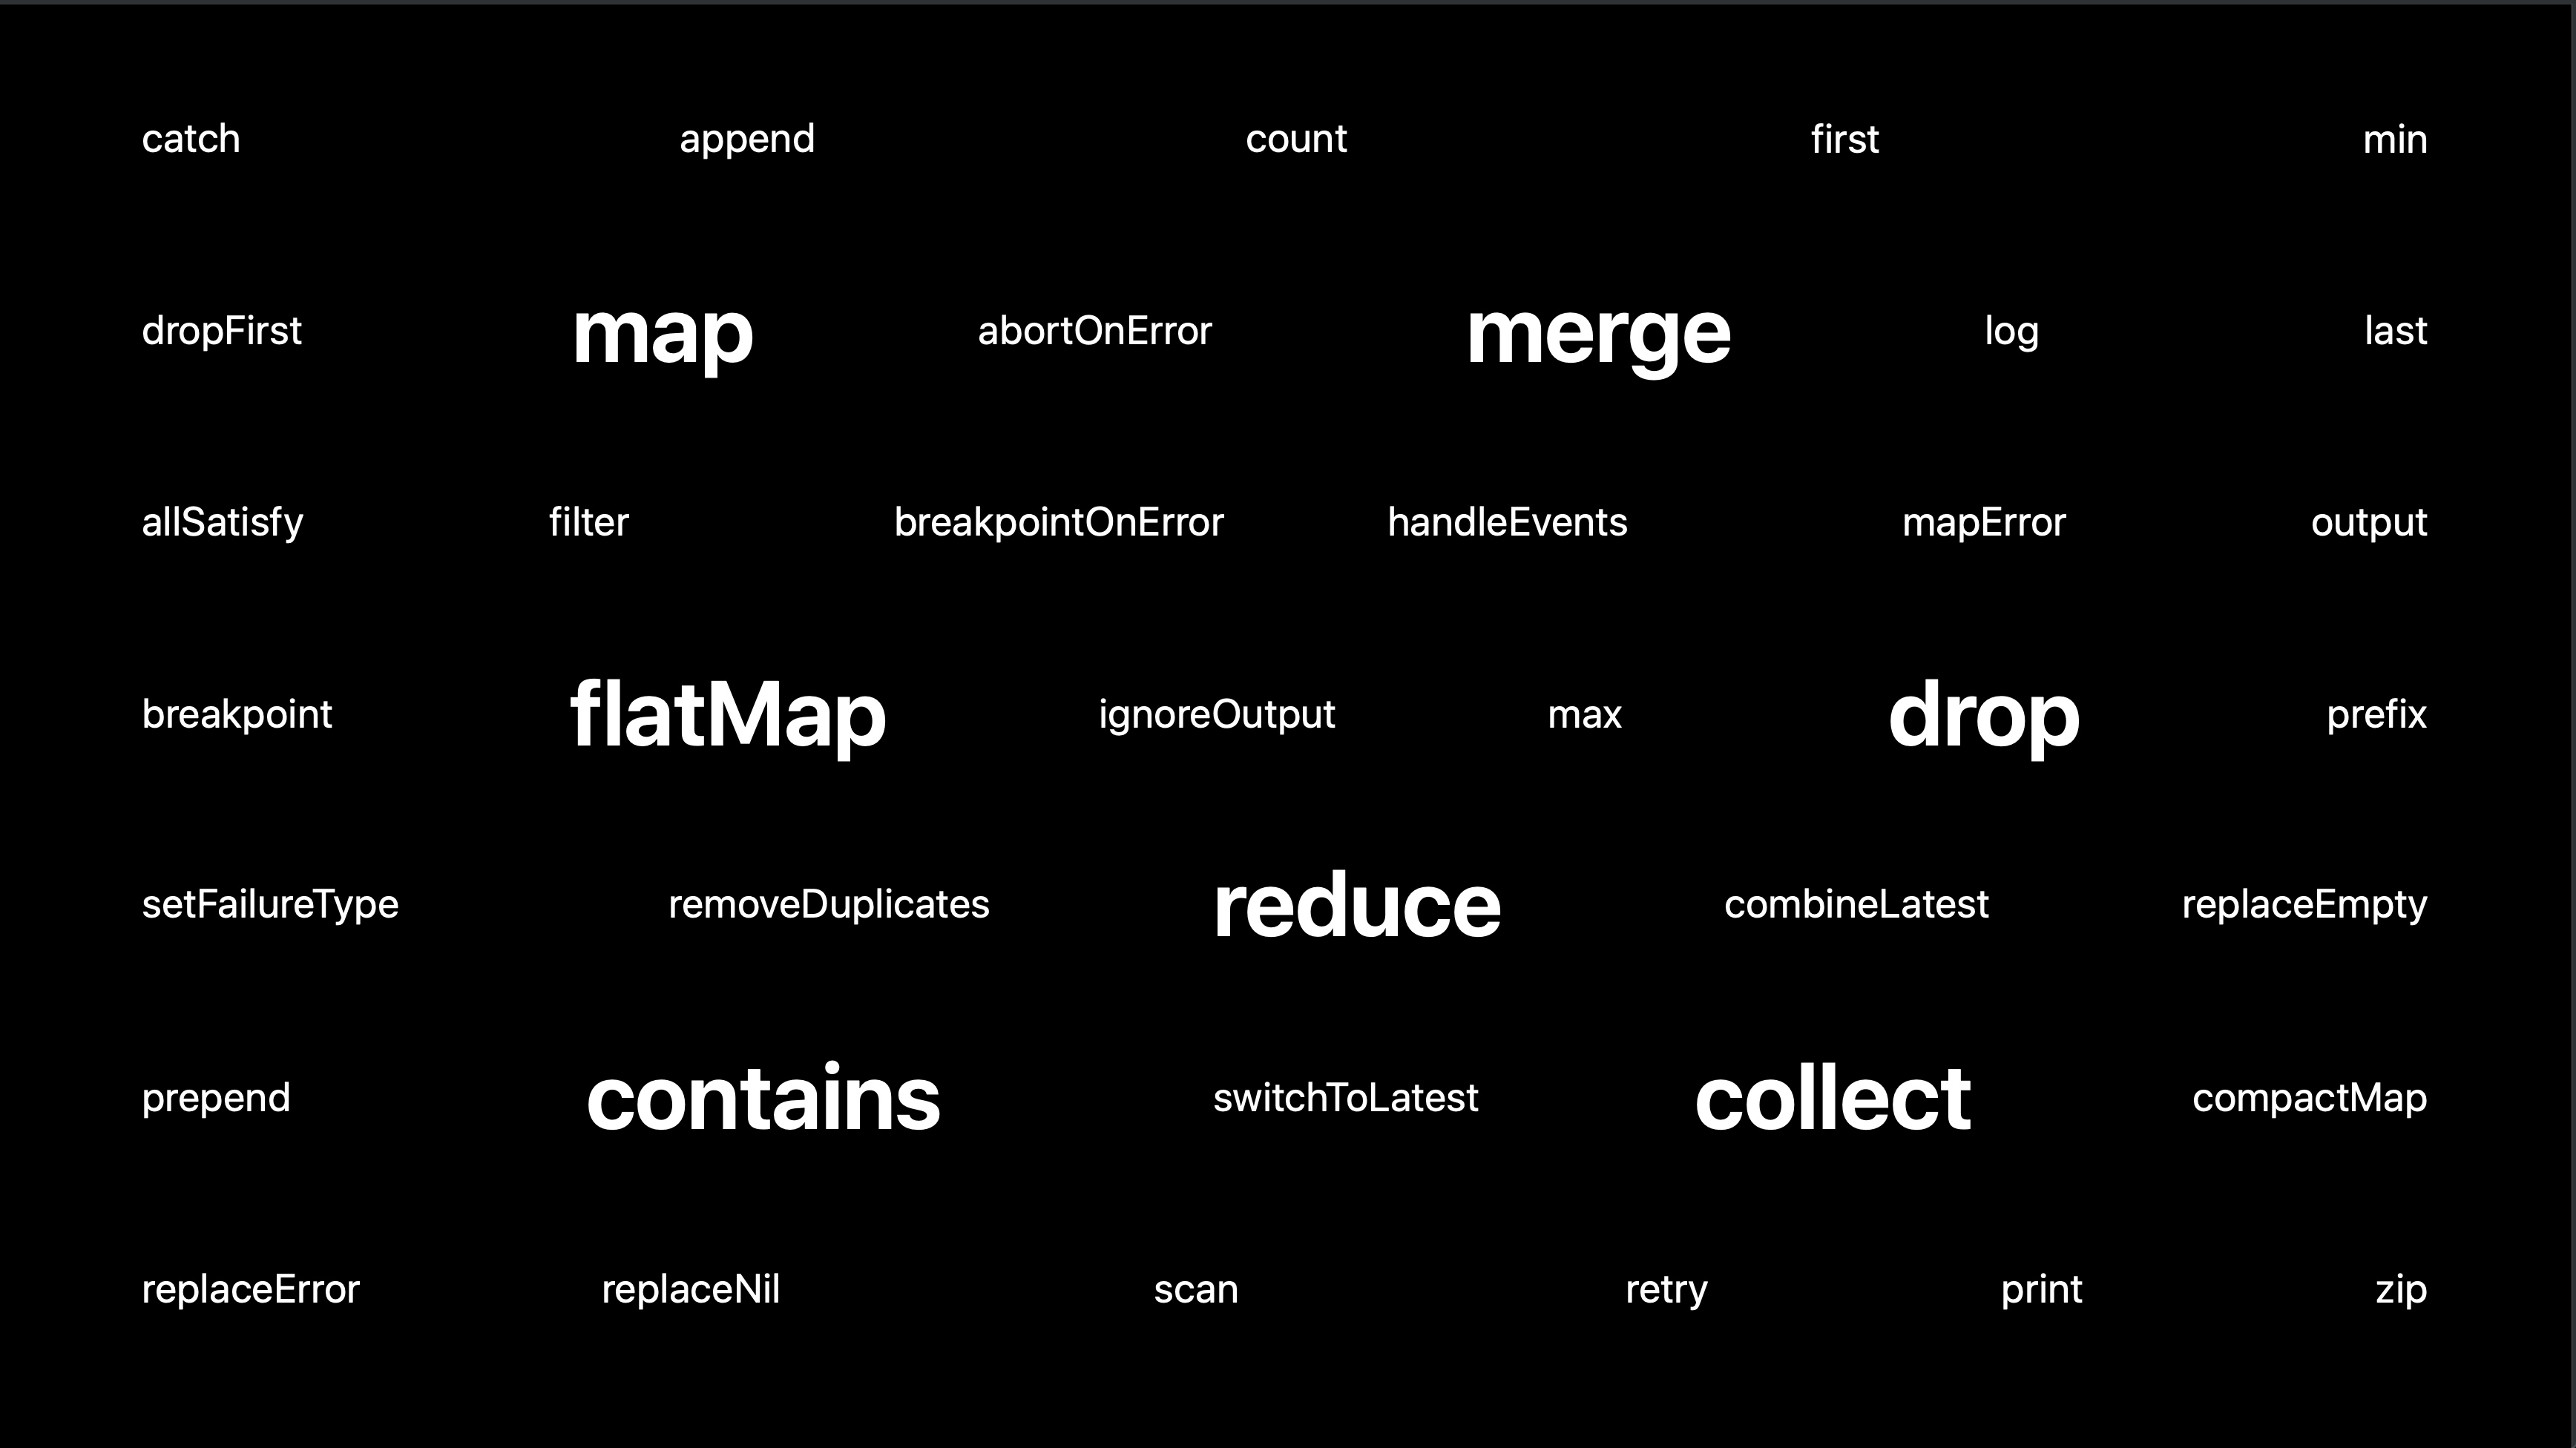
Combine 框架中,有以下几类声明式操作符 API:
1. 函数式转换
比如 map、filter、reduce 等函数式思想里的常见的高阶函数的操作符。
2. 列表操作
比如 first、drop、append 等在产生值序列的中使用便捷方法的操作符。
3. 错误处理
比如 catch,retry 等进行错处理的操作符。
4. 线程/队列行为
比如 subscribeOn,receiveOn 等对订阅和接受时线程进行指定的操作符。
5. 调度和时间处理
比如 delay,debounce(去抖动),throttle(节流) 等操作符。
Combine 设计理念 - 组合优先
Combine 的设计理念就是优先是使用组合。
如果把 Combine 的思想对应到同步编程里面的概念,就是这样下面的图。
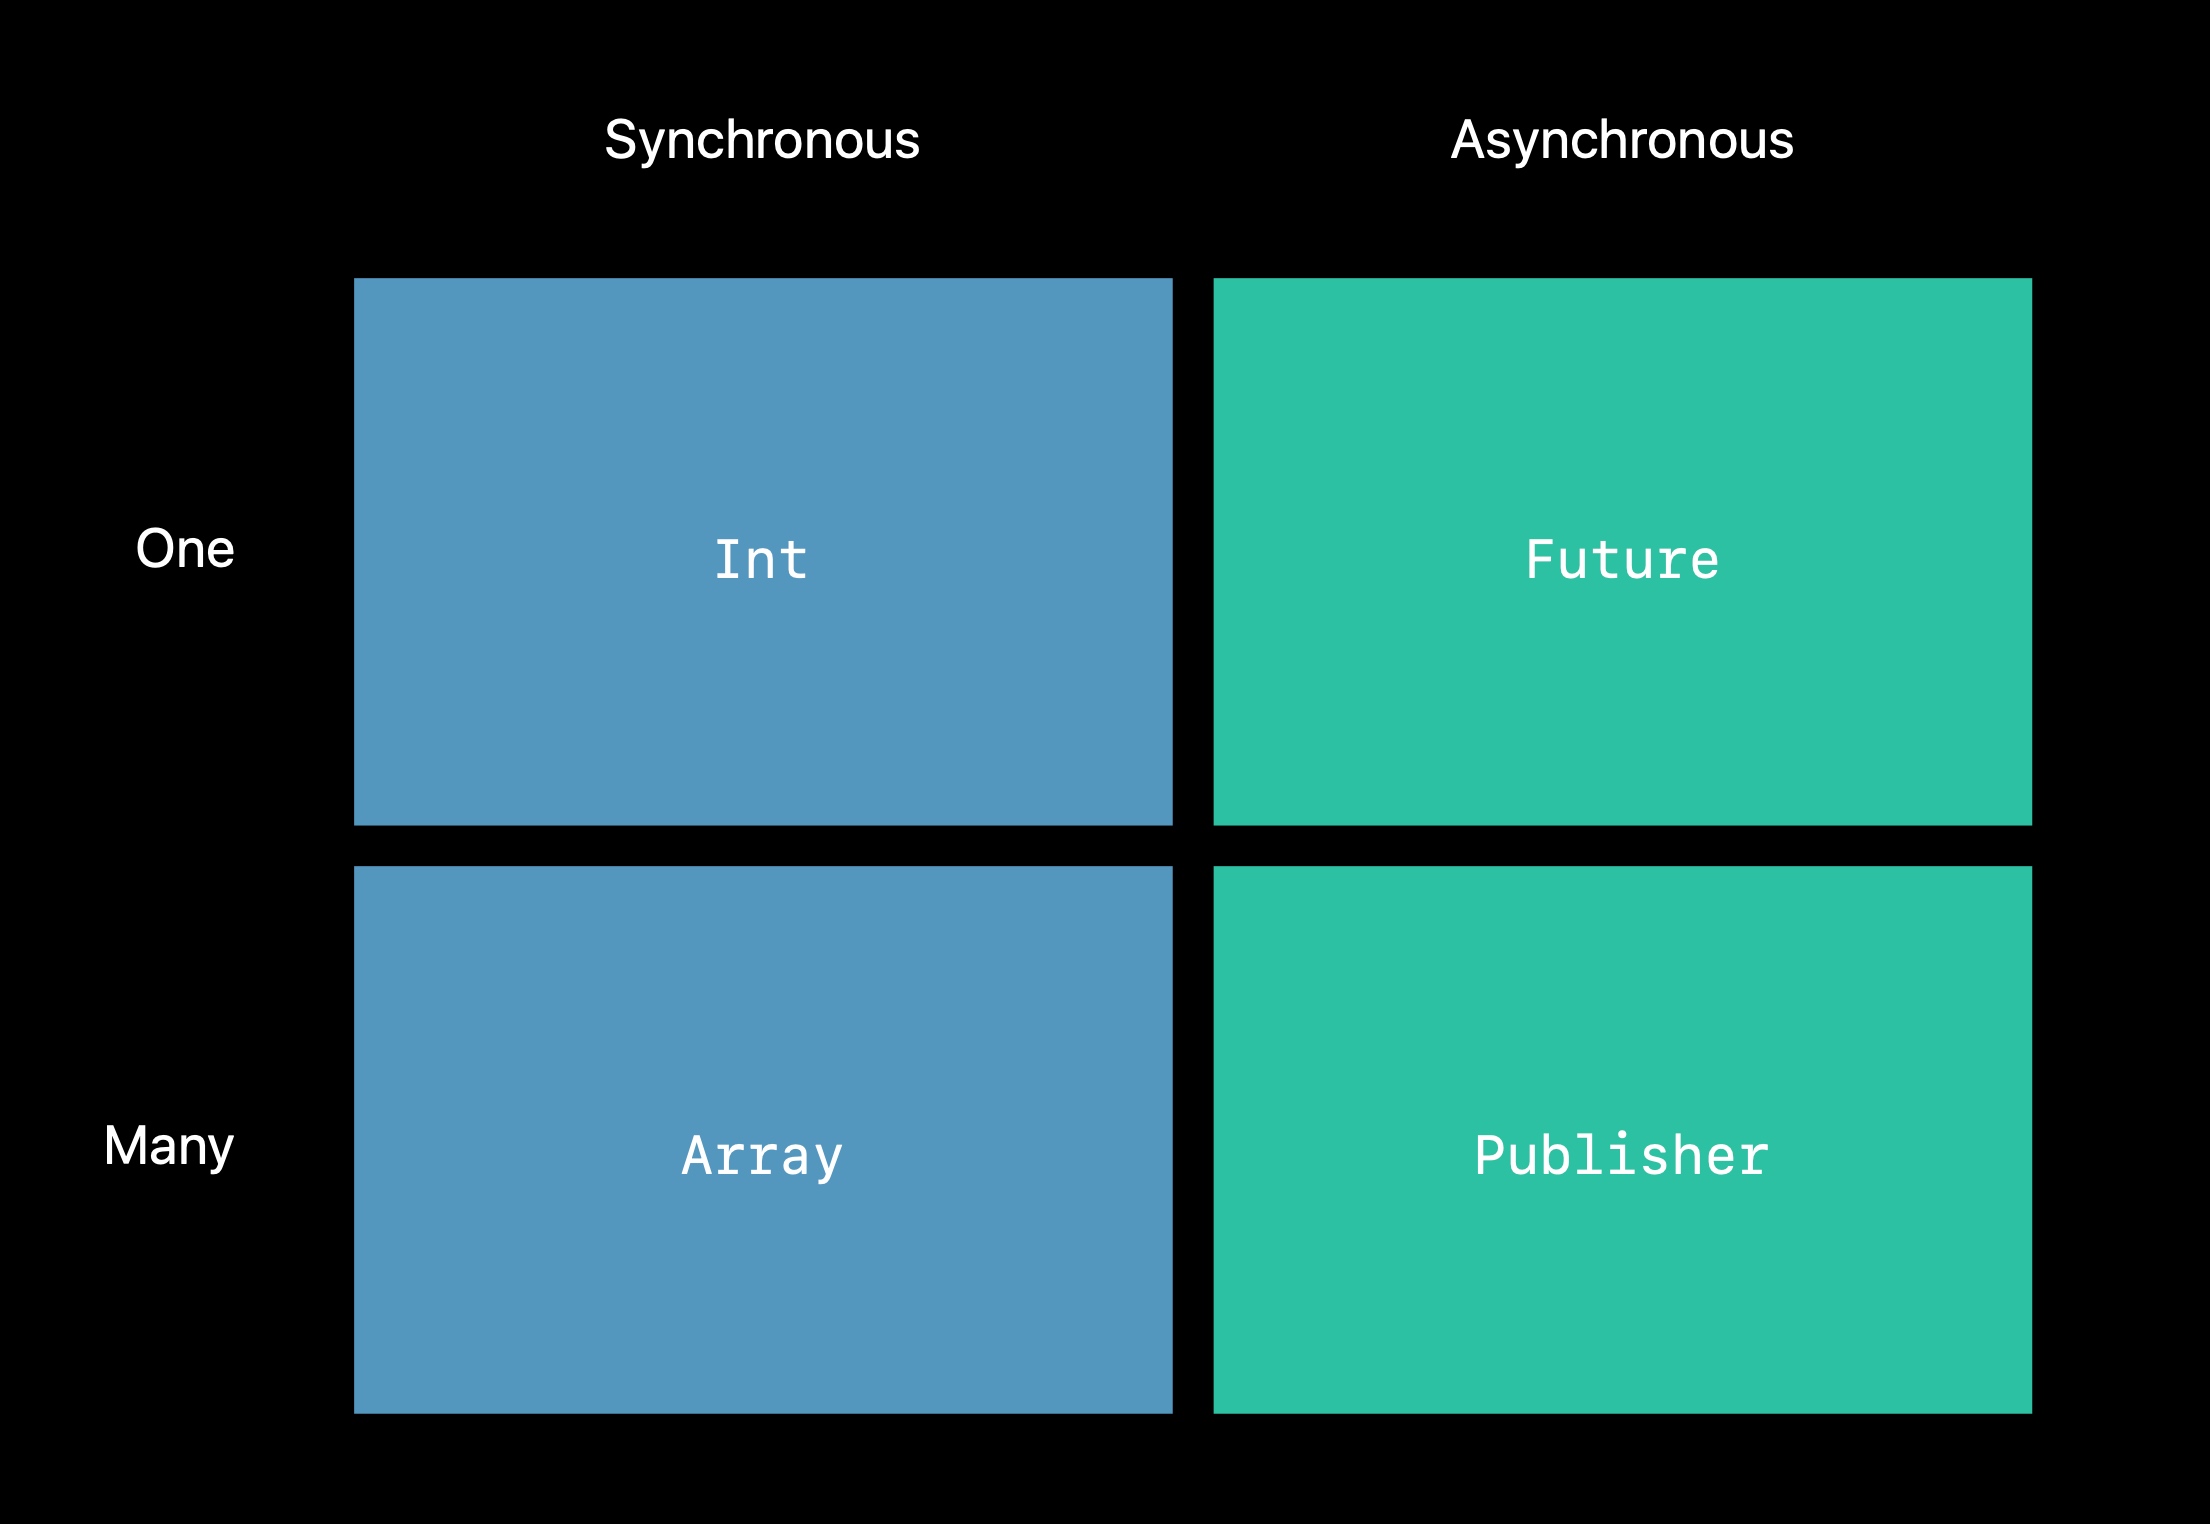
也就是发布者可以使用的操作符,大部分和 Foundation 框架里 Collection 类型的操作符相似,举个例子:我们知道可以对集合类型进行 filter 操作,那么 Combine 操作符里也有对应的 filter 方法。通过方法链(Method Chaning),组合大量的操作符,可以让异步操作更加统一,代码更加整洁。
组合多个发布者
有时候,我们希望将一些异步操作汇合,并统一处理响应。组合多个发布者有两种方式:Zip 和 CombineLastest。
Zip

Zip 在 Combine 框架里面是一个结构体(同时还有 Zip3,Zip4,用于更多数量的组合)
extension Publishers {
    public struct Zip<A, B> : Publisher where A : Publisher, B : Publisher, A.Failure == B.Failure {
        public typealias Output = (A.Output, B.Output)
        public typealias Failure = A.Failure
        public let a: A
        public let b: B
        public init(_ a: A, _ b: B)
        public func receive<S>(subscriber: S) where S : Subscriber, B.Failure == S.Failure, S.Input == (A.Output, B.Output)
    }
}
Zip 可以通过传入两个发布者进行初始化,要求多个组合的发布者的的错误类型一致,而输出是多个组合的发布者合并起来的元组。Zip 的意思是,当组合的每一个发布者都产生值的时候,才会将值合并成元组发送给订阅者。
Combine Lastest
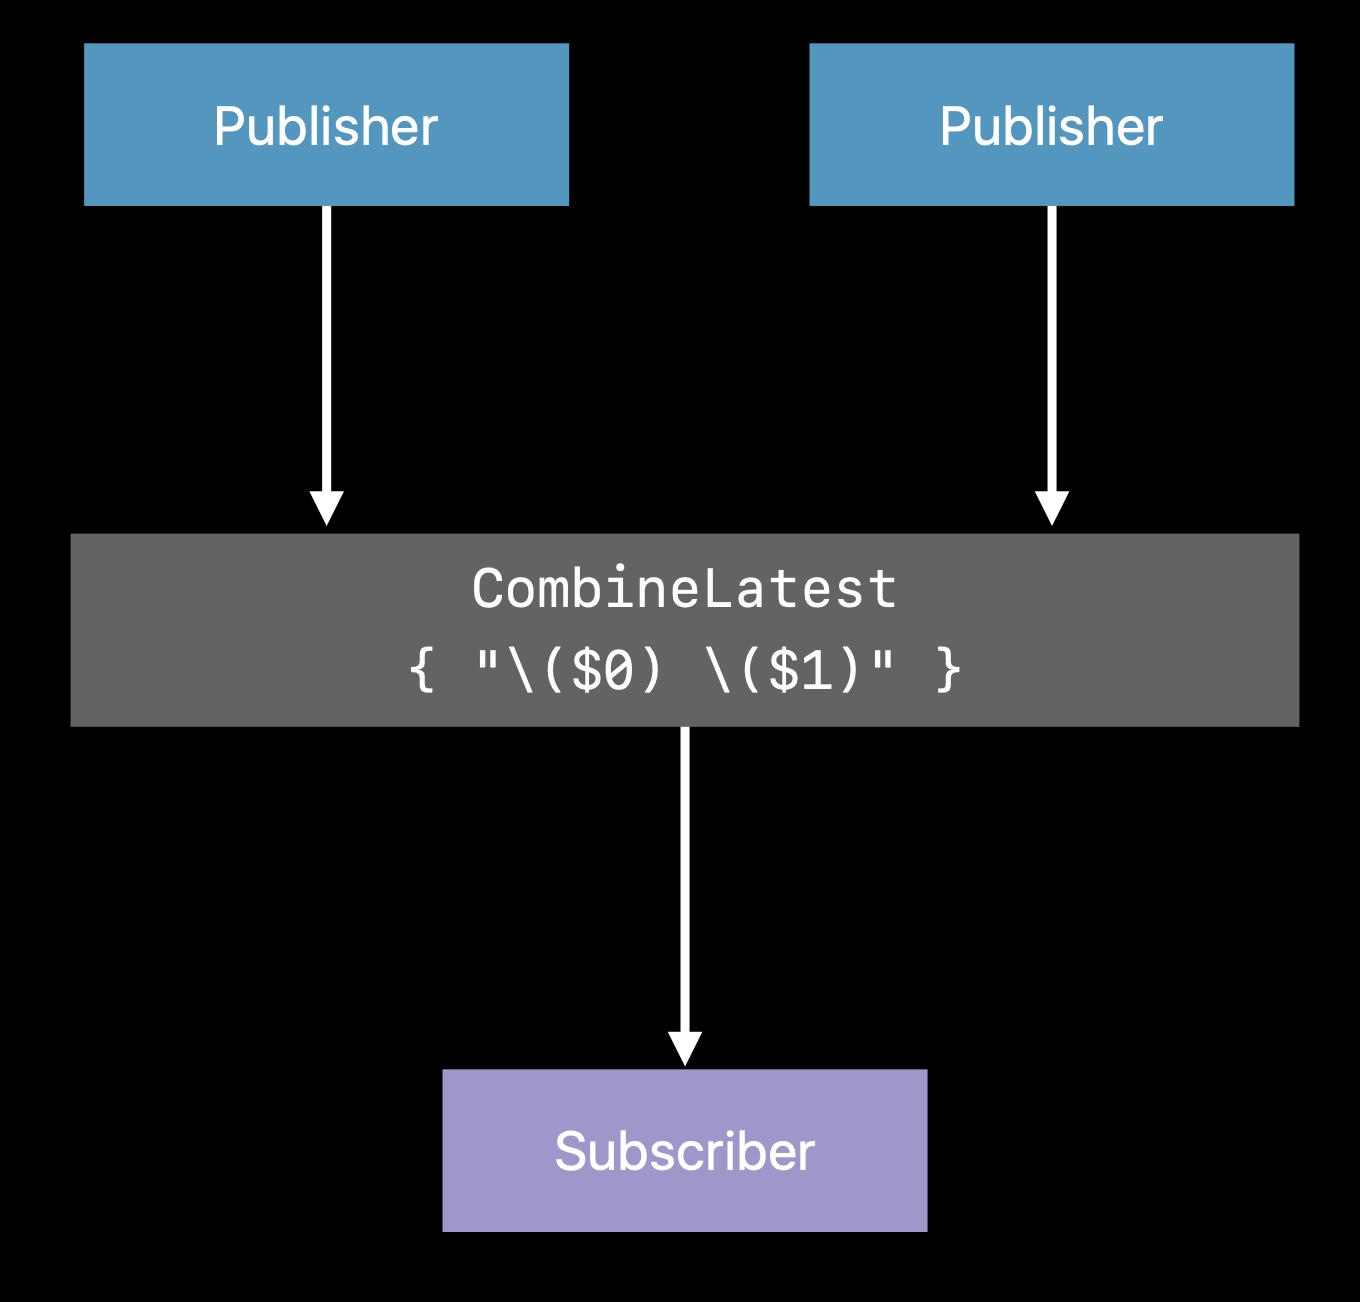
类似的是,CombineLastest 在 Combine 框架里面也是一个结构体(同理还有 CombineLatest3,CombineLatest4,用于更多数量的组合)
extension Publishers {
    public struct CombineLatest<A, B, Output> : Publisher where A : Publisher, B : Publisher, A.Failure == B.Failure {
        public typealias Failure = A.Failure
        public let a: A
        public let b: B
        public let transform: (A.Output, B.Output) -> Output
        public init(_ a: A, _ b: B, transform: @escaping (A.Output, B.Output) -> Output)
        public func receive<S>(subscriber: S) where Output == S.Input, S : Subscriber, B.Failure == S.Failure
    }
}
CombineLatest 使用两个发布者加上一个 transform 的转换闭包(在闭包中将两个产生的值处理并返回)进行初始化(截止目前 beta1 版本的 Xcode,苹果还没将声明公开 init 方法,预计可能还会调整,这一部分来自官方幻灯片中的例子,有待订正beta 2 版本已支持),同样也要求多个组合发布者的错误类型一致,输出是 transform 闭包里的 Output 类型。CombineLastest 的意思是,当多个发布者中任意一个发布者产生值时,都会执行 transform 闭包的操作并将结果发送给订阅者。
总结
Combine 作为官方出品的响应式框架,无疑是令人惊喜的。整个框架的思想虽然现有的响应式框架(如 RxSwift)差不多,但无论是接口上隐藏掉序列,冷热信号等理解难度较大的概念,还是更方便的事件设计,清晰简洁的命名规范,都觉得 Apple 很用心的在打磨这个框架。同时,最具杀伤力的的是,Apple 可以让他和 Cocoa 框架更紧密的结合,打造出类似 UIKit+Combine,Foundation+Combine 的官方支持,这也意味着 Combine 有望成为类似 JavaScript 里面 Promise 这样的规范特性。如果你错过了 ReactiveCocoa,也错过了 RxSwift,也没使用过响应式编程,那么我强烈建议你了解一下今年的 Combine 框架。而剩下最大的问题,是国内什么时候能够 iOS 13 Only 和迁移到 Swift 了。
延伸阅读
Apple 官方异步编程框架:Swift Combine 应用
WWDC19 Session 721 - Combine in Practice
引言
Combine 是 WWDC2019 推出的异步编程框架,在上篇 文章 中,介绍了 Combine 的基本概念。在这篇文章中,着重介绍一些 Combine 的实际应用。
发布者(Publisher)
假设有一个 MagicTrick 类型的 JSON 数据,这个数据的来源是 NotificationCenter,数据会以 Data 的形式放在 Notification 的 UserInfo 中。让我们使用 Combine 的发布者来改造这个数据的发送。
extension Notification.Name{
    static var newTrickDownloaded:Notification.Name {
        return Notification.Name("aa")
    }
}

class MagicTrick:Codable {
    var name:String = ""
}

let trickNamePublisher = NotificationCenter.Publisher(center: .default, name: .newTrickDownloaded)
由于 NotificationCenter 发布者的 Output 类型是 Notification,需要类型转换。
map
这个操作符可以改变发布者的类型。
let trickNamePublisher = NotificationCenter.Publisher(center: .default, name: .newTrickDownloaded)
    .map{ notification -> Data in
        let userInfo = notification.userInfo
        return userInfo?["data"] as! Data
    }
这时候 Output 变成了 Data 类型,还不能实际使用。要转换成实际类型,可以用 Codable + JSONDecoder 进行解析,解析时可能会抛出错误,就需要使用 try 关键字。
tryMap
这个操作符允许在转换值的闭包内抛出异常。
let trickNamePublisher = NotificationCenter.Publisher(center: .default, name: .newTrickDownloaded)
    .map{ notification -> Data in
        let userInfo = notification.userInfo
        return userInfo?["data"] as! Data
    }.tryMap { data -> MagicTrick in
        let decoder = JSONDecoder()
        return try decoder.decode(MagicTrick.self, from: data)
    }
decode
而 Combine 为 Codable,还提供了便捷的 decode 方法。这个操作符允许传入 Decodable 类型和解码器,将解码器支持的上游数据类型解码,发送给下游订阅者。
let trickNamePublisher = NotificationCenter.Publisher(center: .default, name: .newTrickDownloaded)
    .map{ notification -> Data in
        let userInfo = notification.userInfo
        return userInfo?["data"] as! Data
    }
    .decode(type: MagicTrick.self, decoder: JSONDecoder())
接下来应该处理解码过程出现的错误了,因为每一个发布者需要描述了他们产生或者允许的错误类型,所以 Combine 中提供了各种各样的错误处理的操作符,对错误做出反应或是从错误中恢复并做一些兜底处理。
assertNoFailure
这个操作符可以在你确认上游发布者不会产生错误时使用,会将错误类型转为 Never,但当错误发生时,将会崩溃。
let trickNamePublisher = NotificationCenter.Publisher(center: .default, name: .newTrickDownloaded)
    .map{ notification -> Data in
        let userInfo = notification.userInfo
        return userInfo?["data"] as! Data
    }
    .decode(type: MagicTrick.self, decoder: JSONDecoder())
    .assertNoFailure()
catch
这个操作符允许在上游发布者发生错误时,提供一个默认的发布者替换上游的发布者,发送值给下游的订阅者,以便做默认兜底方案。
let trickNamePublisher = NotificationCenter.Publisher(center: .default, name: .newTrickDownloaded)
    .map{ notification -> Data in
        let userInfo = notification.userInfo
        return userInfo?["data"] as! Data
    }
    .decode(type: MagicTrick.self, decoder: JSONDecoder())
    .catch{ _ in
        return Publishers.Just(MagicTrick())
    }
Just:是一个很简单的发布者,用需要产生的值进行初始化,就会将该值发送一次给下游订阅者并结束。
flatMap
上面的例子在错误发生后,生成一个 Just 的发布者作为上游发布者的替代品,但 Just 发布者只会产生一个值就结束了,整个事件流就会结束。但我们需要的是当错误发生时,catch 只处理这次错误,但不替换上游的发布者,也就是上游可以继续产生值。为了不影响上游,我们需要一个新的发布者,能将上游的值用新的发布者发送给下游,catch 只影响这个新的发布者,这个时候就需要 flatMap 了。
Combine 里的 flatMap 和函数式编程高阶函数里的 flatMap 一样,可以将包装的类型进行转换,在这里包装就是发布者,类型就是发布者的 Input,也就是说在 flatMap 里面可以返回一个新 Input 类型的发布者。
let trickNamePublisher = NotificationCenter.Publisher(center: .default, name: .newTrickDownloaded)
    .map{ notification -> Data in
        let userInfo = notification.userInfo
        return userInfo?["data"] as! Data
    }
    .flatMap{ data in
        return Publishers.Just(data)
            .decode(type: MagicTrick.self, decoder: JSONDecoder())
            .catch{ _ in
                return Publishers.Just(MagicTrick())
        }
    }
上面例子中,每次 NotificationCenter 的产生的值都在 flatMap 里被生成的 Just 的发布者并发送,当错误发生时,catch 只会替换这个 Just 的发布者,而不会影响 flatMap 上游的发布者,这样就能保证 catch 是对每次错误进行处理的了。
valueForKey
当只需要发送上游发布者的某一个属性的值时,可以使用 ValueForKey 操作符,它允许使用 Key Path 指定上游的某一个属性。这个操作符的声明式 API 如下(还有对应多个 Key Path 的):
public func publisher<T>(for keyPath: KeyPath<Self.Output, T>) -> Publishers.ValueForKey<Self, T>
使用例子如下:
let trickNamePublisher = NotificationCenter.Publisher(center: .default, name: .newTrickDownloaded)
    .map{ notification -> Data in
        let userInfo = notification.userInfo
        return userInfo?["data"] as! Data
    }
    .flatMap{ data in
        return Publishers.Just(data)
            .decode(type: MagicTrick.self, decoder: JSONDecoder())
            .catch{ _ in
                return Publishers.Just(MagicTrick())
        }
    }
		.publisher(for: \.name)
当对值的处理完后,我们需要考虑需不需要对发送和接收的调度进行特殊处理。
debounce
这个操作符作用是去抖动,也就是只关心在某一段时间间隔里最后的消息结果,比如间隔为 1 秒,那么这一秒内多次从上游接受的值只有最后一个会发送给下游。
let trickNamePublisher = NotificationCenter.Publisher(center: .default, name: .newTrickDownloaded)
    .map{ notification -> Data in
        let userInfo = notification.userInfo
        return userInfo?["data"] as! Data
    }
    .flatMap{ data in
        return Publishers.Just(data)
            .decode(type: MagicTrick.self, decoder: JSONDecoder())
            .catch{ _ in
                return Publishers.Just(MagicTrick())
        }
    }
    .debounce(for: 0.5, scheduler: RunLoop.main)
receive(on:)
这个操作符作用是指定订阅者使用哪个调度者里接收值,同理还有 subscibe(on:) 用于指定发布者使用哪个调度者发送值。
调度者(Scheduler):定义了什么时候和在哪个上下文中执行,在 Cocoa 框架中,RunLoop 和 DispatchQueue 已经适配了调度者协议,可以很方便的使用
let trickNamePublisher = NotificationCenter.Publisher(center: .default, name: .newTrickDownloaded)
    .map{ notification -> Data in
        let userInfo = notification.userInfo
        return userInfo?["data"] as! Data
    }
    .flatMap{ data in
        return Publishers.Just(data)
            .decode(type: MagicTrick.self, decoder: JSONDecoder())
            .catch{ _ in
                return Publishers.Just(MagicTrick())
        }
    }
    .receive(on: DispatchQueue.main)
@Published
这个注解是一个属性包装器(Property Wrapper),可以方便地为任何属性生成其对应类型的发布者。这个发布者会在属性值发生变化时发送消息。
属性包装器(Property Wrapper):Swift 5.1 的新特性,可以抽象对属性 Set/Get 方法的通用逻辑。可以在提案中了解更多。
@propertyDelegate public struct Published<Value> : Publisher {
    public typealias Output = Value
    public typealias Failure = Never
    public init(initialValue: Value)
    public func receive<S>(subscriber: S) where Value == S.Input, S : Subscriber, S.Failure == Published<Value>.Failure
    public var value: Value
}
有了这个特性,对已有的代码进行改造接入 Combine 框架就更方便了(截止至 beta2 版本的 Xcode,$ 符号还不能使用):
@Published var foo:String = "test"

let subscription = $foo.sink {
    print("foo is \($0)")
}
这个关键字其实印证了一点,Combine 和 Swift 语言生态的结合其实是很紧密的,也许将来为了 SwiftUI 和 Combine 这种重量级框架更方便使用,Apple 还会接纳更多社区优秀的提案。
Future
Future 是单次执行的发布者,在闭包中主动产生一个值,之后就结束(和 Javascript 的 Promise,Java 的 Future 类似的设计理念)。初始化闭包会返回一个 excutor 闭包,完成同步/异步操作候,通过主动调用 excutor 闭包(Promise 的 fulfill)将值发送给下游,而在 Combine 框架里这个闭包类型的是 Promise 类型,Promise 类型其实是 (Result<Output, Failure>) -> Void 的别名。
extension Publishers {
    final public class Future<Output, Failure> : Publisher where Failure : Error {
        public typealias Promise = (Result<Output, Failure>) -> Void
        public init(_ attemptToFulfill: @escaping (@escaping Publishers.Future<Output, Failure>.Promise) -> Void)
        final public func receive<S>(subscriber: S) where Output == S.Input, Failure == S.Failure, S : Subscriber
    }
}
通过 Future,可以将任何代码适配 Combine 框架,包括现有的同步,异步代码。
let trickNamePublisher = NotificationCenter.Publisher(center: .default, name: .newTrickDownloaded)
    .map{ notification -> Data in
        let userInfo = notification.userInfo
        return userInfo?["data"] as! Data
    }
    .flatMap{ data in
        return Publishers.Future { promise in
            DispatchQueue.main.asyncAfter(deadline: .now() + 0.3) {
                promise(.success(data))
            }
        }
    }
AnyPublisher
当我们使用 Combine 框架里的方法来生成发布者时,发布者的实际类型可能千奇百怪,对外暴露或者想进行复用时,内部的实际类型其实是不需要关心的,只需要关心 Output 和错误的类型就可以了。这个时候,通用类型 AnyPublisher 就登场了。Combine 提供了 eraseToAnyPublisher 方法,可以将各种各样的发布者统一转换为 AnyPublisher。同样的,还有 eraseToAnySubscriber,eraseToAnySubject 。
public struct AnyPublisher<Output, Failure> where Failure : Error {
    @inlinable public init<P>(_ publisher: P) where Output == P.Output, Failure == P.Failure, P : Publisher
    @inlinable public init(_ subscribe: @escaping (AnySubscriber<Output, Failure>) -> Void)
}
建议在最后将发布者转换为 AnyPublisher。
let trickNamePublisher = NotificationCenter.Publisher(center: .default, name: .newTrickDownloaded)
    .map{ notification -> Data in
        let userInfo = notification.userInfo
        return userInfo?["data"] as! Data
    }
    .eraseToAnyPublisher()
总结
发布者有以下的特点
- 用操作符生成每一小部分的发布者,最后组成事件流
- 操作符描述了从当前发布者生成的新发布者
- 值和错误是强类型的,在整个过程中
- 既可以异步产生值,也可以同步产生值
- 可以添加其兼容的订阅者
订阅者(Subscriber)
规则
- 只会接收到一次订阅通知
- 发布者可以产生 0 或多个值,所以订阅者可能收到 0 或多个值
- 最多只会接收到一个完成通知
Assign
这个订阅者提供通过 Key Path 订阅某个类类型对象属性变化的能力。
let trickNamePublisher = NotificationCenter.Publisher(center: .default, name: .newTrickDownloaded)
    .map{ notification -> Data in
        let userInfo = notification.userInfo
        return userInfo?["data"] as! Data
    }
    .flatMap{ data in
        return Publishers.Just(data)
            .decode(type: MagicTrick.self, decoder: JSONDecoder())
            .catch { _ in
                return Publishers.Just(MagicTrick())
            }
    }
    .publisher(for: \.name)

var test = MagicTrick()
trickNamePublisher.assign(to: \.name, on: test)
当接受到通知后,发布者就会改变 test 的 name 属性。
Sinks
这个订阅者提供了一个简单的从上游订阅数据的能力,错误类型采用上游的错误类型,使用一个闭包执行接收到值的行为,非常简单方便。
let trickNamePublisher = ...// 上个例子里的发布者

trickNamePublisher.sink { value in
    print("name is \(value)")
}
Subject
有一些事物,它们同时承担着发布者和订阅者的角色,既可以发送消息,也可以接收消息。在 Combine 中,这类订阅者就是 Subject。它虽然是订阅者,却也有和发布者类似的发送值的能力。这可以让我们在数据流的过程中插入值给下游的订阅者。
Subject 是一个协议,定义了给下游的订阅者发送值的的方法:
public protocol Subject : AnyObject, Publisher {
    func send(_ value: Self.Output)
    func send(completion: Subscribers.Completion<Self.Failure>)
}
而发布者也有对应的方法可以添加 Subject。
extension Publisher {
    public func subscribe<S>(_ subject: S) -> AnyCancellable where S : Subject, Self.Failure == S.Failure, Self.Output == S.Output
}
Subject 有下面两种:
Passthrough
发送订阅操作发生后,上游发送的值才会发送给下游订阅者。
let trickNamePublisher = ...// 上个例子里的发布者

let magicWordsSubject = PassthroughSubject<String,Never>()

trickNamePublisher.subscribe(magicWordsSubject)

magicWordsSubject.sink { value in
    print("name is \(value)")
}

magicWordsSubject.send("magic!")
CurrentValue
在订阅时,会将上游发布者发送的值中最新一个发送给下游订阅者,之后和正常一样进行发送值。
SwiftUI 中的发布者
在今年发布的重磅框架 SwiftUI 中,底层的数据流也运用了 Combine 框架。SwiftUI 内部已经拥有订阅者,只需要开发者提供发布者用于描述你的数据在何时,如何变化,剩下的更新操作都有框架内部完成。
BindableObject
对自定义的数据类型适配,只需要遵循 BindableObject 协议,提供发布者具体类型,并提供一个 didChange 的发布者实例用于在数据改变时能发送消息。
public protocol BindableObject : AnyObject, DynamicViewProperty, Identifiable, _BindableObjectViewProperty {
    associatedtype PublisherType : Publisher where Self.PublisherType.Failure == Never
    var didChange: Self.PublisherType { get }
}
举个例子,当 model 被 set 的时候,就会触发属性观察的 didSet,里面调用了 didChange 发布者进行通知的发送(没有发送具体的值),这个通知会触发 SwiftUI 内部的 UI 更新流程(类似 React 的 setState),更多具体细节可以在 Session 226 - Data Flow Through SwiftUI 中找到。
class WizardModel: BindableObject {
    var trick: MagicTrick? { didSet { didChange.send() }  }
    let didChange = PassthroughSubject<Void, Never>()
}

struct TrickView: View {
    @ObjectBinding var model: WizardModel
    var body: some View {
        Text(model.trick?.name ?? "")
    }
}
Cancellation
Cancellation 是内置在 Combine 里的一个协议:
public protocol Cancellable {
    func cancel()
}
里面只定义了一个 cancel 方法,用于提前结束结束订阅。Combine 里还定义了 AnyCancellable,这个类会在 deinit 时自动执行 cancel 方法。
final public class AnyCancellable : Cancellable {
    public init(_ cancel: @escaping () -> Void)
    public init<C>(_ canceller: C) where C : Cancellable
    final public func cancel()
}
复杂的例子
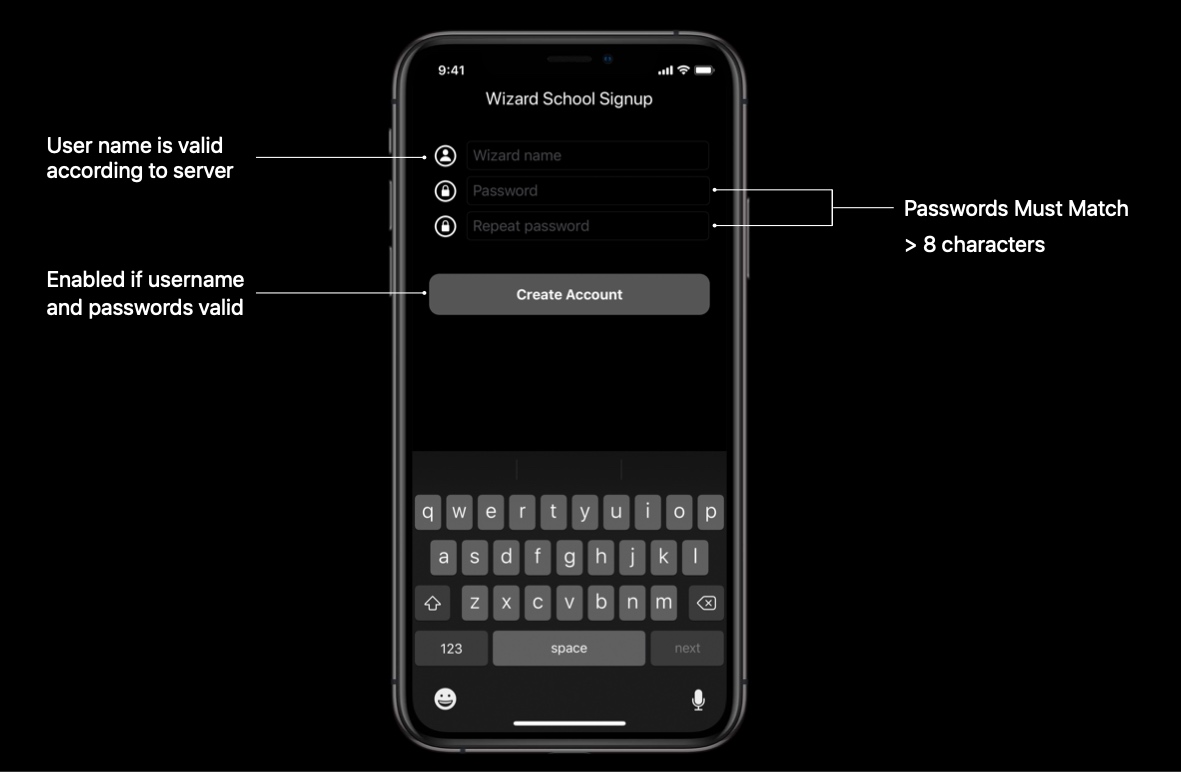
假设有一个登录界面,里面需要输入用户名和密码,用户名需要经过服务器的检验,密码需要超过 8 个字符且需要和重复密码匹配。用户名和密码都符合要求时,下面的按钮状态将变成可点击状态。用 Combine 来完成这个例子吧!
// 用注解给属性添加发布者
@Published var password: String = ""
@Published var passwordAgain: String = ""

var valiatedPassword: AnyPublisher<String?, Never> {
  	// 合并密码和重复密码发布者,当其中一个产生值时检查密码是否符合要求
    return Publishers.CombineLatest($password, $passwordAgain) { password, passwordAgain in
        guard password == passwordAgain, password.count > 8 else {
            return nil
        }
        return password
    }
  	// 可以判断密码是不是太简单,比如 12345678
    .map { $0 == "password1" ? nil : $0}
  	// 转换为 AnyPublisher
    .eraseToAnyPublisher()
}

@Published var username: String = ""

// 提交给服务器判断用户名是否合法,网络请求等异步行为
func usernameAvailable(_ username:String, completion:((Bool) -> ())) {
   // ...
}

var validatedUsername: AnyPublisher<String?, Never> {
  	// 限制产生值的频率
    return $username.debounce(for: 0.5, scheduler: RunLoop.main)
  			// 去重,重复的不需要再次检验
        .removeDuplicates()
  			// 转换成新的发布者
        .flatMap { username in
           	// 使用 Future 适配已有的异步操作
            return Publishers.Future { promise in
                usernameAvailable(username) { available in
                    promise(.success(available ? username : nil))
                }
            }
        }
  			// 转换为 AnyPublisher
        .eraseToAnyPublisher()
}

var validatedCredentials: AnyPublisher<(String,String)?,Never> {
  	// 合并检验密码和检验用户名发布者,均有合理值时发送
    return Publishers.CombineLatest(validatedUsername, valiatedPassword) { username, password -> (String, String)? in
        guard let a = username, let b = password else {
            return nil
        }
        return (a, b)
    }
    .eraseToAnyPublisher()
}

var signupButton:UIButton!

// 检查是否有合理的值
var signupButtonStream = validatedCredentials.map{ $0 != nil }
										// 指定接收的调度者
                                    .receive(on: RunLoop.main)
										// 使用 KVO Assign 订阅者改变 UI 状态
                                    .assign(to: \.isEnabled, on: signupButton)
总的来说,就是使用组合,将各种小的功能组合成完整的数据流。
总结
Apple 官方对接入 Combine 给了以下一些建议:
- 使用多个自定义发布者将小部分的事情组合起来
- 逐步适配,一点点改造
- 在属性中优先使用 @Published 注解
- 使用 Future 将多个异步回调或者发布者组合起来
Use Combine Toady
Combine 清晰,易用,还有着苹果爸爸承诺对 Cocoa 框架 buff 加持,为什么不马上试试呢?
延伸阅读
Apple 官方异步编程框架:Swift Combine 简介
Combine 的非官方实现
CombineFeedback
WWDC 19 专栏文章目录
Copyright © 2015 Powered by MWeb, 豫ICP备09002885号-5