Apple 官方异步编程框架:Swift Combine 简介
WWDC19 Session 722 - Introducing Combine
引言
在现代 GUI 编程中,开发者会处理大量事件(包括网络,屏幕输入,系统通知等),根据事件去让界面变化。而对异步事件的处理,会让代码和状态变得复杂。而现有的 Cocoa 框架中,异步编程的接口主要有以下这几种:
- Target/Action
- NotificationCenter
- KVO
- Callbacks
而在实际情况中,由于不同的第三方库,系统框架,业务代码可能采用不一样的方式处理异步事件,会导致对事件的处理分散且存在差异。苹果为了帮助开发者简化异步编程,发布了 Swift 的异步编程框架 - Combine。
What is Combine
“A unified, declarative API for processing values over time”
统一、声明式、为处理变化的值而生的 API。
Combine 作用是将异步事件通过组合事件处理操作符进行自定义处理。
关注如何处理变化的值,正是响应式编程所考虑的。也可以说,Combine 是一个苹果官方的 Swift 响应式框架。
响应式编程(Reactive Programming):面向异步数据流的编程思想。业界比较知名的响应式框架是 ReactiveX 系列。Rx 也有 Swift 版本的 RxSwift。
Combine 特性
由于 Combine 是一个 Swift 编写的框架,所以 Combine 可以受益于 Swift 的一些语言特性。
泛型支持
Combine 享受 Swift 泛型带来的便利性。泛型可以帮助开发者提取更多模板代码,这也意味着我们可以让异步操作的代码支持泛型,然后适配到各个种类的异步操作中。
类型安全
同样受惠于 Swift,可以让编译器和 Runtime 帮助我们检查类型安全问题。
组合优先
Combine 的主要设计理念,使用组合。组合的优点是可以将核心设计得简单又便于理解,但当放在一起使用时,能产生 1 + 1 > 2 的效果。
请求驱动
请求驱动(Request Driven):基于请求和响应的设计思想,消费者向生产者请求某个事务的变化,当变化时生产者给消费者对应的响应。
事件驱动(Event Driven):基于事件通知的设计思想。在事务发生变化时,生产者将通知提交给事件管道进行分发,而不关心谁去消费事件。消费者需要到事件管道中订阅关心的通知。
Combine 是基于请求和响应的设计思想的,这允许你更精准的控制 App 的内存使用和性能。(这一块苹果没有详细解释)
Combine 核心
Combine 框架有三个核心概念
- 发布者(Publisher)
- 订阅者(Subscriber)
- 操作符(Operator)
发布者(Publisher)
发布者在 Combine 框架中是一个协议:
public protocol Publisher {

    /// 产生的值的类型
    associatedtype Output

    /// 失败的错误类型
    associatedtype Failure : Error

    /// 实现这个方法,将调用 `subscribe(_:)` 订阅的订阅者附加到发布者上
    func receive<S>(subscriber: S) where S : Subscriber, Self.Failure == S.Failure, Self.Output == S.Input
}

extension Publisher {
    /// 将订阅者附加到发布者上,供外部调用,不直接使用 `receive(_:)` 方法
    public func subscribe<S>(_ subscriber: S) where S : Subscriber, Self.Failure == S.Failure, Self.Output == S.Input
}
发布者定义了如何描述产生的值和错误,通过定义关联类型 Output 和 Failure 的实际类型(当发布者不产生错误时,可以使用 Never)。由于发布者不需要实际产生值和错误,所以我们可以用值类型来定义它,也就是 Swift 里的结构体。发布者提供让订阅者注册的能力,通过实现 receive 方法。
发布者可以适配到现有的很多异步操作接口中。
官方 Cocoa 框架中 NotificationCenter 接口适配发布者的例子( 截止至 beta1 版本的 Xcode, 此 API 尚未开放 beta2 版本已支持):
extension NotificationCenter {
        struct Publisher: Combine.Publisher {
                typealias Output = Notification
                typealias Failure = Never
                init(center: NotificationCenter, name: Notification.Name, object: Any? = nil)
        }
}
订阅者(Subscriber)
和发布者配对的,就是订阅者。同样的,在 Combine 框架中是一个协议:
public protocol Subscriber : CustomCombineIdentifierConvertible {

    /// 接受到的值的类型
    associatedtype Input

    /// 可能接受到的错误的类型
    associatedtype Failure : Error

    /// 告诉订阅者,它在发布者上被成功订阅,可以请求值了
    func receive(subscription: Subscription)

    /// 告诉订阅者,发布者产生值了
    func receive(_ input: Self.Input) -> Subscribers.Demand

    /// 告诉订阅者,发布者已经终止产生值了,不管是正常情况还是由于错误情况
    func receive(completion: Subscribers.Completion<Self.Failure>)
}
订阅者定义了如何描述接受的值和错误,类似的,通过定义关联类型 Input 和 Failure。由于订阅者在接受到值之后,经常会影响和修改某些状态,所以我们使用引用类型来定义它,也就是 Swift 里的类类型。
订阅者有三个核心方法:
- 接收到订阅的消息
- 接收到产生的值的消息
- 接收到产生已经终止的消息
订阅消息(Subsciption):描述如何控制发布者到订阅者的数据流动,用于表达发布者和订阅者之间的连接。
官方的提供 Assign 的订阅者例子(可以在文档中找到更详细的定义):
extension Subscribers {

    final public class Assign<Root, Input> : Subscriber, Cancellable {

        public typealias Failure = Never
        public init(object: Root, keyPath: ReferenceWritableKeyPath<Root, Input>)
			//...
    }
}
运算符(Operator)
当有了发布者和订阅者后,它们之间是怎么配合起来运作的呢,如下图所示:
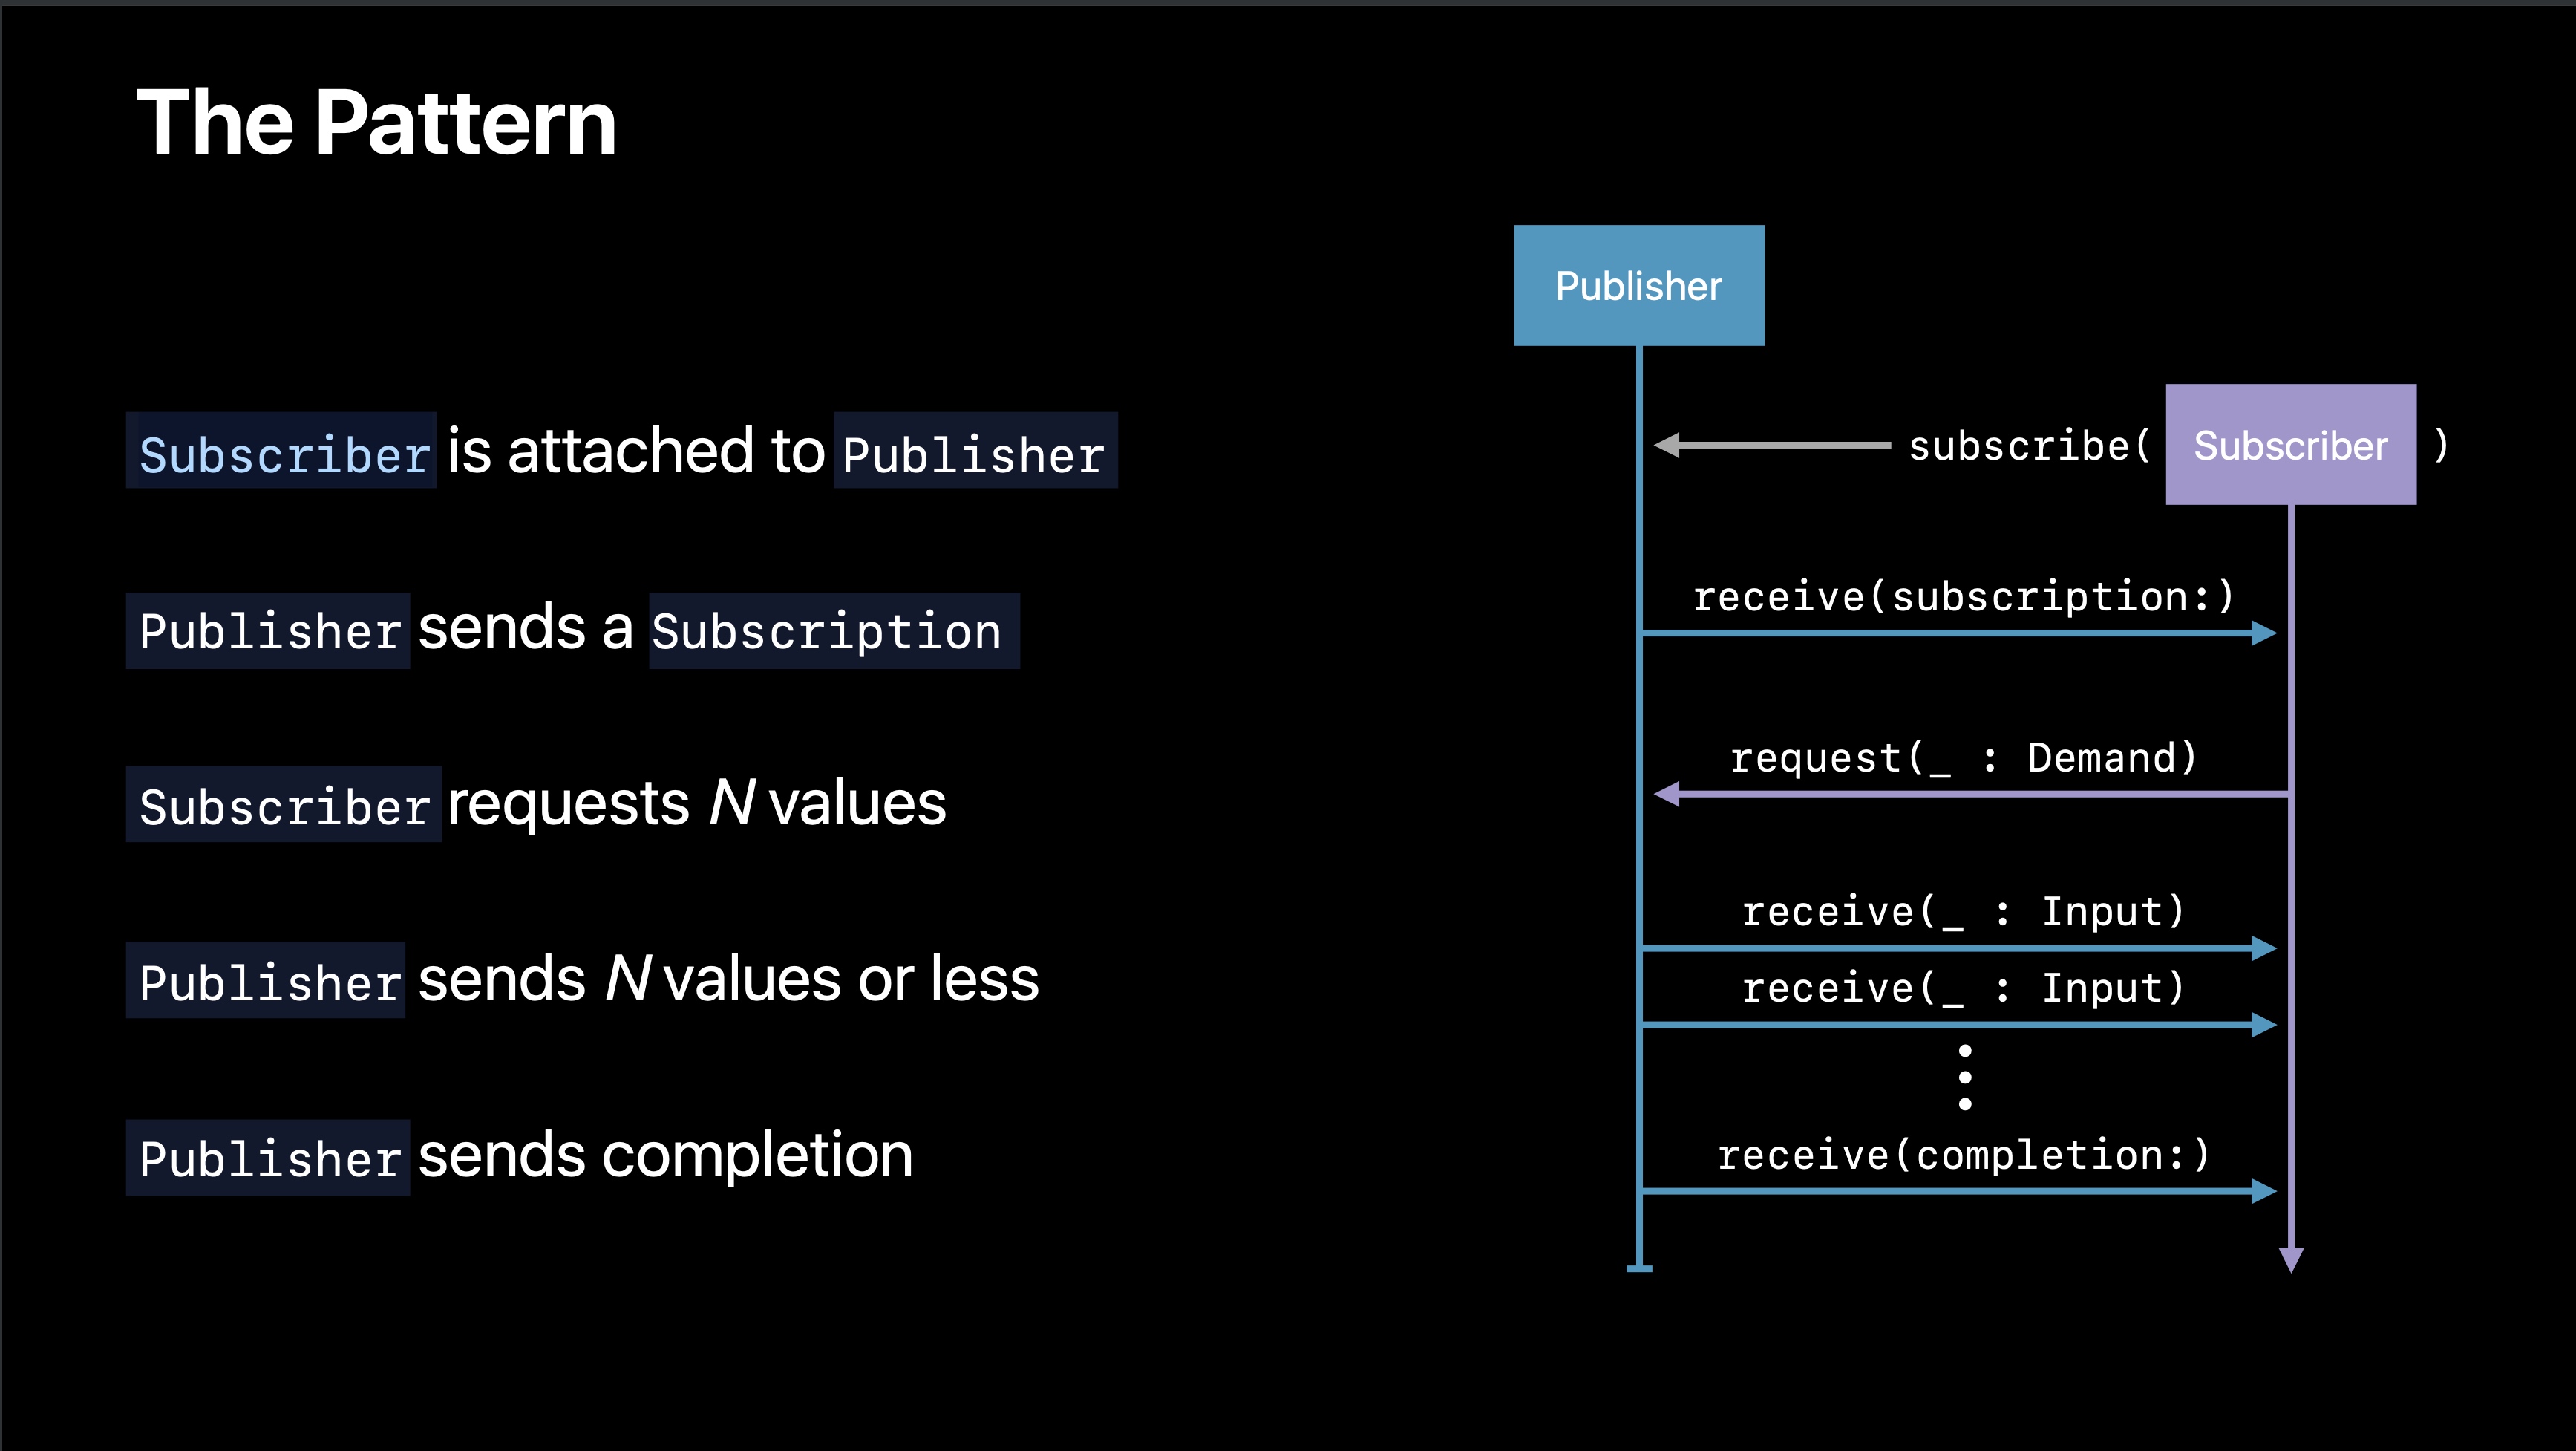
- 首先订阅者通过 subsribe 方法附加到发布者上
- 发布者发送一个订阅消息给订阅者,订阅者通过 receive 方法响应
- 发布者通过定义在订阅消息中的 request 方法发送请求需要的值
- 当请求的值产生时,发布者将值发送给订阅者,订阅者通过 receive 方法收到响应
- 最后当发布者终止产生值时,发送完成消息给订阅者,订阅者通过 receive 方法收到响应
看起来一切都配合的很美好,好像这两个概念已经可以实现我们的功能了。当你开开心心敲下这个例子的时候:
class Foo {
    var name:String
    init(name:String) {
        self.name = name
    }
}

let object = Foo(name:"Test")
let publisher = NotificationCenter.Publisher(center: .default, name: "Send", object: object)
let subsciber = Subscribers.Assign(object: object, keyPath: \.name)

publisher.subscribe(subsciber)
你会发现编译不过,因为 NotificationCenter 发布者产生的值类型是 Notification,而订阅者需要接受 name 的 String 类型。这时候,操作符就应运而生了。
操作符是一个桥梁,定义一些便捷的操作,让发布者和订阅者能搭配使用,而这样就可以让发布者和订阅者的耦合程度降低,通用程度变高。而复用的发布者和订阅者可以通过一到多个操作符进行适配。
操作符定义如何进行值的转换。操作符是遵循 Publisher 协议的,从上游的发布者订阅值,生成新的发布者,处理后并发送给下游的订阅者。
官方提供的 Map 操作符的例子:
extension Publishers {
    public struct Map<Upstream, Output> : Publisher where Upstream : Publisher {
        public typealias Failure = Upstream.Failure
        public let upstream: Upstream
        public let transform: (Upstream.Output) -> Output
        public func receive<S>(subscriber: S) where Output == S.Input, S : Subscriber, Upstream.Failure == S.Failure
    }
}
但在一般使用时,我们不直接生成操作符发布者,而是使用官方提供的声明式操作符 API。
比如 Map 操作符的方法如下:
extension Publishers.Map {
    public func map<T>(_ transform: @escaping (Output) -> T) -> Publishers.Map<Upstream, T>
}
Combine 框架中,有以下几类声明式操作符 API:
1. 函数式转换
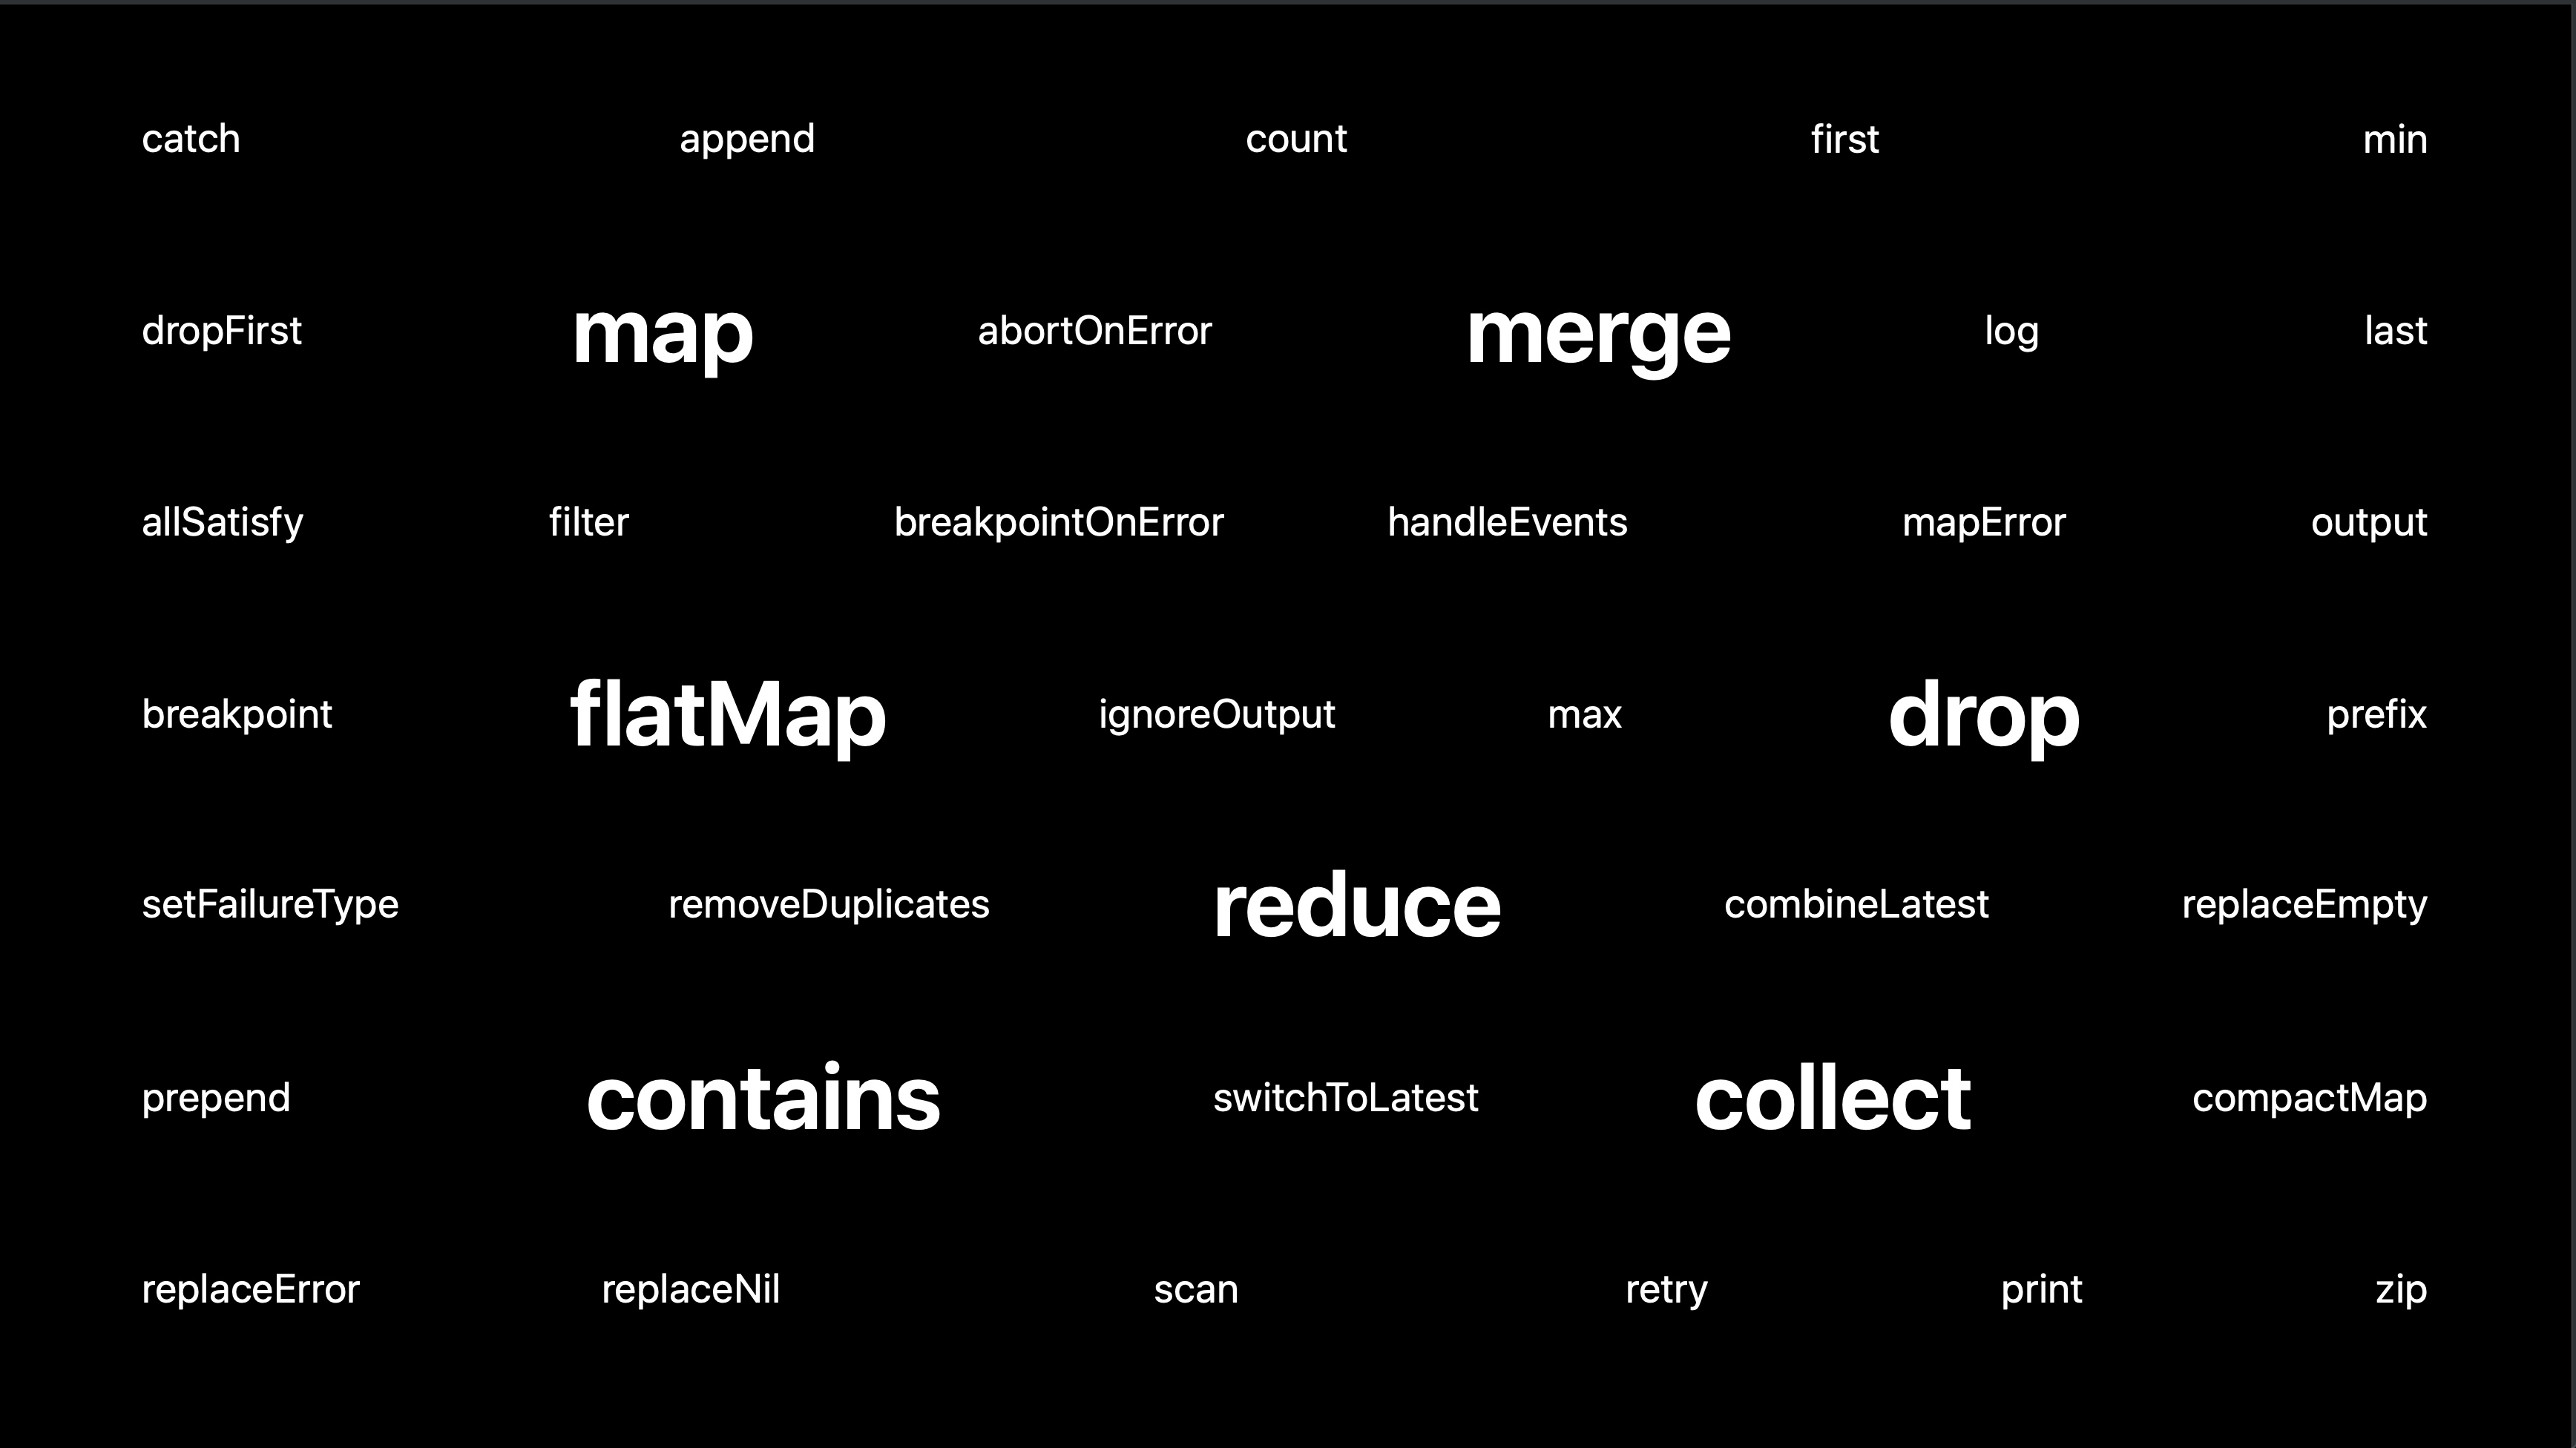
比如 map、filter、reduce 等函数式思想里的常见的高阶函数的操作符。
2. 列表操作
比如 first、drop、append 等在产生值序列的中使用便捷方法的操作符。
3. 错误处理
比如 catch,retry 等进行错处理的操作符。
4. 线程/队列行为
比如 subscribeOn,receiveOn 等对订阅和接受时线程进行指定的操作符。
5. 调度和时间处理
比如 delay,debounce(去抖动),throttle(节流) 等操作符。
Combine 设计理念 - 组合优先
Combine 的设计理念就是优先是使用组合。
如果把 Combine 的思想对应到同步编程里面的概念,就是这样下面的图。
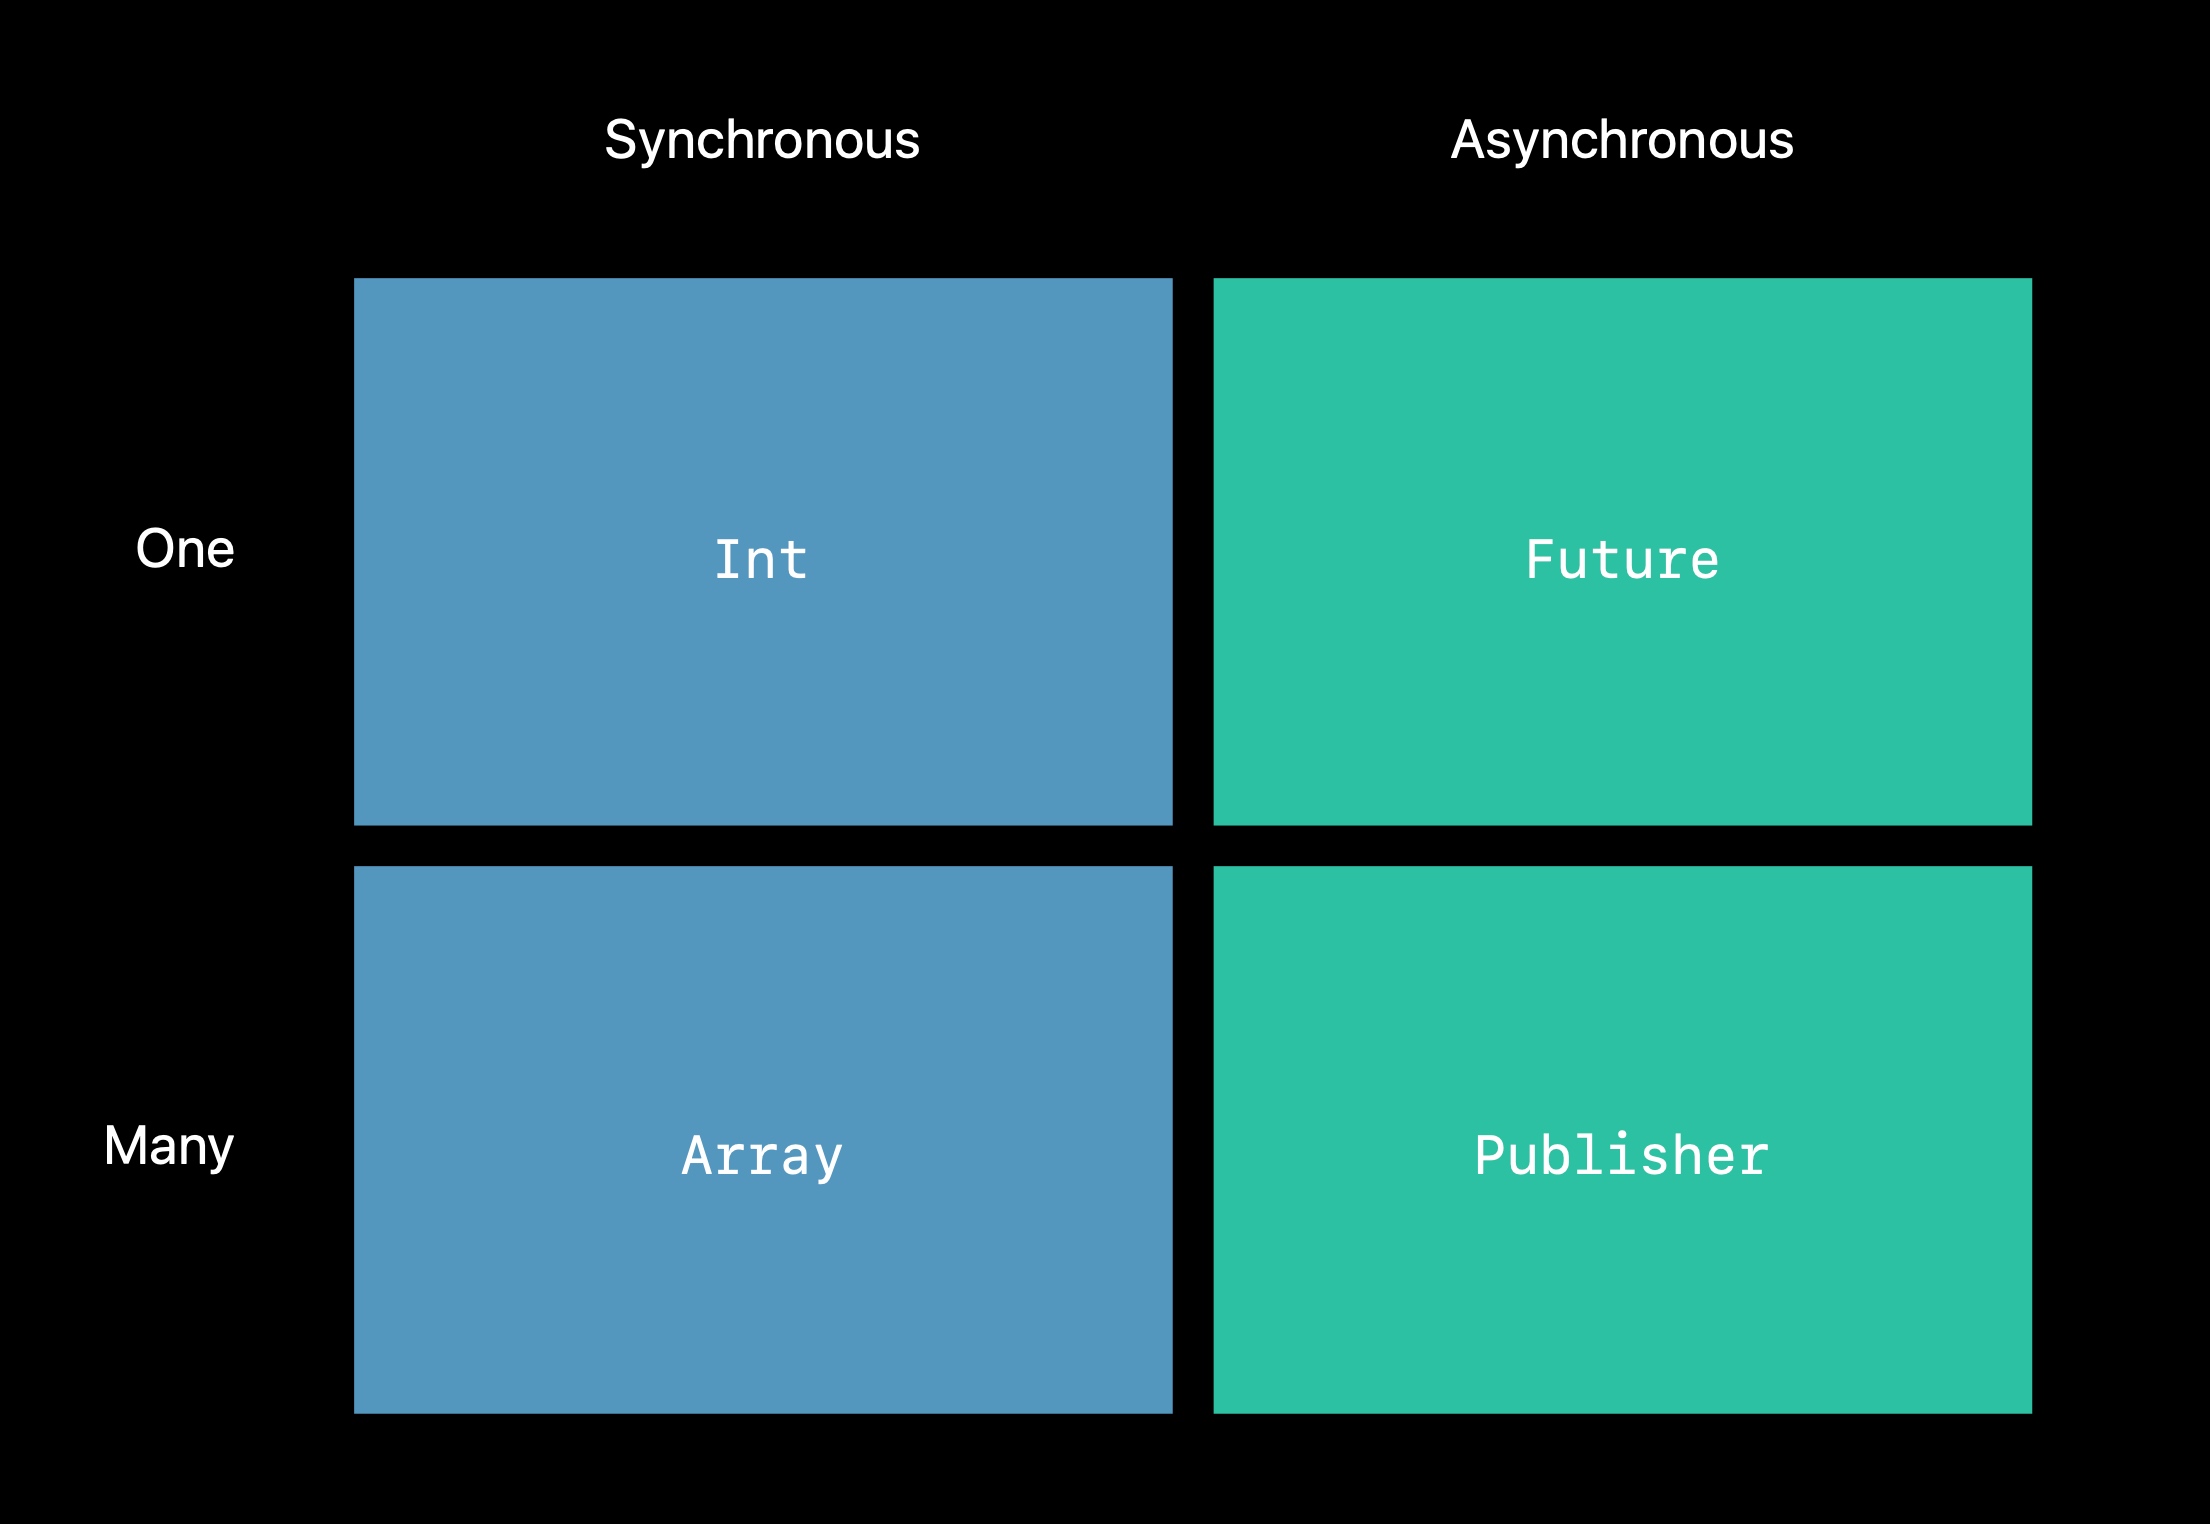
也就是发布者可以使用的操作符,大部分和 Foundation 框架里 Collection 类型的操作符相似,举个例子:我们知道可以对集合类型进行 filter 操作,那么 Combine 操作符里也有对应的 filter 方法。通过方法链(Method Chaning),组合大量的操作符,可以让异步操作更加统一,代码更加整洁。
组合多个发布者
有时候,我们希望将一些异步操作汇合,并统一处理响应。组合多个发布者有两种方式:Zip 和 CombineLastest。
Zip
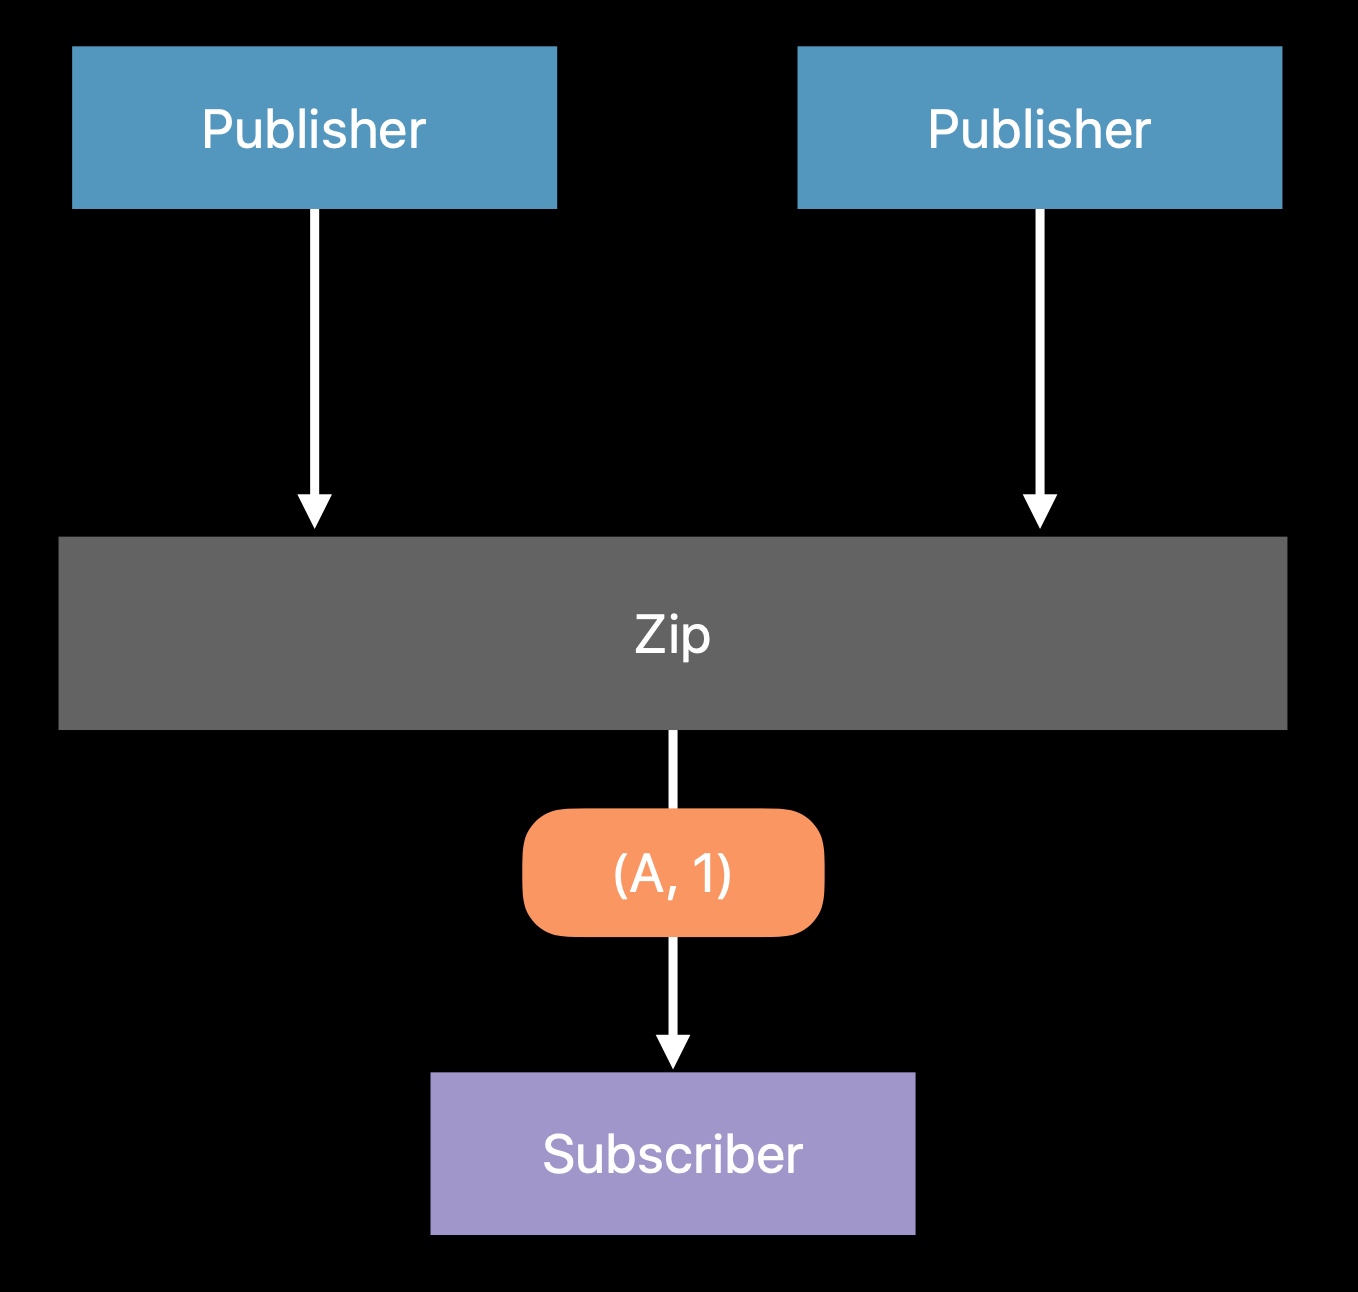
Zip 在 Combine 框架里面是一个结构体(同时还有 Zip3,Zip4,用于更多数量的组合)
extension Publishers {
    public struct Zip<A, B> : Publisher where A : Publisher, B : Publisher, A.Failure == B.Failure {
        public typealias Output = (A.Output, B.Output)
        public typealias Failure = A.Failure
        public let a: A
        public let b: B
        public init(_ a: A, _ b: B)
        public func receive<S>(subscriber: S) where S : Subscriber, B.Failure == S.Failure, S.Input == (A.Output, B.Output)
    }
}
Zip 可以通过传入两个发布者进行初始化,要求多个组合的发布者的的错误类型一致,而输出是多个组合的发布者合并起来的元组。Zip 的意思是,当组合的每一个发布者都产生值的时候,才会将值合并成元组发送给订阅者。
Combine Lastest
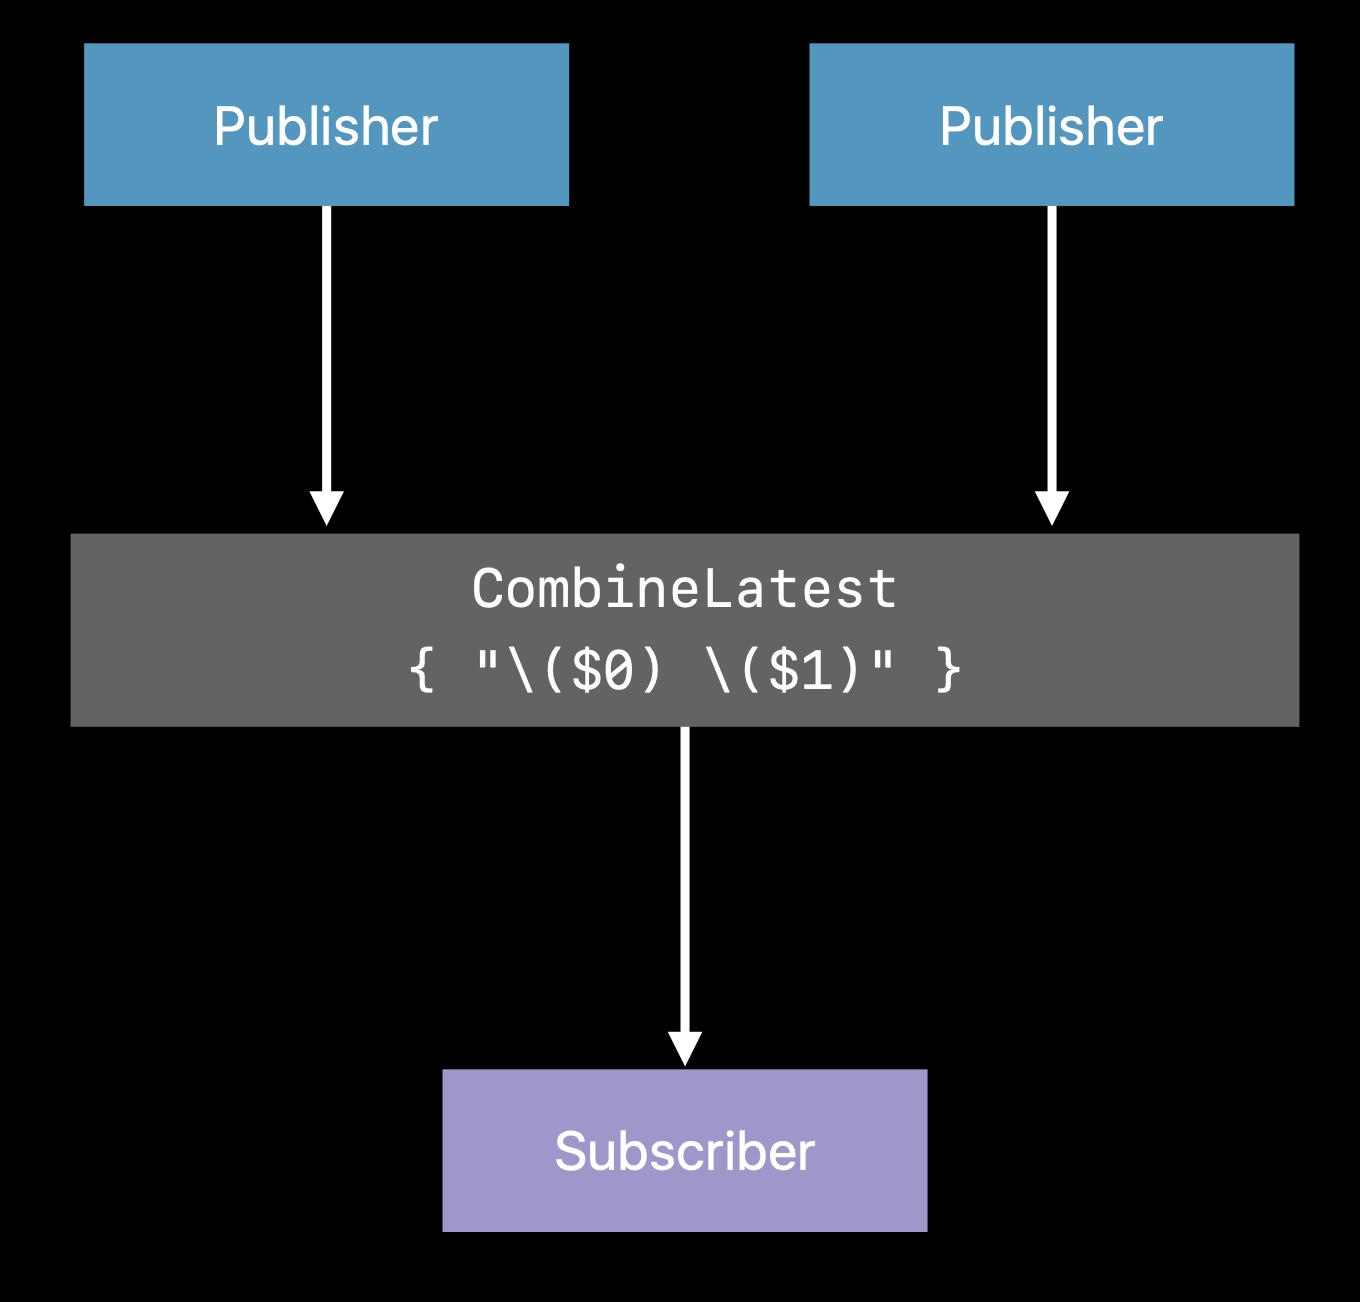
类似的是,CombineLastest 在 Combine 框架里面也是一个结构体(同理还有 CombineLatest3,CombineLatest4,用于更多数量的组合)
extension Publishers {
    public struct CombineLatest<A, B, Output> : Publisher where A : Publisher, B : Publisher, A.Failure == B.Failure {
        public typealias Failure = A.Failure
        public let a: A
        public let b: B
        public let transform: (A.Output, B.Output) -> Output
        public init(_ a: A, _ b: B, transform: @escaping (A.Output, B.Output) -> Output)
        public func receive<S>(subscriber: S) where Output == S.Input, S : Subscriber, B.Failure == S.Failure
    }
}
CombineLatest 使用两个发布者加上一个 transform 的转换闭包(在闭包中将两个产生的值处理并返回)进行初始化(截止目前 beta1 版本的 Xcode,苹果还没将声明公开 init 方法,预计可能还会调整,这一部分来自官方幻灯片中的例子,有待订正beta 2 版本已支持),同样也要求多个组合发布者的错误类型一致,输出是 transform 闭包里的 Output 类型。CombineLastest 的意思是,当多个发布者中任意一个发布者产生值时,都会执行 transform 闭包的操作并将结果发送给订阅者。
总结
Combine 作为官方出品的响应式框架,无疑是令人惊喜的。整个框架的思想虽然现有的响应式框架(如 RxSwift)差不多,但无论是接口上隐藏掉序列,冷热信号等理解难度较大的概念,还是更方便的事件设计,清晰简洁的命名规范,都觉得 Apple 很用心的在打磨这个框架。同时,最具杀伤力的的是,Apple 可以让他和 Cocoa 框架更紧密的结合,打造出类似 UIKit+Combine,Foundation+Combine 的官方支持,这也意味着 Combine 有望成为类似 JavaScript 里面 Promise 这样的规范特性。如果你错过了 ReactiveCocoa,也错过了 RxSwift,也没使用过响应式编程,那么我强烈建议你了解一下今年的 Combine 框架。而剩下最大的问题,是国内什么时候能够 iOS 13 Only 和迁移到 Swift 了。
延伸阅读
Apple 官方异步编程框架:Swift Combine 应用
WWDC19 Session 721 - Combine in Practice
引言
Combine 是 WWDC2019 推出的异步编程框架,在上篇 文章 中,介绍了 Combine 的基本概念。在这篇文章中,着重介绍一些 Combine 的实际应用。
发布者(Publisher)
假设有一个 MagicTrick 类型的 JSON 数据,这个数据的来源是 NotificationCenter,数据会以 Data 的形式放在 Notification 的 UserInfo 中。让我们使用 Combine 的发布者来改造这个数据的发送。
extension Notification.Name{
    static var newTrickDownloaded:Notification.Name {
        return Notification.Name("aa")
    }
}

class MagicTrick:Codable {
    var name:String = ""
}

let trickNamePublisher = NotificationCenter.Publisher(center: .default, name: .newTrickDownloaded)
由于 NotificationCenter 发布者的 Output 类型是 Notification,需要类型转换。
map
这个操作符可以改变发布者的类型。
let trickNamePublisher = NotificationCenter.Publisher(center: .default, name: .newTrickDownloaded)
    .map{ notification -> Data in
        let userInfo = notification.userInfo
        return userInfo?["data"] as! Data
    }
这时候 Output 变成了 Data 类型,还不能实际使用。要转换成实际类型,可以用 Codable + JSONDecoder 进行解析,解析时可能会抛出错误,就需要使用 try 关键字。
tryMap
这个操作符允许在转换值的闭包内抛出异常。
let trickNamePublisher = NotificationCenter.Publisher(center: .default, name: .newTrickDownloaded)
    .map{ notification -> Data in
        let userInfo = notification.userInfo
        return userInfo?["data"] as! Data
    }.tryMap { data -> MagicTrick in
        let decoder = JSONDecoder()
        return try decoder.decode(MagicTrick.self, from: data)
    }
decode
而 Combine 为 Codable,还提供了便捷的 decode 方法。这个操作符允许传入 Decodable 类型和解码器,将解码器支持的上游数据类型解码,发送给下游订阅者。
let trickNamePublisher = NotificationCenter.Publisher(center: .default, name: .newTrickDownloaded)
    .map{ notification -> Data in
        let userInfo = notification.userInfo
        return userInfo?["data"] as! Data
    }
    .decode(type: MagicTrick.self, decoder: JSONDecoder())
接下来应该处理解码过程出现的错误了,因为每一个发布者需要描述了他们产生或者允许的错误类型,所以 Combine 中提供了各种各样的错误处理的操作符,对错误做出反应或是从错误中恢复并做一些兜底处理。
assertNoFailure
这个操作符可以在你确认上游发布者不会产生错误时使用,会将错误类型转为 Never,但当错误发生时,将会崩溃。
let trickNamePublisher = NotificationCenter.Publisher(center: .default, name: .newTrickDownloaded)
    .map{ notification -> Data in
        let userInfo = notification.userInfo
        return userInfo?["data"] as! Data
    }
    .decode(type: MagicTrick.self, decoder: JSONDecoder())
    .assertNoFailure()
catch
这个操作符允许在上游发布者发生错误时,提供一个默认的发布者替换上游的发布者,发送值给下游的订阅者,以便做默认兜底方案。
let trickNamePublisher = NotificationCenter.Publisher(center: .default, name: .newTrickDownloaded)
    .map{ notification -> Data in
        let userInfo = notification.userInfo
        return userInfo?["data"] as! Data
    }
    .decode(type: MagicTrick.self, decoder: JSONDecoder())
    .catch{ _ in
        return Publishers.Just(MagicTrick())
    }
Just:是一个很简单的发布者,用需要产生的值进行初始化,就会将该值发送一次给下游订阅者并结束。
flatMap
上面的例子在错误发生后,生成一个 Just 的发布者作为上游发布者的替代品,但 Just 发布者只会产生一个值就结束了,整个事件流就会结束。但我们需要的是当错误发生时,catch 只处理这次错误,但不替换上游的发布者,也就是上游可以继续产生值。为了不影响上游,我们需要一个新的发布者,能将上游的值用新的发布者发送给下游,catch 只影响这个新的发布者,这个时候就需要 flatMap 了。
Combine 里的 flatMap 和函数式编程高阶函数里的 flatMap 一样,可以将包装的类型进行转换,在这里包装就是发布者,类型就是发布者的 Input,也就是说在 flatMap 里面可以返回一个新 Input 类型的发布者。
let trickNamePublisher = NotificationCenter.Publisher(center: .default, name: .newTrickDownloaded)
    .map{ notification -> Data in
        let userInfo = notification.userInfo
        return userInfo?["data"] as! Data
    }
    .flatMap{ data in
        return Publishers.Just(data)
            .decode(type: MagicTrick.self, decoder: JSONDecoder())
            .catch{ _ in
                return Publishers.Just(MagicTrick())
        }
    }
上面例子中,每次 NotificationCenter 的产生的值都在 flatMap 里被生成的 Just 的发布者并发送,当错误发生时,catch 只会替换这个 Just 的发布者,而不会影响 flatMap 上游的发布者,这样就能保证 catch 是对每次错误进行处理的了。
valueForKey
当只需要发送上游发布者的某一个属性的值时,可以使用 ValueForKey 操作符,它允许使用 Key Path 指定上游的某一个属性。这个操作符的声明式 API 如下(还有对应多个 Key Path 的):
public func publisher<T>(for keyPath: KeyPath<Self.Output, T>) -> Publishers.ValueForKey<Self, T>
使用例子如下:
let trickNamePublisher = NotificationCenter.Publisher(center: .default, name: .newTrickDownloaded)
    .map{ notification -> Data in
        let userInfo = notification.userInfo
        return userInfo?["data"] as! Data
    }
    .flatMap{ data in
        return Publishers.Just(data)
            .decode(type: MagicTrick.self, decoder: JSONDecoder())
            .catch{ _ in
                return Publishers.Just(MagicTrick())
        }
    }
		.publisher(for: \.name)
当对值的处理完后,我们需要考虑需不需要对发送和接收的调度进行特殊处理。
debounce
这个操作符作用是去抖动,也就是只关心在某一段时间间隔里最后的消息结果,比如间隔为 1 秒,那么这一秒内多次从上游接受的值只有最后一个会发送给下游。
let trickNamePublisher = NotificationCenter.Publisher(center: .default, name: .newTrickDownloaded)
    .map{ notification -> Data in
        let userInfo = notification.userInfo
        return userInfo?["data"] as! Data
    }
    .flatMap{ data in
        return Publishers.Just(data)
            .decode(type: MagicTrick.self, decoder: JSONDecoder())
            .catch{ _ in
                return Publishers.Just(MagicTrick())
        }
    }
    .debounce(for: 0.5, scheduler: RunLoop.main)
receive(on:)
这个操作符作用是指定订阅者使用哪个调度者里接收值,同理还有 subscibe(on:) 用于指定发布者使用哪个调度者发送值。
调度者(Scheduler):定义了什么时候和在哪个上下文中执行,在 Cocoa 框架中,RunLoop 和 DispatchQueue 已经适配了调度者协议,可以很方便的使用
let trickNamePublisher = NotificationCenter.Publisher(center: .default, name: .newTrickDownloaded)
    .map{ notification -> Data in
        let userInfo = notification.userInfo
        return userInfo?["data"] as! Data
    }
    .flatMap{ data in
        return Publishers.Just(data)
            .decode(type: MagicTrick.self, decoder: JSONDecoder())
            .catch{ _ in
                return Publishers.Just(MagicTrick())
        }
    }
    .receive(on: DispatchQueue.main)
@Published
这个注解是一个属性包装器(Property Wrapper),可以方便地为任何属性生成其对应类型的发布者。这个发布者会在属性值发生变化时发送消息。
属性包装器(Property Wrapper):Swift 5.1 的新特性,可以抽象对属性 Set/Get 方法的通用逻辑。可以在提案中了解更多。
@propertyDelegate public struct Published<Value> : Publisher {
    public typealias Output = Value
    public typealias Failure = Never
    public init(initialValue: Value)
    public func receive<S>(subscriber: S) where Value == S.Input, S : Subscriber, S.Failure == Published<Value>.Failure
    public var value: Value
}
有了这个特性,对已有的代码进行改造接入 Combine 框架就更方便了(截止至 beta2 版本的 Xcode,$ 符号还不能使用):
@Published var foo:String = "test"

let subscription = $foo.sink {
    print("foo is \($0)")
}
这个关键字其实印证了一点,Combine 和 Swift 语言生态的结合其实是很紧密的,也许将来为了 SwiftUI 和 Combine 这种重量级框架更方便使用,Apple 还会接纳更多社区优秀的提案。
Future
Future 是单次执行的发布者,在闭包中主动产生一个值,之后就结束(和 Javascript 的 Promise,Java 的 Future 类似的设计理念)。初始化闭包会返回一个 excutor 闭包,完成同步/异步操作候,通过主动调用 excutor 闭包(Promise 的 fulfill)将值发送给下游,而在 Combine 框架里这个闭包类型的是 Promise 类型,Promise 类型其实是 (Result<Output, Failure>) -> Void 的别名。
extension Publishers {
    final public class Future<Output, Failure> : Publisher where Failure : Error {
        public typealias Promise = (Result<Output, Failure>) -> Void
        public init(_ attemptToFulfill: @escaping (@escaping Publishers.Future<Output, Failure>.Promise) -> Void)
        final public func receive<S>(subscriber: S) where Output == S.Input, Failure == S.Failure, S : Subscriber
    }
}
通过 Future,可以将任何代码适配 Combine 框架,包括现有的同步,异步代码。
let trickNamePublisher = NotificationCenter.Publisher(center: .default, name: .newTrickDownloaded)
    .map{ notification -> Data in
        let userInfo = notification.userInfo
        return userInfo?["data"] as! Data
    }
    .flatMap{ data in
        return Publishers.Future { promise in
            DispatchQueue.main.asyncAfter(deadline: .now() + 0.3) {
                promise(.success(data))
            }
        }
    }
AnyPublisher
当我们使用 Combine 框架里的方法来生成发布者时,发布者的实际类型可能千奇百怪,对外暴露或者想进行复用时,内部的实际类型其实是不需要关心的,只需要关心 Output 和错误的类型就可以了。这个时候,通用类型 AnyPublisher 就登场了。Combine 提供了 eraseToAnyPublisher 方法,可以将各种各样的发布者统一转换为 AnyPublisher。同样的,还有 eraseToAnySubscriber,eraseToAnySubject 。
public struct AnyPublisher<Output, Failure> where Failure : Error {
    @inlinable public init<P>(_ publisher: P) where Output == P.Output, Failure == P.Failure, P : Publisher
    @inlinable public init(_ subscribe: @escaping (AnySubscriber<Output, Failure>) -> Void)
}
建议在最后将发布者转换为 AnyPublisher。
let trickNamePublisher = NotificationCenter.Publisher(center: .default, name: .newTrickDownloaded)
    .map{ notification -> Data in
        let userInfo = notification.userInfo
        return userInfo?["data"] as! Data
    }
    .eraseToAnyPublisher()
总结
发布者有以下的特点
- 用操作符生成每一小部分的发布者,最后组成事件流
- 操作符描述了从当前发布者生成的新发布者
- 值和错误是强类型的,在整个过程中
- 既可以异步产生值,也可以同步产生值
- 可以添加其兼容的订阅者
订阅者(Subscriber)
规则
- 只会接收到一次订阅通知
- 发布者可以产生 0 或多个值,所以订阅者可能收到 0 或多个值
- 最多只会接收到一个完成通知
Assign
这个订阅者提供通过 Key Path 订阅某个类类型对象属性变化的能力。
let trickNamePublisher = NotificationCenter.Publisher(center: .default, name: .newTrickDownloaded)
    .map{ notification -> Data in
        let userInfo = notification.userInfo
        return userInfo?["data"] as! Data
    }
    .flatMap{ data in
        return Publishers.Just(data)
            .decode(type: MagicTrick.self, decoder: JSONDecoder())
            .catch { _ in
                return Publishers.Just(MagicTrick())
            }
    }
    .publisher(for: \.name)

var test = MagicTrick()
trickNamePublisher.assign(to: \.name, on: test)
当接受到通知后,发布者就会改变 test 的 name 属性。
Sinks
这个订阅者提供了一个简单的从上游订阅数据的能力,错误类型采用上游的错误类型,使用一个闭包执行接收到值的行为,非常简单方便。
let trickNamePublisher = ...// 上个例子里的发布者

trickNamePublisher.sink { value in
    print("name is \(value)")
}
Subject
有一些事物,它们同时承担着发布者和订阅者的角色,既可以发送消息,也可以接收消息。在 Combine 中,这类订阅者就是 Subject。它虽然是订阅者,却也有和发布者类似的发送值的能力。这可以让我们在数据流的过程中插入值给下游的订阅者。
Subject 是一个协议,定义了给下游的订阅者发送值的的方法:
public protocol Subject : AnyObject, Publisher {
    func send(_ value: Self.Output)
    func send(completion: Subscribers.Completion<Self.Failure>)
}
而发布者也有对应的方法可以添加 Subject。
extension Publisher {
    public func subscribe<S>(_ subject: S) -> AnyCancellable where S : Subject, Self.Failure == S.Failure, Self.Output == S.Output
}
Subject 有下面两种:
Passthrough
发送订阅操作发生后,上游发送的值才会发送给下游订阅者。
let trickNamePublisher = ...// 上个例子里的发布者

let magicWordsSubject = PassthroughSubject<String,Never>()

trickNamePublisher.subscribe(magicWordsSubject)

magicWordsSubject.sink { value in
    print("name is \(value)")
}

magicWordsSubject.send("magic!")
CurrentValue
在订阅时,会将上游发布者发送的值中最新一个发送给下游订阅者,之后和正常一样进行发送值。
SwiftUI 中的发布者
在今年发布的重磅框架 SwiftUI 中,底层的数据流也运用了 Combine 框架。SwiftUI 内部已经拥有订阅者,只需要开发者提供发布者用于描述你的数据在何时,如何变化,剩下的更新操作都有框架内部完成。
BindableObject
对自定义的数据类型适配,只需要遵循 BindableObject 协议,提供发布者具体类型,并提供一个 didChange 的发布者实例用于在数据改变时能发送消息。
public protocol BindableObject : AnyObject, DynamicViewProperty, Identifiable, _BindableObjectViewProperty {
    associatedtype PublisherType : Publisher where Self.PublisherType.Failure == Never
    var didChange: Self.PublisherType { get }
}
举个例子,当 model 被 set 的时候,就会触发属性观察的 didSet,里面调用了 didChange 发布者进行通知的发送(没有发送具体的值),这个通知会触发 SwiftUI 内部的 UI 更新流程(类似 React 的 setState),更多具体细节可以在 Session 226 - Data Flow Through SwiftUI 中找到。
class WizardModel: BindableObject {
    var trick: MagicTrick? { didSet { didChange.send() }  }
    let didChange = PassthroughSubject<Void, Never>()
}

struct TrickView: View {
    @ObjectBinding var model: WizardModel
    var body: some View {
        Text(model.trick?.name ?? "")
    }
}
Cancellation
Cancellation 是内置在 Combine 里的一个协议:
public protocol Cancellable {
    func cancel()
}
里面只定义了一个 cancel 方法,用于提前结束结束订阅。Combine 里还定义了 AnyCancellable,这个类会在 deinit 时自动执行 cancel 方法。
final public class AnyCancellable : Cancellable {
    public init(_ cancel: @escaping () -> Void)
    public init<C>(_ canceller: C) where C : Cancellable
    final public func cancel()
}
复杂的例子
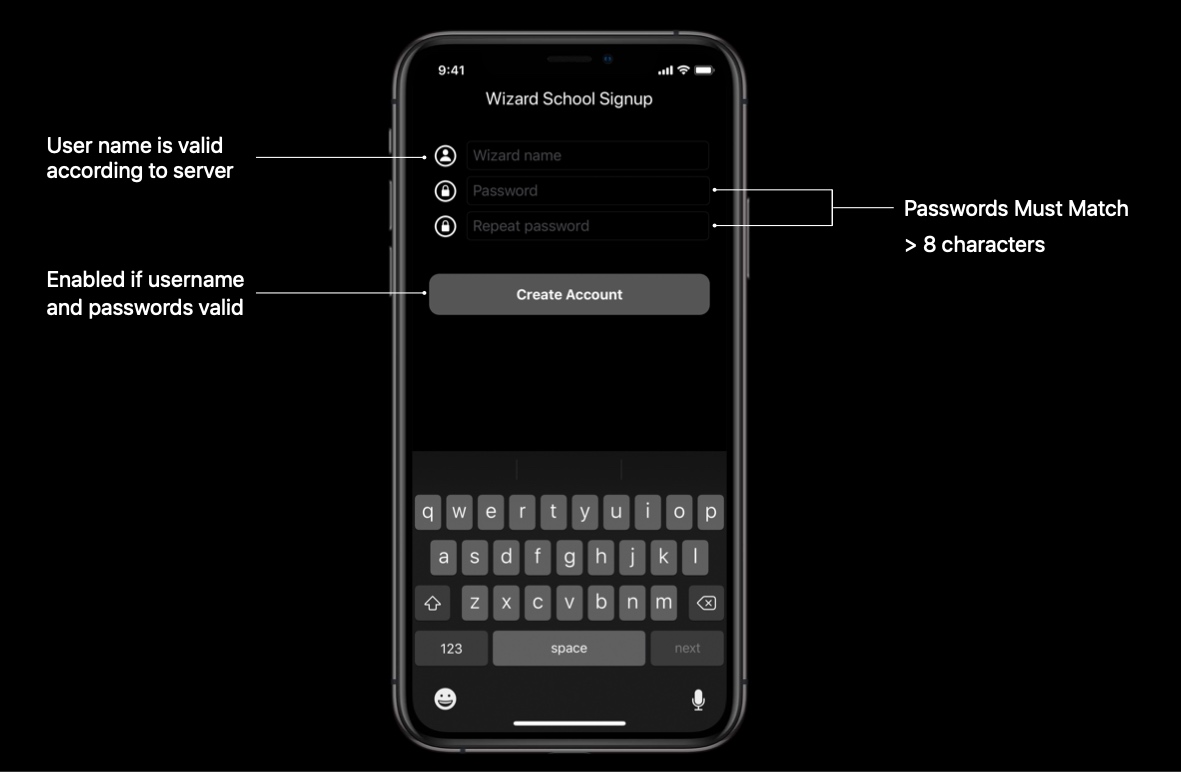
假设有一个登录界面,里面需要输入用户名和密码,用户名需要经过服务器的检验,密码需要超过 8 个字符且需要和重复密码匹配。用户名和密码都符合要求时,下面的按钮状态将变成可点击状态。用 Combine 来完成这个例子吧!
// 用注解给属性添加发布者
@Published var password: String = ""
@Published var passwordAgain: String = ""

var valiatedPassword: AnyPublisher<String?, Never> {
  	// 合并密码和重复密码发布者,当其中一个产生值时检查密码是否符合要求
    return Publishers.CombineLatest($password, $passwordAgain) { password, passwordAgain in
        guard password == passwordAgain, password.count > 8 else {
            return nil
        }
        return password
    }
  	// 可以判断密码是不是太简单,比如 12345678
    .map { $0 == "password1" ? nil : $0}
  	// 转换为 AnyPublisher
    .eraseToAnyPublisher()
}

@Published var username: String = ""

// 提交给服务器判断用户名是否合法,网络请求等异步行为
func usernameAvailable(_ username:String, completion:((Bool) -> ())) {
   // ...
}

var validatedUsername: AnyPublisher<String?, Never> {
  	// 限制产生值的频率
    return $username.debounce(for: 0.5, scheduler: RunLoop.main)
  			// 去重,重复的不需要再次检验
        .removeDuplicates()
  			// 转换成新的发布者
        .flatMap { username in
           	// 使用 Future 适配已有的异步操作
            return Publishers.Future { promise in
                usernameAvailable(username) { available in
                    promise(.success(available ? username : nil))
                }
            }
        }
  			// 转换为 AnyPublisher
        .eraseToAnyPublisher()
}

var validatedCredentials: AnyPublisher<(String,String)?,Never> {
  	// 合并检验密码和检验用户名发布者,均有合理值时发送
    return Publishers.CombineLatest(validatedUsername, valiatedPassword) { username, password -> (String, String)? in
        guard let a = username, let b = password else {
            return nil
        }
        return (a, b)
    }
    .eraseToAnyPublisher()
}

var signupButton:UIButton!

// 检查是否有合理的值
var signupButtonStream = validatedCredentials.map{ $0 != nil }
										// 指定接收的调度者
                                    .receive(on: RunLoop.main)
										// 使用 KVO Assign 订阅者改变 UI 状态
                                    .assign(to: \.isEnabled, on: signupButton)
总的来说,就是使用组合,将各种小的功能组合成完整的数据流。
总结
Apple 官方对接入 Combine 给了以下一些建议:
- 使用多个自定义发布者将小部分的事情组合起来
- 逐步适配,一点点改造
- 在属性中优先使用 @Published 注解
- 使用 Future 将多个异步回调或者发布者组合起来
Use Combine Toady
Combine 清晰,易用,还有着苹果爸爸承诺对 Cocoa 框架 buff 加持,为什么不马上试试呢?
延伸阅读
Apple 官方异步编程框架:Swift Combine 简介
Combine 的非官方实现
CombineFeedback
WWDC 19 专栏文章目录
使用kcptun加速搬瓦工VPS
以下以搬瓦工contOS 64位系统为例:
假设你的shadowsock地址为: 23.106.147.91端口为:444
部署服务端
kcptun地址, 按需选择对应32或者64位版本.
mkdir /root/kcptun
cd /root/kcptun
wget https://github.com/xtaci/kcptun/releases/download/v20170221/kcptun-linux-amd64-20170221.tar.gz
tar -zxf kcptun-linux-amd64-20170221.tar.gz
创建 start.sh
vim /root/kcptun/start.sh
写入以下内容:
#!/bin/bash
cd /root/kcptun/
./server_linux_amd64 -c /root/kcptun/server-config.json 2>&1 &
echo "Kcptun started."
创建配置文件server-config.json
vi /root/kcptun/server-config.json
写入以下内容:
{
    "listen": ":29900",
    "target": "127.0.0.1:444",
    "key": "test",
    "crypt": "salsa20",
    "mode": "fast2",
    "mtu": 1350,
    "sndwnd": 1024,
    "rcvwnd": 1024,
    "datashard": 70,
    "parityshard": 30,
    "dscp": 46,
    "nocomp": false,
    "acknodelay": false,
    "nodelay": 0,
    "interval": 40,
    "resend": 0,
    "nc": 0,
    "sockbuf": 4194304,
    "keepalive": 10,
    "log": "/root/kcptun/kcptun.log"
}
“listen”: “:29900” 29900可以随便填写一个自己喜欢的
“target”: “127.0.0.1:444” 127.0.0.1是写死的, 444换成你的ss的端口
创建 stop.sh
vi /root/kcptun/stop.sh
写入以下内容
#!/bin/bash
echo "Stopping Kcptun..."
PID=`ps -ef | grep server_linux_amd64 | grep -v grep | awk '{print $2}'`
if [ "" !=  "$PID" ]; then
  echo "killing $PID"
  kill -9 $PID
fi
echo "Kcptun stoped."
创建 restart.sh
vi /root/kcptun/stop.sh
写入以下内容
#!/bin/bash
cd /root/kcptun/
sh stop.sh
echo "Restarting Kcptun..."
sh start.sh
启动服务端
/root/kcptun/start.sh
停止服务端
/root/kcptun/stop.sh
重启服务端
/root/kcptun/restart.sh
监听日志信息
tail -f /root/kcptun/kcptun.log
按 control + c 退出监听
添加开机启动
chmod +x /etc/rc.d/rc.local;echo "sh /root/kcptun/start.sh" >> /etc/rc.d/rc.local
配置客户端
首先下载 Kcptun 的客户端文件,最好单独放到一个文件夹中
Windows 和 Mac 按需下载.
darwin即代表Mac版
版本要和服务端一致. 服务端为v20170221, 这里也要20170221
下面要进行客户端配置,我选择的是GUI的方式,图形界面比较清晰. 你也可以选择用命令配置.
参考这里:
小内存福音,Kcptun Shadowsocks加速方案
在openwrt上部署kcptun给搬瓦工加速
下载Mac GUI工具 或者 Windows GUI工具并安装
设置看图:
- 点击1添加一个客户端
- 点击2浏览,指定前面下载的Mac版客户端文件.
- 处随便填写一个端口.
- 处填写你的ss地址
- 处填写服务端配置文件server-config.json中的29900
- 画圈圈打星星的部分,必须按照server-config.json配置文件中的填写.
Shadowsocks 客户端配置
在客户端中新建服务器:
服务器 IP 填写本机:127.0.0.1 (此处写死,不要改😀)
服务器端口填写:8388 这个8388就是你上一步3处的本地侦听端口
正确填写你的 Shadowsocks 密码,加密方式,协议和混淆方式。
切换到该服务器上,测试是否正确运行。
全部OVER.
解决2019款macbookpro -16寸 外接显示器风扇不停的转,温度特别高
终极方案: 禁止独显 & 使用 Turbo_Boost_Switcher_Pro_2.10.2 。
禁止独显使用集成显卡
发热很久了,最后找到一个解决方法。禁止独显,使用集显即可。但设置仅使用集显后还需要在关闭系统设置/电源/自动切换显卡 选项,不然外接显示器没有反应。步骤:打开终端,输入:sudo pmset -a GPUSwitch 0
// 0: 强制使用核显; 1: 强制使用独显 2: 自动切换显卡
pmset -g //查看是否成功,会看到下图
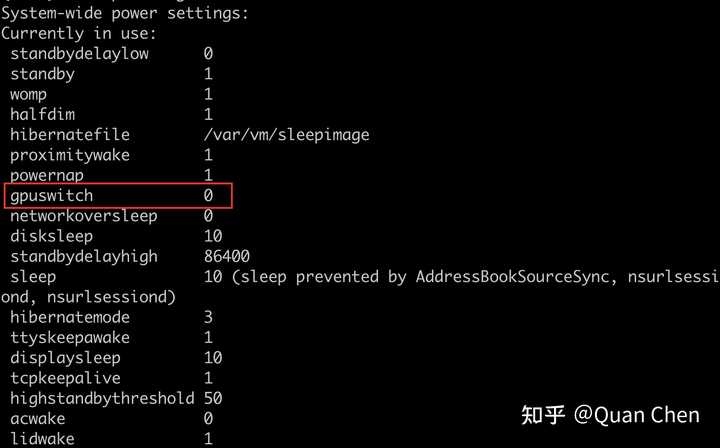
后关闭系统设置 / 电源 / 自动切换显卡 选项
特别操作: 关闭系统设置 / 电源 / 自动切换显卡 选项
参考: https://www.zhihu.com/question/290208585
使用Turbo_Boost_Switcher_Pro

外接显示器的风扇会在4000rpm 左右, 风扇噪音明显减轻。
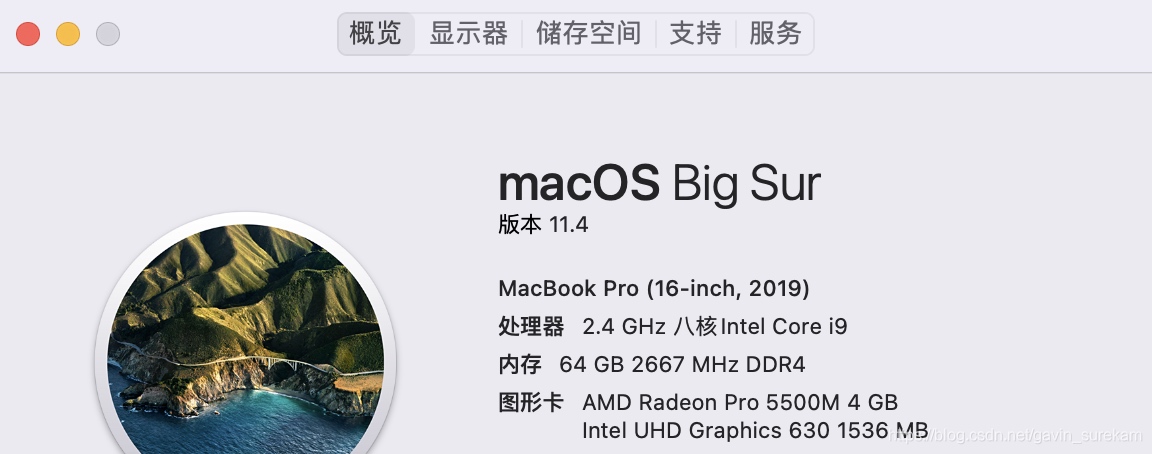
机器型号
Flutter项目高德地图后台持续定位功能的实现(iOS)
首先高德本身就支持后台持续定位:实例文档.对于Flutter项目高德也提供了框架支持:文档
pubspec.yaml如下:
dependencies:
  flutter:
    sdk: flutter
  # 权限相关
  permission_handler: ^5.1.0+2
  # 定位功能
  amap_location_fluttify: ^0.20.0
实现逻辑我们以iOS项目为例:
iOS项目工程(ios/Runner)配置:
添加定位权限申请配置
<key>NSLocationAlwaysAndWhenInUseUsageDescription</key>
<string>申请Always权限以便应用在前台和后台(suspend 或 terminated)都可以获取到更新的位置数据</string>
<key>NSLocationAlwaysUsageDescription</key>
<string>需要您的同意才能始终访问位置</string>
<key>NSLocationWhenInUseUsageDescription</key>
<string>需要您的同意,才能在使用期间访问位置</string>
以上权限会根据iOS 系统版本的不同有所不同
后台任务(Background Modes)模式配置
<key>UIBackgroundModes</key>
<array>
	<string>location</string>
	<string>remote-notification</string>
</array>
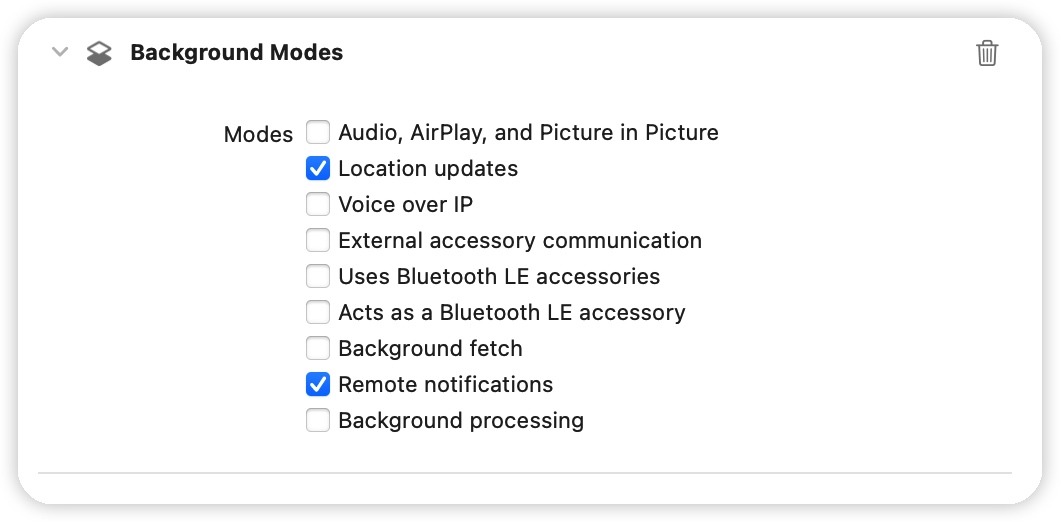
选择Location updates选项
Flutter项目实例
对于Flutter中的使用方法,具体实例如下:
- 首先要在main函数中进行高德地图组件的注册
- 视图中在调用定位之前必须进行权限申请
- 开启后台任务功能
- 执行持续定位
代码 main.dart:
import 'package:amap_location_fluttify/amap_location_fluttify.dart';

void main() {
  runApp(const MyApp());
  # 注册高德地图组件
  AmapLocation.instance.init(iosKey: 'xxxxxx');
}

class MyApp extends StatelessWidget {
  const MyApp({Key? key}) : super(key: key);

  // This widget is the root of your application.
  @override
  Widget build(BuildContext context) {
    return MaterialApp(
      title: 'Flutter Demo',
      theme: ThemeData(
        primarySwatch: Colors.blue,
      ),
      home: LocationPage(),
    );
  }
}
location_page.dart:
import 'package:amap_location_fluttify/amap_location_fluttify.dart';
import 'package:flutter/material.dart';
import 'dart:async';
import 'package:permission_handler/permission_handler.dart';

class LocationPage extends StatefulWidget {
  LocationPage({Key? key}) : super(key: key);

  _LocationPageState createState() => _LocationPageState();
}

class _LocationPageState extends State<LocationPage> {
  //获取数据
  // Map<String, Object> _locationResult;
  String _latitude = ""; //纬度
  String _longitude = ""; //经度

  @override
  void initState() {
    super.initState();
    /// 动态申请定位权限
    requestPermission();
  }

  @override
  void dispose() {
    super.dispose();
  }

  /// 动态申请定位权限
  void requestPermission() async {
    // 申请权限
    bool hasLocationPermission = await requestLocationPermission();
    if (hasLocationPermission) {
      print("定位权限申请通过");
    } else {
      print("定位权限申请不通过");
    }
  }

  ///  申请定位权限  授予定位权限返回true, 否则返回false
  Future<bool> requestLocationPermission() async {
    //获取当前的权限

    var status = await Permission.locationAlways.status;
    if (status == PermissionStatus.granted) {
      //已经授权
      return true;
    } else {
      //未授权则发起一次申请
      status = await Permission.location.request();
      if (status == PermissionStatus.granted) {
        return true;
      } else {
        return false;
      }
    }
  }

  @override
  Widget build(BuildContext context) {
    return Scaffold(
      appBar: AppBar(
        title: Text("地理定位演示"),
      ),
      body: Center(
        child: Column(
          mainAxisAlignment: MainAxisAlignment.center,
          children: [
            //  latitude: 36.570091461155336, longitude: 109.5080830206976
            //
            Text("纬度:${this._latitude}"),
            Text("经度:${this._longitude}"),
            SizedBox(height: 20),
            ElevatedButton(
              child: Text('开始定位'),
              onPressed: () {
                this._startTheLocation();
              },
            ),
          ],
        ),
      ),
    );
  }

  Future _startTheLocation() async {
    if (await Permission.location.request().isGranted) {

        # 开启后台持续定位功能
      await AmapLocation.instance.enableBackgroundLocation(
        10,
        BackgroundNotification(
          contentTitle: 'contentTitle',
          channelId: 'channelId',
          contentText: 'contentText',
          channelName: 'channelName',
        ),
      );

      # 监听持续定位
      AmapLocation.instance.listenLocation().listen((location) {
        setState(() {
          _latitude = location.latLng.latitude.toString();
          _longitude = location.latLng.longitude.toString();
          print("监听定位: {$_latitude, $_longitude}");
        });
      });
    } else {
      openAppSettings();
    }
  }

}
总结
关于后台持续定位对于高德来说核心函数只有2个:
开启后台任务
AmapLocation.instance.enableBackgroundLocation(id, notification)
执行持续定位:
AmapLocation.instance.listenLocation().listen((location) {
    // do someting
});
Copyright © 2015 Powered by MWeb, 豫ICP备09002885号-5


